We are in the heart of summer BBQ season and this blog is a tutorial on smoking beef brisket aimed at those who have not done this before or did not get good results when they did try it. It is for smoking a 4-5 lb. brisket, either the point or the flat, on a Kamado type grill but with suggestions for adjusting it if you want to try a whole brisket that is 12-16 lbs and/or use other kinds of grills. All the terms used like point, flat, and stall are explained below. Much of the information in this blog comes from the Aaron Franklin video on smoking Brisket –https://www.youtube.com/watch?v=VmTzdMHu5KU.
Basic rules for brisket
- Cook to the temperature , not to the clock. This is important enough that it gets several mentions below. Brisket must be cooked until at least an internal temp of 200° and 205° is optimum. The most common mistake that people make in smoking a brisket is to use some recommended guide of minutes per lb. The result is generally something that is almost impossible to chew instead of breaking apart in your hands.
- A 4-5 lb. brisket will usually take at least 8 hours to cook, more depending on how you handle the stall, and then an hour to rest before slicing. If you want to smoke a brisket to eat that day for dinner, you should plan to start your file in the Kamado grill at 7:00 AM so the temp is stabilized at 250° by 8:00 and the meat can go on then.
- Brisket will keep warm and ready to eat for several hours if wrapped in a warm towel and put in a Styrofoam cooler.
- BBQ is a cooking technique, not a sauce. To be considered BBQ the protein needs to either be grilled over an open flame (not a gas grill) or be smoked for part of the cooking process. Adding a sauce labeled BBQ to a piece of meat does not make that BBQ. Sauces primarily accompany the protein (meat or fish) and people can add the sauce to their plate if they want. Some dishes call for a sauce to glaze the protein as part of the recipe but for brisket the sauce is generally served on the side at the table. My Hot & Sweet Sauce recipe is at the bottom of this blog.
Kamado Recipe
This recipe is for smoking beef brisket on a Kamado style grill. I have a Kamado Joe but this should work equally well for a Big Green Egg. It should not be difficult to adjust this recipe for other types of smokers but I suggest looking at some smoked brisket recipes for that style grill and adjusting this recipe based on what other recipes are calling for. The Kamado style grills use ceramic heat deflectors to create an indirect head environment. Offset smokers like a Traeger already have that indirect heat so all references to deflector plates can be ignored. Doing a smoked brisket on a charcoal kettle grill like a Weber is very difficult because of the long cook time, difficulty in maintaining a 250° stable cooking temperature, and adding additional charcoal creates fluctuations in the cooking temperature.
Brisket 101
A full beef brisket is made up of two different muscles that overlap. The biggest one which has a rich layer of fat running through it is called the point. The thin one is called the flat. Interestingly, the flat is often the last to hit the 205° desired internal temp even though it is much thinner than the point. A full brisket is about 12-16 pounds which is a lot of meat and needs a lot of grill surface to hold something that large. Many stores will sell just the point or just the flat.
The grain on the two muscles runs in different directions and you need to slice brisket against the grain. If you smoke a full brisket, after the 1 hour resting time you want to cut it to separate the two muscles. To do that below are the directions from www.bbq-experts.com:
- First, identify where the point and flat are on the brisket.
- That fat seam is called “the nose,” and that’s where you want to start separating the two.
- Follow the fat seam as it curves back and under the flat.
- Keep lifting the flat with your non-cutting hand and slicing through the fat seam until the point tapers out.
You can also do this to create two smaller briskets and smoke the point and the flat at different times, freezing the one that you want to do later.
Cooking Time:
The challenge for brisket is to make it tender enough to enjoy eating. Smoked brisket needs to cook for a LONG time at a low temperature to break down the connective tissue so that the meat easily pulls apart in your hands. Even a small brisket, 4 lbs., will take at least 8 hours to get to the right temp to come off the grill. A full brisket can take 16 hours and some people smoke them overnight. If it anything other than a small brisket, I will cook it the day before I serve it to have enough time for it to get to the right temp and then rest for at least an hour. I slice it and refrigerate the slices overnight because getting the whole brisket warm enough to serve and them slicing it is a real challenge. I generally do a 4 lb. brisket because I don’t have that many people to feed and it is very preferable to eat it the same day you smoked it.
As a result of the long cooking time, smoked brisket is always at the well done stage. The analogy is beef stew where again tough cuts of beef are cut into cubes and cooked for a long time as part of the stew so them become tender.
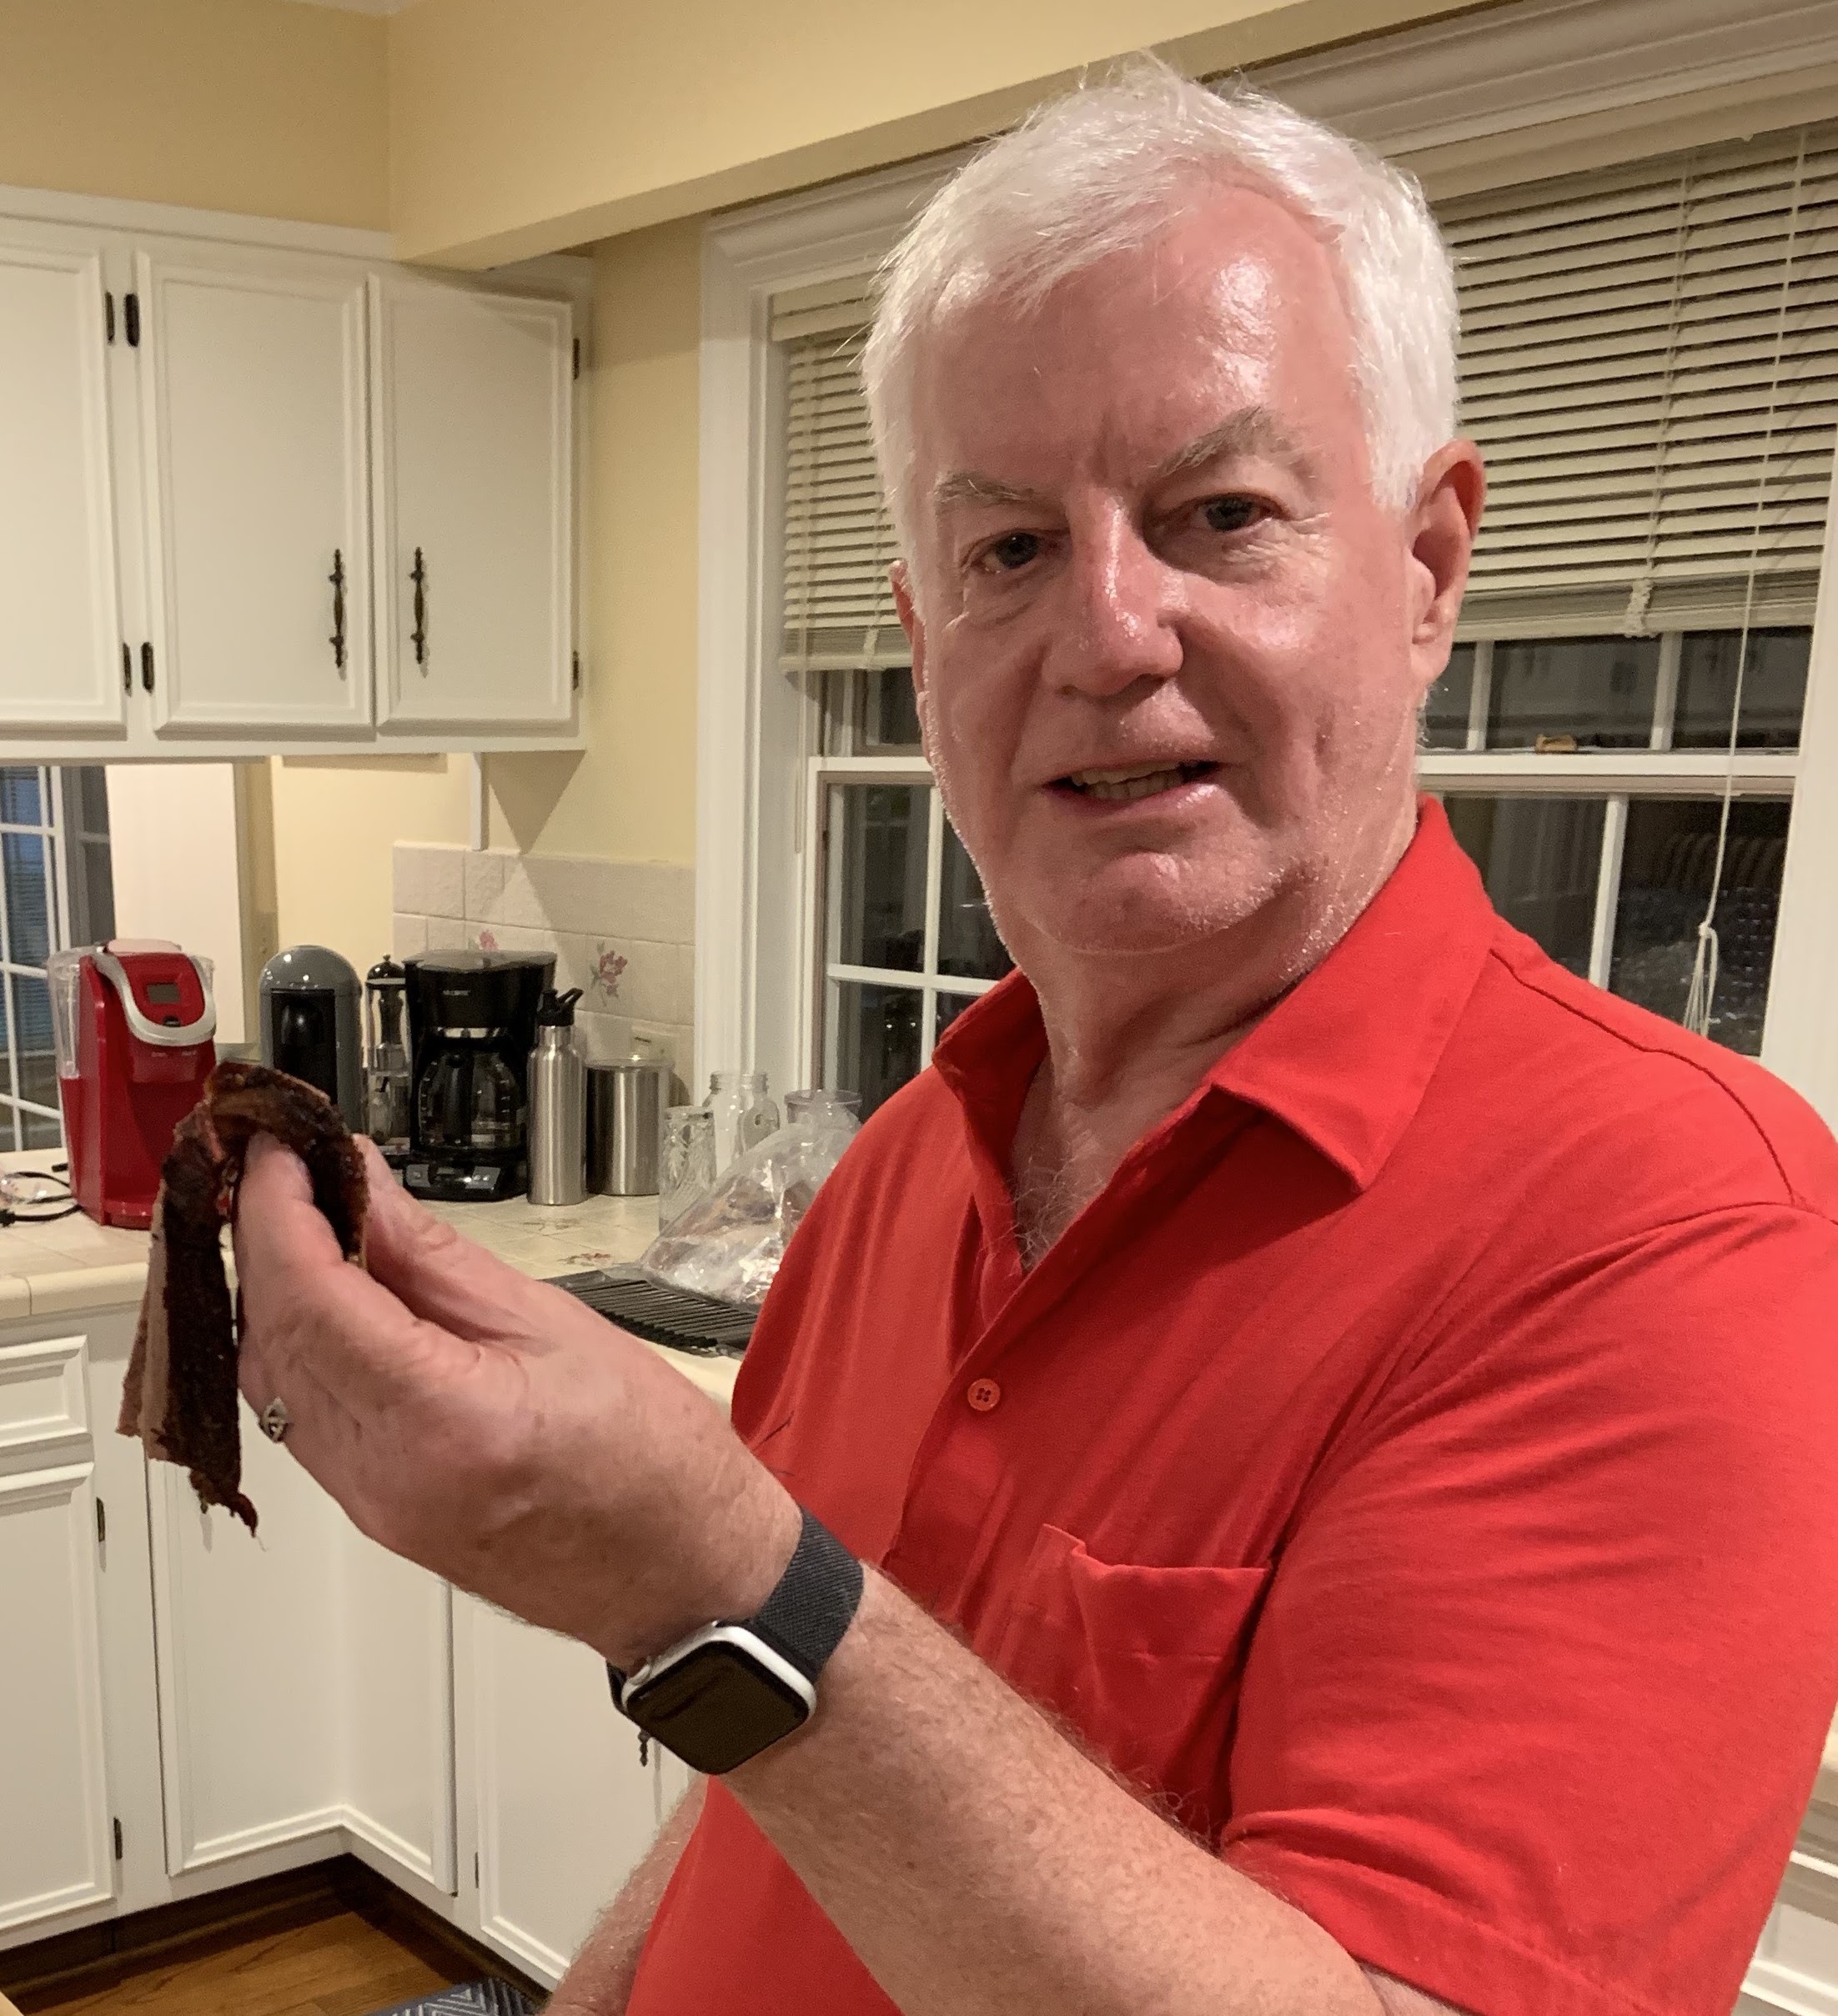
I strongly encourage you to use so many minutes per pound ONLY for rough planning. The brisket needs to keep cooking until it hits at least 200⁰ internal temp regardless of how long that takes and 205⁰ is the ideal target. Anything less than that temp will mean that the meat will be very tough and not at all enjoyable. It needs to cook at 250⁰ for many hours to break down all the connective tissue so it can pass the key test for brisket. When you cut a slice of the brisket and hold it up in your hand it should be so tender that it folds over you hand and you can easily pull a bite sized piece off the slice with your fingers. The brisket needs to be that tender to enjoy eating. Using an internal probe that constantly tells you the internal temp is the best way to do this. I use a unit with up to six probes so I can have one on the cooking surface next to the brisket letting me manage the temperature to be 250° at the cooking surface. The temperature gauge in the dome of the Kamado is a long way away from the cooking surface and will often show a very different temp than the probe at the cooking surface. I use another probe in each piece of meat being smoked to track their internal temp. Using a handheld probe that you poke into the meat requires you to open the Kamado every time you want to find the internal temp which is not good for your cooking time and you don’t know when The Stall starts or ends or just when it hits that target 200 -205⁰. For full brisket plan on about 1 ¼ hours per lb. 3-4 lb. brisket – 7-8 hours at 250⁰. Smaller cuts take significantly longer per lb. But cook to the internal temp, not to the minutes per pound.
Slow cooked smoked meat like brisket and pulled pork have something called The Stall during their cooking. Generally, around 160⁰ of internal temperature that temp will not change for up to a few hours and can even go down a few degrees. Science has determined that juices have come to the surface of the meat where they evaporate, and that evaporation has a cooling effect that slows down the cooking. You have two choices to deal with The Stall.
- Factor it into your timing for the cooking. When I am doing a smaller 3-4 lb. brisket, Ican just let it keep cooking through The Stall and plan that it will be at least 8 hours on the grill and another hour to rest before eating the brisket. Getting the meat on the grill before 8 AM means I can have it for dinner that night even with The Stall.
- The Texas Cheat – when you hit the stall, take the brisket off the grill and wrap it in foil sealing it and put it back on the grill. The foil seal takes away the ability to evaporate so the cooking time can be an hour or two faster than just cooking through The Stall. You can also wrap it in pink butcher’s paper if you have a roll and tie it with twine. The heat is low enough that the paper does not catch on fire. When I am doing a larger brisket, the cooking time is long enough that I use the Texas Cheat and when I don’t want to get up really early i will also do it for a smaller brisket. There is no taste impact. It got the name Texas Cheat from when it started to be used in BBQ competitions. Since I keep a temp probe in the brisket the entire cooking time, I found it better to wrap around the probe than to try to reinsert it into the right spot through the foil or paper. When the internal temp gets to 195°, take the brisket out of the wrap and let the surface dry out and crisp up a little while it gets to the 205° final internal temp.
I use Hickory wood for the smoke. About six chunks, 2-3 inches on a side. small wood ships are not good for this long smoking process. I saw a very good write up that soaking the wood in water is not good for the smoking, so I don’t do that. Oak or Pecan is also good with brisket. The fruit woods like Apple and Cherry are pretty mild for brisket. Mesquite is a matter of taste. It will give the strongest smoke flavor but not everyone wants that strong a smoke taste and some people are allergic to Mesquite. I don’t use any Mesquite. Hickory is the heaviest smoke that I use. According to Chef Michael Symon, the meat will absorb smoke flavor until it gets to 140° internal temp but after it gets to that temp, it does not absorb any additional smoke. You could even move it to your kitchen oven at 250° once it gets to that temp if you have issues like weather that make keeping it on the grill difficult.
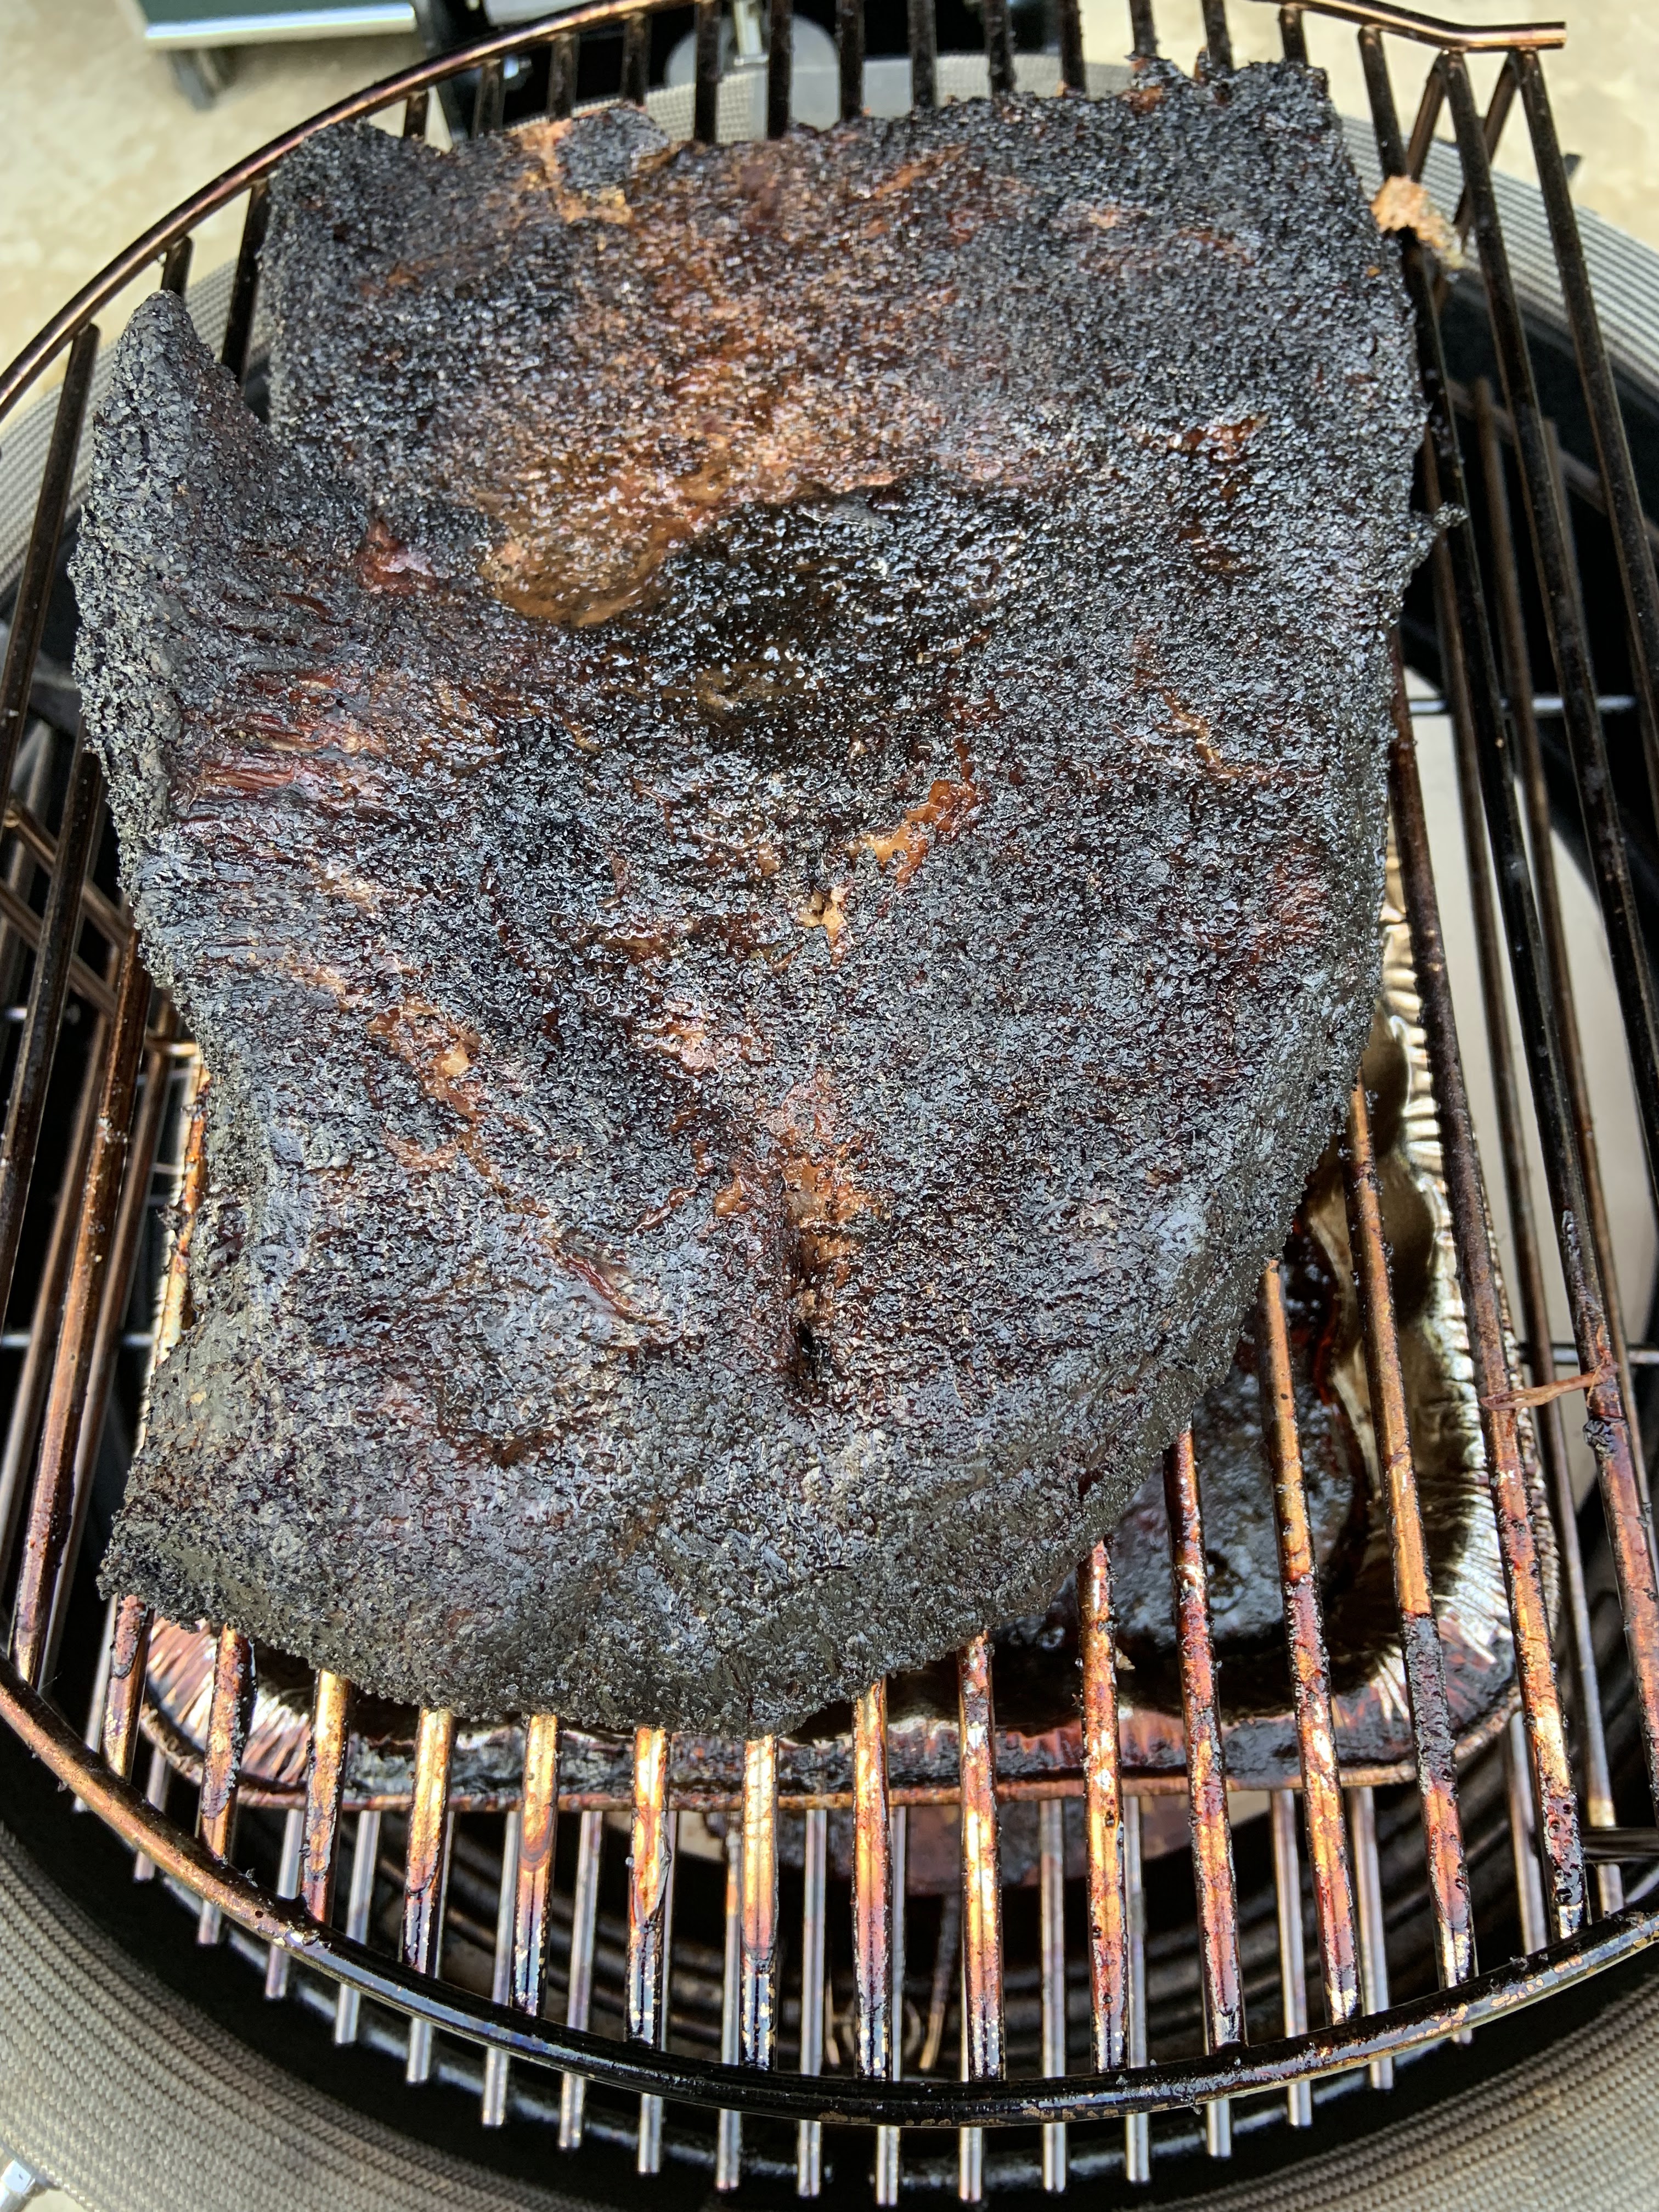
When the internal temp is at 180⁰, or when you take off the foil if you used the Texas Cheat, you can do a probe test with a skewer or fork to check that the meat is starting to be tender in every portion of the brisket because the probe goes in easily. The thinnest portion of the brisket maybe the last to be tender. Keep cooking until the brisket is totally tender, when the internal temp comes up to 200 – 205⁰.
Dry Rub one hour before putting on the grill

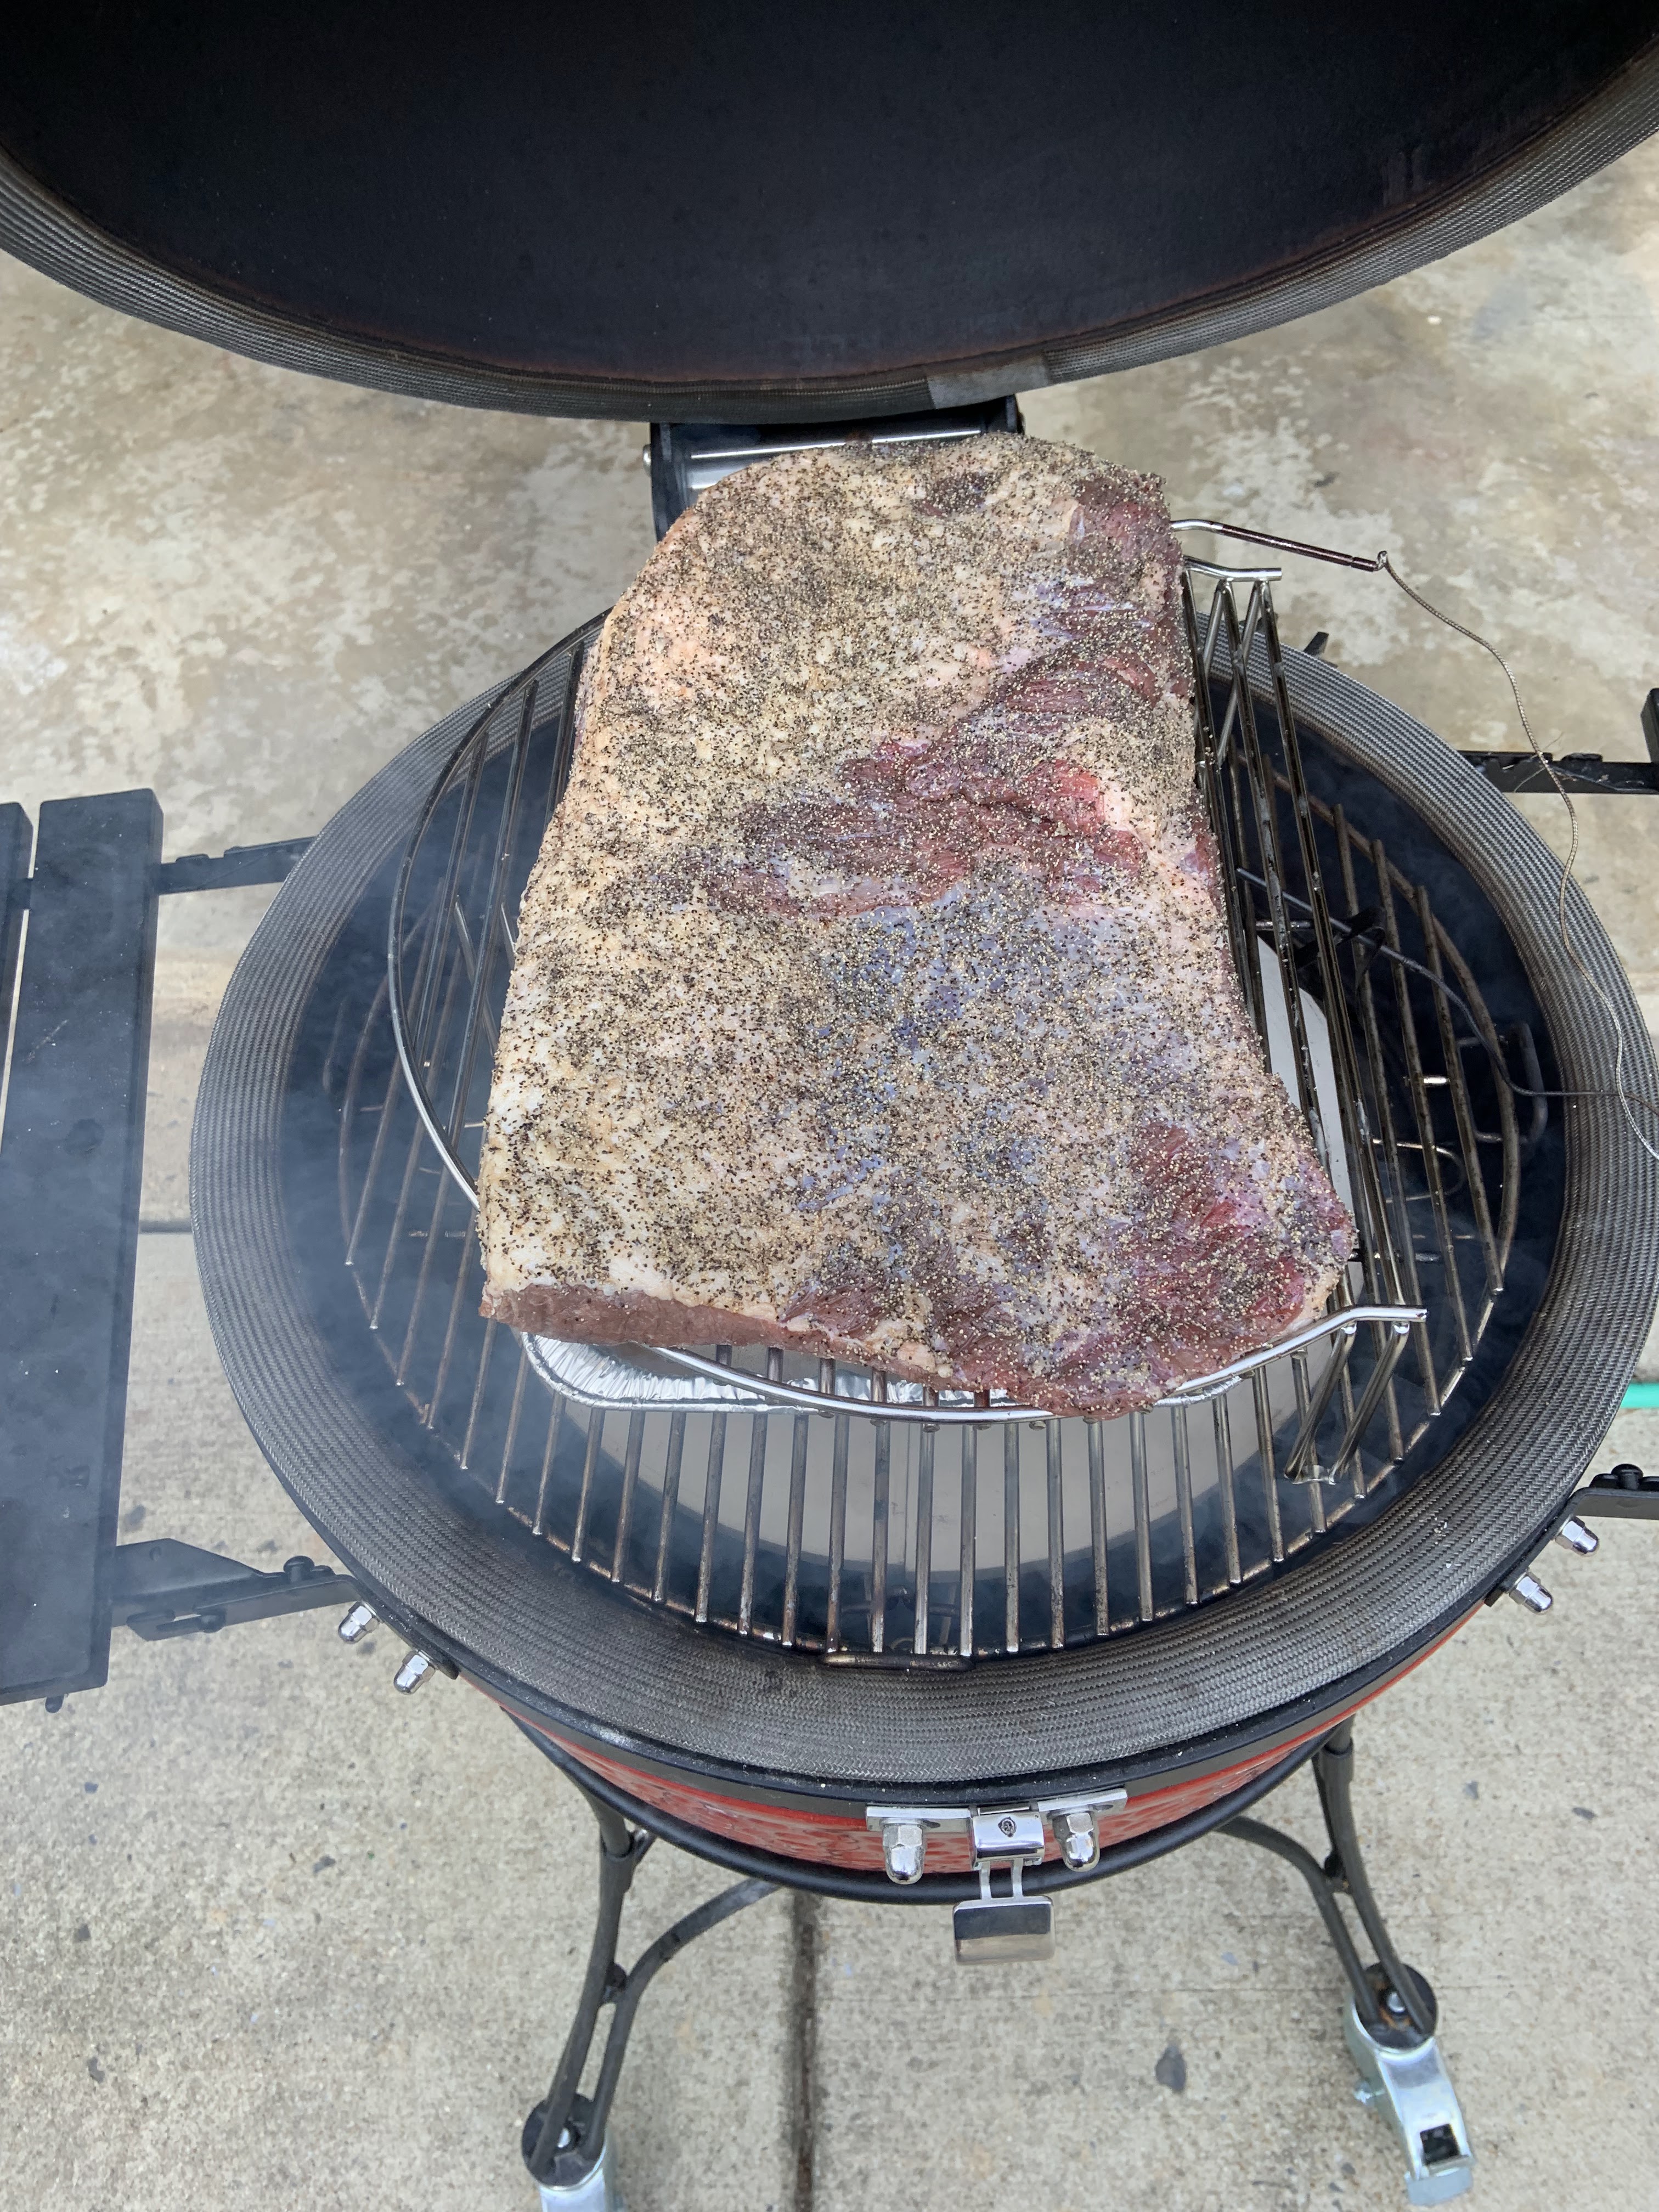
1/8 cup each of kosher salt and ground black pepper for a 4 lb. brisket. This is the standard for Texas style brisket, which is generally considered the home of the best brisket. Adjust accordingly for larger briskets. Shake well in a container to mix them thoroughly. The heavier salt will sink to the bottom so reshake periodically to keep the mixture even. Pat the rub on all sides of the brisket. Sprinkle it across the brisket, not making a crust to cover the meat. Does not need to be rubbed in. Put the rub on an hour before it goes on the grill and let it sit on the counter to come up to room temperature. The picture shows the brisket with the rob on it.
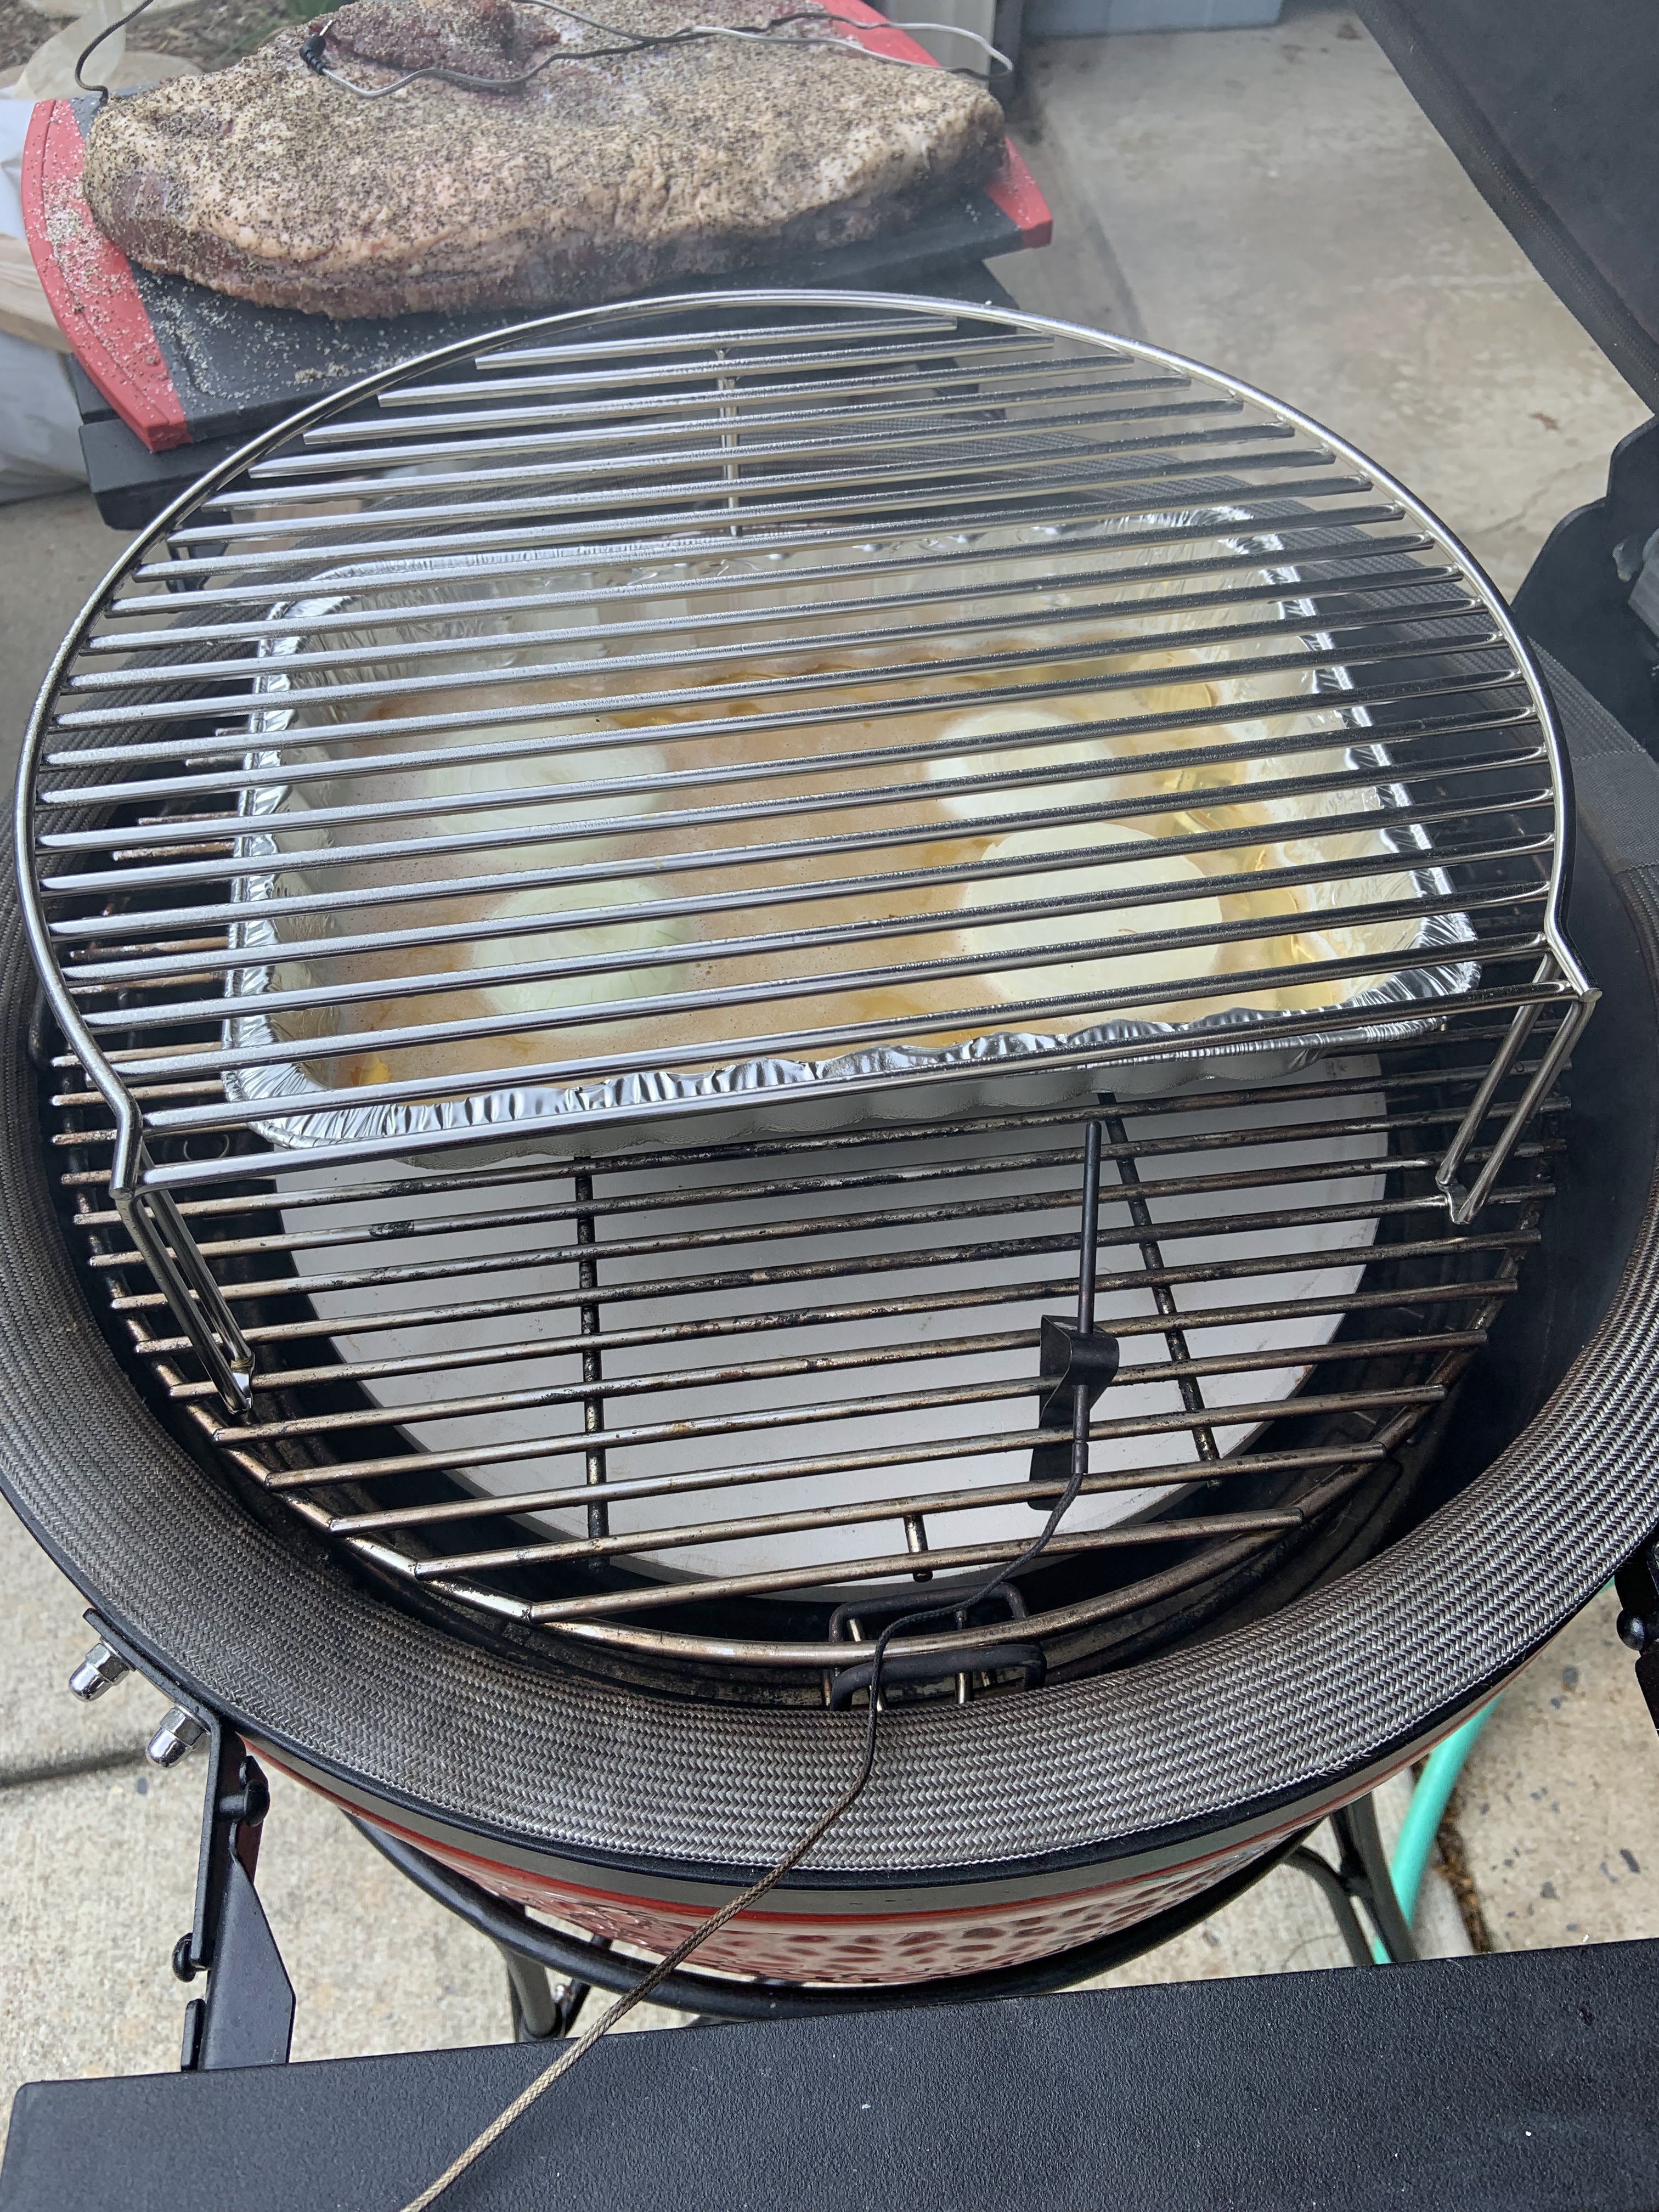
Use a drip pan under the rack that the brisket is on. Put 1 cup water and ¼ cup apple cider vinegar in the drip pan. I sometimes add a thickly sliced onion but I don’t think that it really adds much flavor. The picture shows the multilevel cooking environment I can set up with my Kamado. the white circle are the deflector places over the coasl creating an indirect heat. they are in th elowest position so just the smoke comes up around them. The drip pan is on the racks in the upper position and I have the temp probe for the cooking tem there as well. The brisket goes on the upper rack above the drip pan. I can also use the upper rack to do larger amounts of food like multiple tacks of ribs in cone cooking. The drip pan should be a throw away aluminum pan because the residue after 8+ hours of cooking will not be removable or useable for anything.
The grill should be lit for an hour before the meat goes on the Kamado so the ceramic is uniformly up to temperature. Adjust as needed for the smoker you have to get it to a stable 250⁰.
Add the hickory chunks and put the deflector plates in place and close up the smoker until the smoke runs clear. The heavy white smoke that comes out initially can add an unpleasant taste so wait a few minutes for the wood to start to put out clear smoke and then put the drip pan on the accessory rack, put the racks in place in the upper position and then put the brisket on the rack with the fat side and close the grill. For all BBQ the fat side of the meat should be closest to the heat source so I put the brisket fat side down.
Keep the cooking temperature where the beef is sitting on the rack as close to 250⁰ as possible for the full cooking time. The thermometer on the Kamado is up at the top of the dome and not representative of the temperature down where the brisket is cooking. I use a second probe on the rack right next to the brisket to monitor the cooking temperature and have both probes sending me the internal and cooking temps to my phone. I can then adjust the two vents to get the 250° cooking temp that I want. There is no need to open the grill any time during the cooking. That will only slow down the cooking on a Kamado. No need to mist or baste the brisket during cooking. If you want to do the Texas Cheat and wrap the brisket when it stalls around 160°, you need to open the Kamado to do that but close it up while you are doing the wrap. When meat is at least 200⁰ internal temp (205° is better) and fully tender, wrap in foil and hold for an hour and then carve.
Carving the Brisket

Slice across the grain with slices about 1/8” thick. The grain runs different for the thin part of the brisket, called the “flat” than it does for the thick part of the brisket called the “point”. If you have the full brisket, separate it into the two muscles so you can carve each against the grain using the approach mentioned above.
Not thin slices like sliced meat from the deli. The slices should be about the thickness of a pencil.
Test – does a slice fold over when held and easily come apart with a tug of the hand. That is a perfectly cooked brisket.
BBQ Sauce for the brisket
For most BBQ the sauce is an accompaniment that is added at the table by each person in the amount they want and, if several sauces are offered, the style sauce they want. Not everyone agrees and the most argument for having sauce on the meat during smoking is about ribs. For Texas style brisket, no sauce is ever added during the cooking. Below is the recipe for my Hot & Sweet sauce that I serve with my brisket. Adopted from Aaron Franklin’s excellent YouTube video on brisket. I prefer to make the sauce the day before I smoke the brisket.
½ cup – good for 5-6 people. Really good sauce so no problem if you have some left over.
1 cup – larger group eating a larger brisket and some sauce for left over.
Ingredients:
| 1/2 Cup | 1 Cup | |
| 1 Tbs | 2 Tbs | Butter |
| 1 Tbs | 2 Tbs | Finely chopped onion |
| 1/2 cup | 1 cup | Catsup |
| 1 Tbs | 2 Tbs | Apple Cider vinegar |
| 1/2 Tbs | 1 Tbs | Light brown sugar |
| 1/8 cup | 1/4 cup | Molasses – If you don’t have some good blackstrap molasses you can use honey. But I think the molasses really makes this sauce different |
| 3/4 Tsp | 1 1/2 Tsp | Chili powder – I use a mixture of Guajillo, Ancho, and Chipotle with maybe a tiny dash of Habanero |
| 1/4 Tsp | 1/2 Tsp | Kosher salt and ground black pepper – can use some of the left over rub if you did not use it all |
| 3 Tbs | 1/4 cup | Orange juice |
| 1 dash | 2 dashes | Worcestershire sauce |
Heat – you can use any relatively mild chili powder or combinations. Ancho adds some smokey flavor. Chipotle adds some depth. Habanero adds a lot of heat so be very careful with it if you add that to the mix. Add to get the level of kick that you want but you can’t really go backwards to make it less spicy. You need to let the sauce simmer for at least 15 minutes after adding any chili powders to get any idea of the impact. It will only be the next day where you will taste the real heat, generally a little less kick that shows up a little later in the taste. I don’t have measurements if you want to use different chili peppers instead of powder so I can only say add to taste and again, that taste will evolve considerably over time. The goal of this sauce is to get the upfront sweet taste first and have the heat kick in later to get the hot and sweet taste.
Sweetness – Goal is to get the upfront sweet taste first and have the heat kick in late for the hot and sweet taste. Less sweet than most store-bought sauces.
Approach:
In a stainless-steel pot melt the butter and cook the onions in the melted butter. Aluminum pans may react a little with some of the ingredients so stainless steel is recommended. When the onions are translucent add the other ingredients and, using a very large wisk, combine them together. Let simmer for at least 20 minutes and taste. Correct to your taste buds and let simmer a little longer and then remove from the heat.
Three choices:
- Save as is with the onion making it a little lumpy. The finer the chopped onion, the less this is a problem. This is what I generally do.
- Put in the blender to liquify the onion. If you use any chili peppers instead of powder blending is recommended
- Run through a strainer to remove the onion chunks

Yum!!!
>
LikeLike
This makes me want to break out the BBQ. I’ve always wanted to try a brisket, but I’m the only one in the family that can eat beef and even a small one is a lot of meat for one person.
LikeLike
Unfortunately even for a large person like you a 4 lb. Brisket shold be at least 8 meals.
LikeLike
The BBQ sauce is really good on pork or anything you would use a tomato based BBQ sauce for.
LikeLike