The first two days of our trip to Spain were both half-days so I am combining them for this first post that gets into a little more detail on all the things that we did on this trip we enjoyed so much. I have also included one of the interesting lessons that we learned on this trip, and I will be adding other lessons on some of the upcoming posts for each day.
We always fly over at least a day ahead of the start of any group trip that we take, primarily due to paranoia that that if we have any delays in our flight over, the group will leave without us. We have never had that kind of delay before a trip but there is enough stress leaving on a long trip and this is one less thing to worry about, and it gives us a day to start to adjust to the time change. We were also able to get a one stop flight on United through Brussels at a lower cost than a non-stop flight. Very disappointed that for the first time we did not get upgraded to Business Class with my United Priority Points. When I was flying frequently for business I had high status and we were upgraded every time. Since I retired in January I only had one other flight this year and there were other people with Priority Points that had higher status than me and they got the upgrades.
Our connection in Brussels was delayed two hours, supposedly to let 30 people connecting get on that fight but when we finally took off, no additional people had boarded. As a result we did not check into our hotel until 3 PM on Saturday the 17th and did not have the full afternoon for sightseeing that we had planned. We stayed in the Marriott Aloft hotel in Madrid which is in a very convenient location to walk to the main sights. We enjoyed a nice glass of Albariño on the rooftop terrace bar of the hotel and organized our clothes for a one night stay at this hotel and a one night stay at the next hotel so we would have minimum unpacking and packing. I went to the ATM linked to our bank, about a 20 minute walk each way, to get additional Euros.
The 17th was Beth’s birthday so she selected a highly ranked Paella restaurant for her birthday dinner, Restaurante Paella Real Madrid. I was not able to get a reservation there on line but we walked there and got there shortly after they opened for dinner at 8:00 and they did seat us. We decided to split the seafood Paella and each have a starter. Beth ordered what she thought was the House Salad, but it came with a lovely salmon filet and was a dinner salad in size but only 9€. the picture shows the one salad split between the two of us. I got the plate of Iberico Ham, something we love but is typically over $90/lb in the US, and the picture shows that it too was a very large portion for 15€. Despite the large starters, we did some serious damage to the Seafood Paella and highly recommend this restaurant. At one point on our trip our guide, Antonio, started talking about Paella and made a very strong point that there is food served on top of rice and there is Paella. If it does not have chicken, rabbit, sausage, and seafood, it is food on top of rice. Real Paella has to have the rich assortment of different meats and seafood to be Paella. Based on that we had delicious seafood on rice – but we loved it.
Lesson #1 – We quickly learned that the Spanish approach to meals is very different from what we have in the US. Breakfast is a full meal, not just some yoghurt which is my typical breakfast. Lunch is the primary meal of the day and is eaten between 2 and 4 PM. It can be a very long meal with many courses, and we had several lunches that were over 2 ½ hours. Dinner is a very light meal, generally just some Tapas or Pintxos. Pintxos are most common in northern Spain and the name means skewer. They are small portions cooked and served on a skewer. It is pronounced PIN shos and the “x” being pronounced as an “sh” sound will come up in one of the lovely white wines we were introduced to on this trip. This light dinner is generally eaten around 9 or 10 PM and many of the restaurants don’t open until 8:00 or 8:30. Those opening early, or offering a menu of full meals, are targeting the tourist traffic so our Paella restaurant falls into that category. It was full up when we left but it looked like a mix of tourists and some Spaniards who were sharing a bowl of Paella so it would have been a light meal for them.
When we got the detailed agenda from Howard we saw that we had a full breakfast included at each hotel and lunches most of the days at one of the wineries. Only two dinners were included so we budgeted money for the other dinners and hoped that just some tapas might be enough so we would not have a lot of expensive dinners to pay for. We ended up skipping most dinners completely and just having a glass of wine at the hotel at the end of the day. In addition to the delicious full lunches that we had, the wineries that we visited before lunch all had platters of cheese, Spanish ham, sliced chorizo, and great bread for us to shack on so we had plenty to eat each day. We were able to adapt to the Spanish approach to meals quickly and found them enjoyable.
After the dinner we took a walking tour of Old Town Madrid. We walked down to the Royal Palace and the Cathedral and took some pictures. Beth’s new phone, the Google Pixel 6, has an option that automatically removes people and other objects from pictures and uses AI to put in the background they were standing in front of. Beth hates to have people ruining her pictures so she really loved the ability to get rid of them. We then walked up to the Plaza Mayor, stopping just before it to survey the Mercado San Miguel, recommended by some friends from Norbeck Country Club. We fell immediately in love with the many food stands of great Spanish food and the ability to get a glass of wine or beer from any of the bars and walk abound to the different food stands and try what they had. We locked in plans to spend a few hours there when we returned to Madrid at the end of the wine tasting trip.
Our impression of Plaza Mayor was that you could pick it up and put it in Lisbon, London, Barcelona, or most any other city in Europe and no one would notice. A typical European large square. We walked from there back to the hotel. We logged 7.6 miles walking that day, the highest of any day of the trip.
On Sunday we took a short plane hop on Iberia Airlines from Madrid to Santiago de Compestela, the capital city of the province of Galicia. The Marriot booked a cab for us at 9:30 that was waiting for us right after we finished breakfast and it was a 25 minute ride out to the airport. We also took a cab in from the airport on Saturday and it is a fixed price of 30€ to or from the airport and the cabs all take credit cards so it was very easy. We met up with Howard at the airport and got introduced to Antonio, our guide, and a number of other people that were taking Howard’s wine tour. Most of them had flown over from the US on Iberia, arriving that morning, and changing planes to go to Santiago.
I am NOT a fan of Iberia Airlines. We had a real problem with them about a lost bag that took three days to get to us on an earlier trip to Seville. I had no interest in flying them over from the US. The tickets for Madrid to Santiago were only 46€ each. But when I went online to check in for the flight on Saturday, I found I also needed to pay for a seat and could only bring one carry on bag on board and it could not be a roller board. All checked bags had to be paid for. It was another 60€ each to actually take the flight. I am NOT a fan of Iberia Airlines.
Howard had a bus meeting us at the airport in Santiago and taking us to our hotel which is about a mile outside the walled town for our one night stay there. We had the afternoon free, so Beth and I walked to Santiago, had lunch at a nice Italian restaurant, L. Incontro Santiago, and explored the Cathedral which is the burial site for St. James the Apostle.
The Way of St. James, El Camino de Santiago
A church was built in Santiago in 899 and quickly became a popular pilgrimage site. The great Romanesque Cathedral that we see now was originally consecrated in 1211. The Way of St. James is a very popular pilgrimage destination with a number of popular starting points across Europe and attracting over 200,000 pilgrims each year. Many of the routes are 500 – 700+ Km long and can take a month to hike on foot. Pilgrims can purchase a Credencial or pilgrim’s passport which give access to overnight accommodations along the way with the ability to record where they ate and slept along their path.
The goal of the pilgrimage is to get the Compostela which is a certificate of accomplishment. To earn it one must walk at least 100 km or bike at least 200 km for spiritual reasons, collecting stamps from the places that you pass through with the Credencial stamped at least twice each day for the final 100 km. and ending in Santiago de Compostela.
The many routes are marked with the Scallop shell as shown in the picture. These can be in the ground or mounted on walls or trees. We passed a number of hiking pilgrims as we went out to the vineyards to begin our tours of different wineries. The two pilgrims in the picture are celebrating they have reached the final scallop shell in front of the cathedral and their pilgrimage is over.
One of the famous objects in the Cathedral is their enormous censer or botafumerio which is shown in the picture. It is over 5 feet tall and weighs about 180 pounds. When used in a service 8 men take up the ropes shown in the picture to swing it back and forth. Legend has it that the early pilgrims filling the church had been marching for a month of longer with minimal opportunities to bathe and a great deal of incense needed to be burned to overcome their aroma.
We also got to walk into the church through the Holy Door which is only open in years when St. James Day, July 25, falls on a Sunday. There are special blessings for walking through the Holy Door.
We stepped out of the church to grab a delicious quick bite before the 7:30 service at Restaurante El Trebol and when we came back the church was filled with hundreds standing. We were each able to sit on the base of one the pillars and join the service before walking back to the hotel. We finished this day with 5.6 miles walking.
Beth and I did something for the first-time last month. We took a trip to Europe with a group of people where we were all on a bus going from location to location, packing up each time we changed hotels. We have been big fans of River Cruises, using Viking, where we get on the boat and unpack and don’t have to pack up again until the cruise is over. We generally arrive a day or two early so are in a hotel then and sometimes we stay a few extra days so are again in a hotel but three changes maximum. This was our first experience with this kind of inland tour using a bus the entire way with a small group of people together for two weeks. It ended up being one of the best trips we have ever taken.
Punching down a Gran Reserva being fermented in an oak barrel about one week at Bodegas Valduero
Paco Rodero, the owner of Pago de Los Capellanes in Roa giving us jgrapes to taste as they come out of the crusher on their way to the tank for fermentation
This was a wine tasting tour of Northern Spain led by a very knowledgeable wine importer, Howard Friedman. Our other three trips to Spain had all been to the Mediterranean side of Spain, one to Seville, Granada and Marbella, and two to Barcelona, one of our favorite cities in the world. I learned more about wine in the 15 days of this trip than from any other trip or wine related activity than I have ever been part of! We visited 11 different wineries in the middle of the harvest the harvest and because of Howard’s relationship with the winemakers, we got much more than the standard tour and tasting at all but one of them. We got to walk the vineyards and taste grapes about to be harvested with the winemaker showing us some of his oldest vines and some ones just mature enough to produce grapes for his wine so we could taste the difference from the old vine grapes. We got to see the grapes go through the crusher for red wines and the press for white wines and taste the juice right out of the crusher or the press. We then barrel tasted the juices early in the fermentation process, 2-5 days in the tanks, and learned how long they leave the skins in with the juice and how often they punch down the tanks to keep the skins in contact with the juice. One of the winemakers uses only gravity to move the wine through the process because he does not like what pumping it through a hose does to the taste. Others have different things they do in the production process to get the flavor they want in their wines. We then had a tasting of their wines, generally at least 4 different wines each time and in one case 8 wines. On a few occasions we were served a delicious lunch to show how their wines complemented different foods. In other cases, we were offered platters of cheese, Iberian Ham, and slices of sausages along with the wines. We also had lunch at two Michelin One Star restaurants with great wine each time. We were only in a hotel for one night the first night of the trip. We were in two hotels for three nights and the rest for two nights. The hotels were very high quality and a lot of thought went into the best locations for us to stay at.
This trip was so interesting that I am doing a summary of it here and, over the next few weeks, will add a post for each day of the trip with lots of pictures. At each of the wineries our trip through their production process was different so I will get into a little more detail in the write up of each day. Beth and I took over 3,600 pictures on this trip, but I will only post a few of each day’s events, along with pictures of the labels of the wines that we tasted.
I want to acknowledge two people who made this trip such a special experience and highly recommend both of them for any interest you have in Spain in general and wine in particular.
Howard Friedman put the trip together and was the group leader. Howard has had a long and excellent career in the wine industry and for many years worked the floor at Calvert Woodley. He became their internal expert on Spanish wine and in that capacity traveled to Spain to learn the many wines they have and who are the best producers. Based on the relationships that he made, he left Calvert Woodley and became an importer of Spanish wines for the mid-Atlantic area and developed some very strong relationships with the winemakers that he was working with. He took the first group to Spain 12 years ago and everybody had such a good time he was doing it every year until COVID forced a two year halt. This year he was able to do it again, and this was his 10th time taking a group of 20-25 people for two weeks across northern Spain for wine tasting. Perhaps a good indication of how enjoyable people found those trips is that two of the people on our trip had been on one of Howard’s previous trips, one of them on the very first one. Howard is now semi-retired, but he is planning on continuing these trips for at least a few years and is already at work for next year’s trip. If you want to really learn about Spanish wines, discover a few grapes that you have not been familiar with, enjoy great Spanish food, and see some great historic sites across northern Spain, reach out to Howard and get on his mailing list so you can get the details on next year’s trip and decide if you want to sign up. Beth and I highly recommend it. Howard can be reached at hfriedo@verizon.net. Please let him know that I referred you.
Antonio talking about wine that has just been fermenting in the tank for three days
Antonio Santiago Abastas was our Guide for this trip. Antonio has been the guide for all 10 of Howard’s trips and they have a great partnership. For each of the locations that we visited he gave us the history, interesting places to visit in our free time, and restaurant recommendations. He also had local guides that gave us guided tours to several interesting locations including the cathedral in Santiago de Compostela and the Guggenheim Museum in Bilbao. He was fantastic at helping any of with individual questions or issues that we had. Antonio lives in Madrid and is self-employed. He does a number of 1 or 2 day wine tasting trips to La Rioja and Ribera Del Duero and if your travel takes to you Madrid, I strong suggest that you consider spending a day or two with Antonio as your guide. He can be reached at antoniante@hotmail.com, but he worked every day in September with no days off so he is in demand so the earlier you set something up with him, the better chance you will have to enjoy some time with him.
Where we went on this trip
I will close this post with the above map and a short summary of the itinerary of our trip to whet your appetite for the daily write ups with more details on each location.
Saturday Sept 17 – Beth and I flew over to Madrid a day early and stayed at the Marriott Aloft in downtown Madrid.
Sunday Sept 18 – We met Howard and Antonio, and many of the rest of the group, at the Madrid airport for a short hop to Santiago Del Compostela. Howard had a bus waiting to take us to our hotel and Antonio suggested some things to do and places to eat in the balance of the day that was free time. We were only in that hotel one night.
Monday Sept 19 – Our bags were picked up outside our room while we had a delicious breakfast at the hotel. All breakfasts were included in the tour package that we purchased, and bags were picked up from our room and delivered to our room at every stop with all gratuities prepaid. Antonio had a local guide that walked us through the Cathedral We were scheduled to visit our first winery that afternoon but just a week before the trip started the vineyard told Howard that they had serious drought issues and could not support a visit and tasting. Howard was able to substitute in a fantastic seafood luncheon in the two on Vigo and then we went to Baiona and the lovely Parador hotel there for two nights.
Tuesday Sept 20 – We took a short ride to one of the large baixas, or bays, on the Atlantic coast where they have hundreds of barges where they grow mussels, scallops, and oysters. We had a Albariño white wine on the boat and then went to a sommelier guided tasting and luncheon at a 1 star Michelin restaurant. Back at the Parador we had a very nice private tasting of three white wines followed by dinner together. I was a big fan of two Spanish white wines, Rueda and Albariño, before the trip and I quickly became a fan of two others that are pretty available in the US and exposure to several others that appear to be less available in the US. Details in the daily write ups.
Wednesday Sept 21 – We left the Parador and stopped at Bodegas Do Campo and then we moved to a local inn where we had a delicious lunch paired with four different wines from the vineyard we had just visited. We then went to the town of Leon and checked into the Conde de Luna hotel
Thursday Sept 22 – We started the morning with a short visit to the lovely Cathederal in Leon and really wished we had more time there. We then went to Casar de Burbia vineyard in Carradedelo where we had a tour and tasting. We went to the Venecia Restaurant which specializes in steaks from around the world for lunch.
Friday Sept 23 – In the morning we visited a winery that makes hard cider. I am a fan of English hard cider from the keg and this cider was too light for my taste but interesting to explore. We stopped for lunch in the little town of Santillana Del Mar and went from there to Bilbao where we stayed for three nights in the Gran Silken Hotel across the street from the Guggenheim Museum. We took advantage of the 3 day stay in Bilbao to have our laundry done at the hotel.
Saturday Sept 24 – we had a great guided tour of the Guggenheim and then lunch at Nerua, the Michelin 1 Star restaurant that is in the Museum complex. We were VERY impressed by the Guggenheim and it is worth going up to Bilbao just for that experience.
Sunday Sept 25 – We went to Bodega Katxina in the Getarika sub-region of Txakoli. One week into the trip we could even start to pronounce some of the place names and grape names. We had a long, leisurely lunch here with way too much delicious Basque food.
Monday Sept 26 – We left Bilbao and traveled to San Sabastian, a beautiful resort town on the Atlantic. There we had a fun cooking class where we made four different tapas and we then had a full Spanish lunch with lots of wine. We stayed in Los Agustinos in Haro, an old rectory converted into a nice hotel.
Tuesday Sept 27 – we went to the La Rioja region for a visit at Bodega Nivarius, one of the Placios, Vina De Fina wineries along with Trus and Proelio. We really enjoyed the white wine made at Nivarius as well as the red wines from Trus and Proelio making this one of my two favorite tastings on this trip. We then went to CUNE, one of the largest wineries in Spain and were given their standard tour and tasted two OK wines. After the very personal attention we had gotten at the other wineries where Howard had represented them, it was a big change to just be part of the machine.
Wednesday Sept 28 – We went to Bodegas Valduero in the Ribera Del Duero region for a fantastic tour. The long Spanish style lunch was delicious and none of felt the need for any more wine at the end. Valduero was the consensus favorite of the wineries that we visited. We spent the next two nights in the Palacio De Merced in Burgos.
Thursday Sept 29 – After breakfast we went to the Pedrosa de Duero and tasted their great Ribera Del Duero red wines and also a white wine from a vineyard that they bought growing the Godello grape. Their wines are consistently highly rated by Wine Spectator. We than had a free afternoon to walk around Burgos.
Friday Sept 30 – After breakfast we went to Javier Sanz in the Rueda region. This was our final winery visit and when they also served us a variation of the Verdejo grape, the Malcorta, so we tasted two very different styles of Rueda wine, we knew we want to have both in our cellar so they are on the wish list that I am working with Howard. We then went to the Wellington Hotel in Madrid where we said goodbye to our bus and the great driver we had, Ramon, and enjoyed three days in Madrid.
Saturday Oct 1 – We had planned to take the train down to Toledo for a day trip but when we unpacked at the Wellington Friday night we decided that were just exhausted from all the travel and eating and drinking so much so we had a very easy day on Saturday.
Sunday Oct 2 – Beth found a package where we could have a 90 minute guided to the Prado Museum and then go to the restaurant were we would get a tour of the kitchen of the oldest restaurant in the world that specializes in suckling pig.
Sunday Oct 3 – We checked out of the Wellington but left our bags there and had a final day of sight seeing. Howard’s trip ended that morning but we decided to stay another day and fly home on an early flight on the 4th.
Our group
It was a great trip and we are so glad that we did it. We really enjoyed the other people on the trip and formed some friendships that we hope will carry on. We learned a great deal about Spanish food, history, and culture along with find many new wines that we will be adding to our cellar. We have to drink a lot to make room for them.
You can download A PDF of the map with some notes on each day’s activities here.
Friday evening at Norbeck Country Club in Rockville MD I led a Pinot Noir Wine Tasting. Thirty-four people attended and they had a wide range of backgrounds from wine novices to oenophiles and the feedback was very positive from all attendees. We tasted four Pinot Noir wines that were in the $20-25 price range at our local liquor stores that are run by Montgomery County, MD. The liquor license of Norbeck Country Club requires that they purchase all alcohol beverages through the county stores and what they have in inventory severely limits the choices available. Each wine was from one of the four major regions making excellent Pinot Noir: France, California, Oregon, and New Zealand. We then finished with a very nice French Burgundy, the Louis Latour Marsannay Rouge, that was over $50 to show the taste difference as you move up the price spectrum. We had wanted to end with a Premier Cru Burgundy but the county only had one that they were carrying and they only had 3 bottles of it which was not enough for the size of our group so we went with the Marsannay.
Two files are available for download. The first is the place mat that we used so each person knew which wine they were drinking. I wanted people to compare the wines from the different regions so we poured 3 oz servings which let people go back each time I introduced a new wine and see how it compared with the prior wines. By having the place mat they could keep track of which wine was which over the hour long tasting. We had also poured all the wines into the glasses before the people arrived so they could see how they opened up over time and improved in taste. The second file is two pages. the firs is the list of the five wines we tasted and sources for them beyond the County Stores. The second page is a list of 38 other Pinot Noirs at different price points from each of the four regions that I recommended.
The prevailing sentiment was that the Louis Latour Marsannay Rouge and the Willamette Valley Vineyards (WVV) Whole Cluster Pinot Noir were the top wines of the five. Some of the people liked either the Rodney Strong or the Oyster Bay but the majority liked the Whole Cluster and the Louis Latour the most. If people were spending their own money they would go for the Whole Cluster since it was only $25 from the Willamette Valley Vineyards web site which is https://www.wvv.com/Shop-Wines/Willamette-Valley-Vineyards/Browse-All. If someone else was buying, they would probably go for the Louis Latour at $53. It is a real tribute to the Whole Cluster Pinot Noir that it was rated very close to a wine more than twice its price. I had a short video of the WVV founder, Jim Bernau, telling us how he creates the Whole Cluster Pinot Noir and the link to a youtube recording of that video is https://youtu.be/kjrJLE-PVWo.
I let the audience know that the two wines that will be on our table this Thanksgiving are the Whole Cluster Pinot Noir and WVV’s Pinot Gris which I wrote about in an earlier Post of this blog. I am checking out the While Cluster Rose that Jim talks about in the video and may be serving that as the before dinner wine on Thanksgiving.
For the two virtual wine tastings that I did, Pinot Noir and Cabernet Franc, I created a youtube video of those tastings that would let people get the wines and stream the wine tasting while they enjoyed them at a time of their choosing. The only thing missing is the interaction with the other people including me as the leader.
Based on the analytics that I am seeing from youtube, it appears that two people watched most if not all of the Pinot Noir Tasting and one person watched about 70% of the Cabernet Franc wine tasting. All the other views were less than 2 minutes in duration, just looking to see what this video is about
It is 2-3 days of work to take the recording of a virtual tasting and package it for youtube. Based on the number of full views of the tastings on youtube, does it make sense for me to put any future virtual wine tastings on youtube? You are the audience and I want to spend my time on things that you are interested in looking at. I could do a couple of posts on other topics with the time that I spent putting together each youtube video. Does that make more sense?
I do not intend to be critical of my audience. If you are not interested in streaming the video and tasing the wines as I talk about them, I have no problem with that. But if you have gotten the wines but just have not picked a time to steam the video, or are scheduling to get some people over to share the recorded wine tasting then let me know that. Maybe the time interval is still too short to see how much interest there is for me to post wine tastings on youtube.
I could really use your feedback on this so please add a comment with your thoughts. It will help me spend my time on the things that the people following this blog are most interested in. Thanks.
If I count helping my dad cook steaks on the charcoal when I was growing up, I have been cooking steaks the wrong way for over 60 years! Maybe not the wrong way, but certainly not the best way. Over a very hot fire I would sear the steak for 2 minutes on each side. Then depending on how think the steak was, I would either keep turning it every minute or reduce the heat by moving it higher off the coals or a cooler spot on the grill for it to finish cooking. Since I like my steak Rare/Medium Rare (bright rosy red interior) when I did it right I would have a little crust on the steak but, if it was a bone in steak, either the meat next to the bone was VERY rare or the steak was only slightly pink at the edges. Thin steaks were very hard not to overcook and thick steaks were even more difficult not be charred on the outside and raw in the middle.
I got pretty good at determining when the steak was done the way I liked it by poking the steak with my finger and seeing what resistance I got. A raw steak provides very little resistance and as it cooks that gradually increases.
Articles by two celebrity chef’s that I think very highly of, Jose Andres and Michael Symon, got me interested in trying a totally different way to cook steaks and I am now a believer that tempering the steak under low heat and then finishing it with a reverse sear is a much better way to cook a good steak.
Tempering the steak under low heat lets it cook very slowly and that breaks down the connective tissue so that steak becomes very tender and very juicy. The first time I did this was with a dry aged ribeye steak that was 1 ½” thick. The ribeye is two steaks. On one side of the bone is the tenderloin, what is used for Filet Mignon. On the other side of the bone is the strip steak which has great flavor but not known for its tenderness. Filet Mignon has been given high status because it is the most tender cut of the beef. But it really has very little flavor and and is not really a premium cut of steak. Many restaurants serve it with a strong sauce like Bearnaise to cover the lack of flavor. When I tempered this Porterhouse steak at 250° until it reached 100° internal temp and then reverse seared it, the strip steak was almost as tender as the filet side, and it still had all of that great strip steak flavor.
And the tempering the steak slowly also retains the juices so the steak is very moist and more flavorful. In that old style of cooking steaks, I would have to let the steak rest for at least five minutes for the juices to retreat back not the meat before slicing it or the juices would run out on the carving board and the steak would be dry. If the steak has been tempered and then reverse seared, it can be sliced immediately as the low temperature cooking kept the juices always inside the meat which I find to be another benefit of this approach.
I have tried three good ways to temper a steak for the initial cook and three good ways to do the reverse sear at the end. I will cover each of them with pictures below and then I will finish up with some thoughts on how thick a steak should be, grass fed vs grain fed beef, and dry aging.
Tempering The Steak
The goal here is let the steak cook slowly to an internal temperature of 100°. If you like your steak medium or medium well, you might let the internal temp go higher before taking it out. Since I only cook my steaks to Med Rare, I don’t know what that internal temp should be for Med Well but I suspect you can Google search and find that. If you like your steaks well done then we probably have very little to talk about. You should cook them to the way that you like and I am not criticizing, but that taste profile is very different from mine so I don’t think my suggestions will have much relevance for you.
I salt and pepper the steak and then begin the tempering process. Lightly coating the steak with olive oil will let the salt and pepper adhere to the steak better but I like to brush it with a light coat of Dijon mustard instead of the oil. That also lets the salt and pepper adhere well to the steak and the mustard adds a little flavor to the steak.
This method of cooking the steak is all about the internal temperature and not cooking so many minutes per pound or minutes per side. An internal temperature probe is a requirement for this. At the end of this post I will talk about the two internal probes that I have if you need to get one.
Grilling – If you like to grill your steak, either on a gas grill or a charcoal grill, you can do both the tempering of the steak and the reverse sear on the grill or use one of the other ways to temper it and just do the reverse sear on the grill. In the picture you can see that I have my charcoal all in the front half of the grill and my steak is on the back side on an elevated rack. My Kamado lets me cook at three different distances from the coals, as well as letting me put a divider in the fire box so the coals are only under one half the grill. This gives me lots of options on cooking temperatures and I have this steak at the highest level off the coals and it will take about 30 minutes for a 1” thick steak to get to the target internal temperature.
I could do the same thing with my gas grill by having the gas low or off one segment of the grill. But for me the gas grill is just the equivalent of taking the oven/broiler out of the kitchen. It is more fun to cook outside, and my wife is happy for me to be out of her way in the kitchen so I do use my gas grill when I don’t want to go through the time and effort of getting a charcoal fire ready to cook on. It will add grill marks, but it really does not impact the taste of the steak. Cooking over big lump oak hardwood charcoal will add some flavor to the steak and so a charcoal grill is the much better choice than a gas grill when you are cooking a nice cut of meat. I could also put some wood chunks like pecan or hickory on top of the charcoal and close the Kamado lid to add some smoke flavor during the tempering but we prefer to use smoke to only provide an accent to the flavor of some dishes, so I don’t sue any smoke when I am tempering my steaks. If you really like smoke flavor, that is another reason to try this approach on your charcoal grill.
Oven – This next picture shows the steak tempering in the oven at 250°. This also is usually about 30 minutes for a 1” thick steak but that time will vary so I go totally by when the temperature probe tells me it has hit the target temp. The rack that the steak is on I got to grill ribs. It lets me put four racks of ribs on the grill at the same time. It also lets me stand the steak up with it resting on the bone. This lets the low oven heat flow around the steak and cook it evenly. It also warms the bone so the meat next to the bone is cooking, not cooled by bone and staying very rare. If you don’t have a rack that lets you stand the steak up, you can lay the steak down on a rack in the sheet pan but if you just put it directly on the sheet pan instead of on a rack the down side will cook faster due to the contact with the metal and that uneven temperature is not good.
You want about 30 minutes for that slow cooking to break down the connective tissues in the steak. If your oven is getting it up to 100° in less than 25 minutes you should lower the cooking temp to 225° or even 200°. Letting it cook for 45 minutes at 200° is much better than 20 minutes at 250°. More on that in the final way of tempering the steak below.
Sous Vide – This is the wildest way to temper the steak and probably the most controversial. It is also probably the best way to do it if you can get comfortable with putting your steak in a baggie and dropping it into hot water. The Sous Vide fans are very vocal on how great this method is for steaks and they have a very good case. I probably should do a whole post on Sous Vide, but I am still a beginner in this mode of cooking and don’t feel qualified yet to talk about the ins and outs and individual preferences. But I did Sous Vide a bone in strip steak and I think it is an excellent way to very effectively temper a steak. I welcome the Sous Vide fans, and opponents, to weigh in with comments on this mode of cooking.
Sous Vide is French for “without air” or vacuum sealed. You put the food to be cooked in a sealed plastic bag and suspend that bag in a bath of circulating hot water at a temperature you set, generally between 100° and 200°. You can put spices in the bag and they will add flavor to the protein being Sous Vide. I had a sprig of Thyme in the bag with my steak and I had it in the Sous Vide for 60 minutes at 125°. If you are not at all familiar with Sous Vide, in the above picture the round black shape in the upper left corner is the Sous Vide unit and it is clamped onto the inside of the large plastic bin. I set the cooking temperature on it and it heats the water to that temp and keeps it circulating so the temperature stays constant. I put my steak in a zip lock bag sealed and suspended into the water with a large binder clip holding it in place. I worked hard to get all the air out of the bag when I sealed it but any air in there would be heated and cause the bag to float so the steak would not be under water. I clipped a second large binder clip to the bottom of the bag to weigh it down so it stayed fully submerged.
Because of the very low cooking temperatures, the cooking time is longer. You do need to plan for that but it is just a few minutes of prep time and then you walk away for about an hour and can work on other things so not a big deal unless you are doing something last minute. The longer cook time at this low temperature allows for even more of the connective tissue to break down so the steak will be very tender and being sealed in the bag means no juices evaporate during the tempering process.
You are not boiling the steak. The water would have to get up to 212° to boil and you are just at 125°. If you left the steak in for 3 hours the internal temp would not go above 125° because that is how hot the water bath is, but mentally I’m still not ready for that long a time. I want it at 100° so I can take 4-5 minutes to reverse sear it and get a very nice crust on the steak with it being between 125° – 130° when I carve it. An hour worked very well for tempering the steak Sous Vide.
Reverse Sear The Steak
What makes a steak very special is when it has a crisp, thin dark bark or crust with juicy meat just inside it. The reverse sear lets us get steak to that appealing color and can add that bark. The three different ways to reverse sear discussed below have different effectiveness on getting that crispy bark.
One of the concerns I had was the transition from the tempering when I needed to get the cooking temperature up very high for the reverse sear. Depending on which method you use, there can be a lag time. For me the biggest lag time is getting the charcoal grill up to very high temp for the sear. But the steak can sit for a while on the counter while you get to the cooking temp you need for the sear. The internal temp might increase a little while it sits, but not that much because it is pretty low to start with. Even if 20 minutes is needed to get a really hot fire, the steak might start to cool but the searing process will quickly get it to the desired end temperature. Because the internal temp probes are not recommended for temps above 500° and my Kamado can get over 700°, I take the temp probe out and do the reverse sear at 2 to 2 ½ minutes per side. That is getting the steak to the bright rosy red that I like as you can see in the several pictures where I turned one of the slices up to show the doneness.
Grilling – I talked about the grill as the first method for tempering the steak so the first alternative I will cover is reverse searing it on the grill. As noted above, you want to make what ever adjustments your grill needs to the vents and the charcoal levels to get it to blazing hot. In the first picture you see a nice Tomahawk steak at the end of the tempering cycle. It has just a slight brown color, not very appealing to look at. The second picture is when it was on the very hot Kamado for about 2 minutes per side and it is dark brown with a nice bark. The third picture shows it sliced with meat a lovely shade of red and very moist and juicy.
In the tempering process I had the pan with the steak on the standard wire grill racks that come with the Kamado. For the reverse sear I use heavy cast iron grill grates that I bought for the Kamado which creates some very good grill marks. I can really do lots of different things with my Kamado. My gas grill just gets to 600° so it is not doing much for the reverse sear so I either use the charcoal grill or one of the two approaches with a cast iron fry pan discussed below for my reverse sear.
This next picture is a strip steak at the lowest cooking level over a bright red fire with some flame licking the steak. This was a thinner steak so I only did it one and a half minutes per side so it was not as dark as the Tomahawk steak but still with some bark and just the right level of doneness.
I can use the charcoal gill for the reverse sear if I did the tempering in the oven or Sous Vide. I schedule to get the fire to its highest level just when the steak is finishing the tempering process and then take it to the grill to be seared. I get the open flame and a little of the hardwood charcoal taste just using the grill for the reverse sear.
When I have a bone in steak I first cut it off the bone when I carve it and then cut slices perpendicular to the bone about ½” thick. I then reassemble the slices around the bone and serve it family style.
Broiler – If I can’t use the grill for some reason, typically weather, I can do the reverse sear under the broiler. I can lay the steak down on a rack in a sheet pan and flip it at about the 2 minute mark, depending on the thickness of the steak. But I will get much better results if I preheat my cast iron, or carbon steel, fry pan under the broiler and then drop the steak in the very hot pan and again flip it at about the 2 minute mark. The broiler will not give much of a bark on the steak but the fry pan will do a much better job of that.
Butter Basted Cast Iron Fry Pan – Not the healthiest alternative, but probably the one that really gives the best final product is doing the reverse sear in a cast iron or carbon steel fry pan on the stove top where you can butter baste it. When I do this, I melt the butter in the pan and get it very hot. I then add a couple of sprigs of thyme, or rosemary, or tarragon and a very large clove of garlic that I have slightly crushed with the flat of my chef’s knife, leaving the skin on. The skin of the garlic and the stem of the herbs have a lot of flavor but you don’t want to chew them. In this case they are flavoring the butter and get thrown out at the end of the cooking proves so leaving them adds to the flavor. The first picture shows the steak just as it comes out of the tempering and is being added to hot pan with the butter and herbs. The next picture Beth took of me basting the steak with the herb butter. I tilt the pan to get a pool of the butter and use a large serving spoon to baste each side for 1½ to 2 minutes depending on the thickness of the steak. This produces a great bark on the steak.
When I take up the steak I let it rest for a minute while I pour the hot butter into the drip jar. I then add ¼ cup of beef stock and ¼ cup of red wine to the pan, with the herbs and garlic still in it, and scrape the pan to get all the residue from the steak. The picture shows that wine sauce reducing down to about half the volume, and I then pour it through a strainer into a bowl to remove the garlic and herbs. I serve that alongside the carved steak so everyone can add what they want to their steak. I can do the same thing if I use the cast iron pan to sear the steak under the broiler but it doesn’t have the butter that is left clinging to the pan and the herbs to add to the flavor.
Two thoughts on the sauce:
If I don’t have open beef stock available to me, I don’t open a new can or carton just for ¼ cup. I just double the red wine to make up for it.
I don’t cook with expensive wine. In my earlier blog post on Red Table Wines for Under $15, I talked about having one of those inexepnsive wines to cook with and then drinking a nice bottle of wine made from the same grape, cabernet sauvignon or pinot noir usually, with the meal. As long as i am cooking with the same grape as I will be drinking, I can keep the nice bottle just for drinking.
All the volumes and timing here are for a 12-14 oz steak cooked Med Rare for two people to share. Adjust accordingly if you are cooking larger steaks or a want a different level of doneness.
Other Thoughts On Steak
How thick should a steak be – I believe the best steak is when you have one steak large enough for everyone to eat their fill. If you have more then 6 people, or some huge eaters, you might need to go for a second steak. Assuming you have a source to have a steak cut to the size you want, a thick steak will be much more flavorful and juicy than a thin individual steaks. If you have to deal with what the supermarket has available, look for the thickest steaks they have. In the old way of cooking steaks by first searing them, it was very difficult to cook a very thick steak to the desired level of doneness. By tempering it first for as long as it needs to get the innermost part of the steak up to 100°, you don’t have that problem. For a steak over 2″ thick maybe you want to go to 110° internal to end up Med Rare after the Reverse Sear.
Grass fed vs grain fed beef – When I was growing up cows grazed on grass and then went to be slaughtered. The cattle farmers realized that they could add significant weight to the cow, and therefore make more money from the sale, by having the cows fatten up on corn so grain fed beef became the norm on the supermarket shelves. Beth and I were on a trip to the Caribbean a few years ago and had a steak dinner and both of us remarked how good the meat tasted. Beth said it reminded her of the steaks she had as a child. We asked and were told that it was grass fed beef that came in from South America. Grain fed beef will be fatter and that can make them more tender, but grass fed beef has much better flavor. If you have a chance to get grass fed beef, I strongly suggest you try it. You may have been raised on grain fed beef and don’t want a different taste and that is fine. I will take grass fed over grain fed every chance I get.
Dry aged beef – Dry aging is a process that ages the beef before cooking and that aging breaks down that connective tissue and makes the steak much more tender. Some of the great steak houses like Peter Lugers in New York dry age all their steaks for at least several weeks so they don’t need to do the tempering process to server tender steaks. Beth has dry aged some beef for a few days in our refrigerator and even that short time made a noticeable difference. In my earlier blog on how Bobby Fly cooks steak I mentioned that some of the large Harris Teeter stores have dry age units that keep the steaks for at least two weeks before they will sell them. They get a very premium price for the dry aged steaks but they will cut them to order for you and the taste is worth the price premium.
Internal Meat Thermometers
I have two internal meat thermometers that I can put in for the full cooking process and see the internal temp on my cell phone any time I want it. I have had both for several years and this is a rapidly changing technology so there are probably newer, better products on the market now. I think the important things are:
To be able to get the temp on your phone. I am fine with Bluetooth, I am not going far enough away where I need it to be wi fi. I am also OK with the probe having a cable back to the monitor unit. Both Bluetooth and wi fi can have limits of not being subject to temps over 400° so the units where the probe is cable connected to the monitor which sends the data to my phone can work at higher temps.
At least two probes are needed for many cooking sessions, three can be good sometimes. When I am cooking in my Kamado I want a probe in the protein being cooked to let me track the internal temp and I want one on the cooking surface right next to it telling me the cooking temperature that the meat is getting. The big dome of the Kamado can have different temperatures and the external one is at the top of the dome and generally different from what the temp is down on the grill rack. If I am doing two pieces of meat, I may want an internal probe in each of them, especially if they are different sizes so that would call for three probes.
For my outside coking I use a ThermoPro Wireless Meat Thermometer with 6 probes. The model I have is no longer for sale and I don’t remember the model number. The TP930 appears to be the current model closest to what I have and it comes with 4 probes. I don’t think I ever used 4 probes so this would be my choice if I needed to replace what I had now. I have had several generations of ThermoPro and been happy with their products. I recently put probes into ice water and boiling water and found that the readings were 4 degrees higher than they should have been. I now factor that in and add 5 degrees to the temp I am looking for and cook to that reading on the device.
In the kitchen we have a MEATER Plus Smart Meat Thermometer. On the plus side it is totally wireless so no cables are coming out of the oven. The user interface is also very good. The device has two sensors. One at the end of the probe where it goes into the meat to give the internal temp and the other at the top where it gives the cooking temp. If I put the desired end internal temp into the ap on my phone, it will tell me approximately how long it will take to get to that internal temp based on the cooking temp that it is getting. It also has let me know that my oven is generally 8-10 degrees cooler than the temperature I select when turning on the oven so I now set the over for that higher temp so the actual cooking temp is what the recipe called for. The two negatives to this product are that the charging station needs to be just a few feet away from the probe when it is in the oven and that it should not be used at temps over 400°. Both of those are show stoppers for my outside cooking but OK for the kitchen oven. It is on the expensive side at $100.
I hope you found this blog of interest and let me know your thoughts after you have tried tempering a steak and then reverse searing it.
I love the old classic hotels and will be doing a blog post on three of my favorites, the Broadmoor in Colorado Springs, the Greenbrier in White Sulphur Springs, and this initial one on the Grand Hotel on Mackinac Island in Michigan. I will first talk about why you should consider going there and a little of its great history. Once I have your attention I will talk about where it is and how to get there.
Why would you want to go to a very remote location and stay in a hotel that is 136 years old? Lots of reasons:
The hotel is simply beautiful inside and out with incredible gardens surrounding it. I think the pictures in this post are far more impressive than any words that I can share with you.
The tiny island of Mackinac has places to see and things to do that are a lot of fun for a few days. There are no motor vehicles. You can walk, ride a bike, ride a horse, or be driven in horse drawn vehicle. It is a great experience.
There are several hundred years of interesting history starting with the French finding the island and a fascinating history of people and events at the hotel.
It is very family friendly with lots for kids to enjoy including bicycles, horseback riding, a butterfly farm, a great pool, and lots of activities
You can eat very well!
The hotel has that commitment to service that is the hallmark of all of the great classic hotels and that makes it special to stay there.
My parents took my sister and I there I when was 11 and she was 14 and we loved it. Over 50 years later Beth and I had a lovely get away there that we really enjoyed. How many places would hold their appeal
The gleaming white building immediately grabs your attention when you see it. The hotel was built in just a few months in 1887 and has been in operation since then. It is one of the last of the hotels built in the 19th century that only used wood in the building. Because it is a totally wooden building on an island where it gets very cold in the winter, it is only open from April through October and is completely shut down from November through March every year. It sits on Mackinac Island overlooking the Straights of Mackinac that go between Lake Michigan and Lake Huron.
It is now four stories tall and the porch that runs across the front of it is the longest outdoor porch in the world.
When the hotel was originally built it was for the just emerging middle class to have someplace for families to summer. The cities like Chicago and New York were really unpleasant in the summer time in the late 1800s and early 1900s with the heat and the pollution from the factories. There was no concept of air conditioning back then! The new middle class had some money and they used that to send their families out of town for the entire summer. The Grand Hotel was built to meet that need and offered rooms with all meals included for $3-5 per night. Over time the hotel added a wing and additional floors and things like air conditioning but it has always been just for summer guests.
During the winter the hotel is totally sealed up and less than 300 people remain on the island. The straights between the island and the Lower Peninsula are kept open with ice breakers for all the ship traffic to and from Lake Michigan. On the other side of the island the ice is thick, and an ice bridge is defined and used by snowmobiles to bring things to the island. Anything needed in the winter, including all food, either comes by snowmobile or by plane which is very expensive. After Christmas all the Christmas trees in the area are collected and used to line the ice bridge. The reason for that is if you are using the ice bridge and see that any of the trees are not straight up and down, you immediately turn around and go back to shore as that is telling you the ice has melted and the ice bridge is no longer safe.
One of the attractions of visiting there is that only three motor vehicles are allowed on the island, an ambulance, a fire truck, and a police car. All are kept locked away unless there is an emergency. The primary mode of transportation on the island is horseback, both riding and pulling different conveyances. The above picture shows the horse drawn cabs that meet your ferry boat and take you up to the hotel. The ferry is for people only and I’ll talk about those logistics later when you have decided you to visit.
This picture is a delivery cart. A resident must prove that something cannot be delivered by a horse drawn vehicle before an exception is granted for a motor vehicle to go onto the island. Just before we got there one of the houses needed to have a new cupola put on its roof to replace one that had been damaged. They had to hire a helicopter to put it there as a request for a truck with a crane was not approved.
You can also ride horseback with some guided rides around the island a lot of fun for those who are comfortable on horseback. And the special place that horses have on Mackinac Island is celebrated in some of the beautiful plantings that the Grand Hotel has on its grounds.
The 600 some horses that are on the island also generate some employment opportunities! The horses winter in several camps on the Upper Peninsula.
The second most used form of transportation is walking. It is about a 15 minute stroll into the small town where the Ferry arrives and departs. They have a number of lovely shops and the Mackinac Island website has a list and map of all the shops. Like most resort towns they have several Fudge Shops but in my humble opinion, the fudge on Mackinac Island is better than any other fudge I have had. There are also some restaurants there and it is a nice afternoon to walk into town and walk around with maybe a lunch stop. This is also where you get tickets for and board your carriage for a very popular, i.e. expect lines for it, half day carriage ride around the island. It goes through the National Park stopping several times for pictures and is very well done. I highly recommend it and it is very good for school age children. We particularly loved the Carriage Barn with so many of the beautiful carriages that have been used on the island.
The third mode of transportation is bicycle. The kids really love that they can ride all over the island and the only vehicles they have to worry about have one or two horsepower engines and are moving slower than they are.
The hotel rents bikes by the hour and the day and there are other bike rental facilities in town. Mackinac is a very kid friendly place with lots for them to do. Here you have a picture of one of the police cruisers, and they are known to give speeding tickets for bicycle riders going downhill at an unsafe speed. Kids can ride into town safely and parking is not an issue.
As impressive as the hotel is from the outside, it is even more attractive on the inside. In 1976 the hotel was expanded and completely redone on the inside. The decorator was Carleton Varney, one of the major disciples of Dorothy Draper and the current owner of Dorothy Draper and Co. Dorothy’s design philosophy stresses the use of bright colors and the rejection of all that is impractical, uncomfortable, and drab. In embracing this practice, Carleton continues the tradition of Dorothy Draper with vibrant colors, floral patterns, and bold contrasts throughout the hotel. Dorothy believed that every room she decorated was unique and Carleton followed that concept in his design for the Grand Hotel so that every room in the hotel, including every guest room, has a unique appearance and décor. We stayed in one of their standard rooms and this picture shows how colorful it was.
The lobby is an explosion of color and just a delightful place to sit and read a book or watch the people go by.
In the evening you can sit on the deck in a rocking chair with a beverage of your choice and watch the sun go down behind the Mackinac Bridge.
I really enjoyed the Library where you can comfortably sit and read the newspaper or a book and they have a small bar there to get a cup of coffee in the morning or a nice glass of wine in the evening while relaxing there.
The Grand Dining Room is not only beautiful to look at with every table set to grab your attention. It is also a fine dining establishment with breakfast offering a sumptuous buffet or a menu with many delightful choices.
The picture shows corned beef hash with poached eggs and a side of yoghurt with fresh fruit and granola. We ordered off the menu both mornings as the menu items were more unique and appealing over the buffet. Lunch is a very grand buffet but depending on the number of people staying at the hotel the Grand Dining Room is not always open for lunch, but there are several other good lunch options within a few minutes’ walk. The dinner menu is large as are the portions. You can easily split an entrée between two people but if you are on a plan where dinner is included, why not try two different entrees and ask for a doggie bag. You can get packages where breakfast and/or dinner is included, and I highly recommend them so you can enjoy all the choices without worrying about the cost. The menu is on a three day cycle so you will have plenty of choices. They also have a very impressive wine list and even a few bottles under $50. Jackets and ties are required for men for dinner in the Grand Dining Room. I am old fashioned enough that I like that.
After dinner they have either a harpist or someone playing the grand piano in the lobby until the Nightclub opens. I found it very enjoyable to listen to the harpist while I enjoyed a nice glass of port.
The exterior plantings at the Grand Hotel are just as impressive as the internal décor and the hotel justifiably takes great pride in its gardens. They even have a secret garden you have to find on your own and we found it! Plan on an afternoon just to wander the grounds and explore the gardens. Be sure your phone is fully charged so you can take all the pictures that you will want to have to remember this trip.
The other outdoor attraction is the swimming pool and this is a real favorite for the kids. On the hotel tour they tell the kinds that Paul Bunyan lived in the Upper Peninsula and one day he was walking by and stepped on Mackinac Island. The footprint that he left is now the swimming pool. And they also have a golf course on the grounds.
The hotel has a list of daily activities for things to do, a number of them intended for children. One that we really enjoyed, and I highly recommend, is the Hotel Historian taking you behind the scenes to see and understand the hotel’s history. There was a story in so many of the different rooms. In this picture he is telling us of the history of these chandeliers. He finished up the tour telling us about the filming of the movie Somewhere In Time that starred Christopher Reeve and Jane Seymour.
We took an early ferry over to the island on Thursday morning and returned on Saturday, staying two nights. We would have been good staying one more day, mostly to eat again in the Grand Dining Room, but three nights at the hotel is enough in my opinion. If you want to stay longer to just relax and chill out, that is fine and stay as long as you like, but it is not inexpensive. I suggest two nights is the minimum stay and three nights ls long enough in my opinion.
There are some other small hotels and guest houses on the island, but everything revolves around the Grand Hotel. They reserve the right to charge non registered guests just to walk on the property as the sign shows. I think you go there primarily for the Grand Hotel, not to visit Mackinac Island.
Is the name Mac-In-Ack or Mac-In-Awe? The Indians gave the island the name turtle because of it’s shape and when it was settled by the French they took that name and spelled it as Mackinac. But in the French style, they did now pronounce the final c so it sounded like Mac-in-Awe. When the English took it away from the French and then the Americans took it over after the Revolution, they kept both the spelling and the pronunciation. The final c in Mackinac is NEVER pronounced. Across the straits at the top end of the Lower Peninsula is the town of Mackinaw. It is pronounced the same but the spelling is different to convey that it is not on Mackinac Island. Confusing but in a fun way.
Hotel Prices
The Grand Hotel is never inexpensive but it can be extremely expensive. Rates can be as low as $300 a night but when the hotel has a lot of demand those rates quickly go over $650 a night. I strongly suggest that you be as flexible as possible on your dates and use the link below and look at the rates for different days and find a 2 night or 3 night window where the rates are at their lowest. All your planning needs to be around the dates of your hotel reservation. The hotel hosts a number of major events and is fully booked at those times at their highest rates. They also have rates that include breakfast and/or dinner and those are generally a good idea. https://www.grandhotel.com/packages/?gclid=CjwKCAjw3K2XBhAzEiwAmmgrAv4ucBGtajmr-DWIUKI31LYCArwXyU8KIt-N1rWUBjP8zeULHxX_choCHm0QAvD_BwE#/booking/step-1.
Having stayed there I am now on their mailing list for special programs. Below is one that is very attractive called The Discover Summer Offer. If you can find the special programs on their website and see if any of those dates work for you, that can significantly reduce your cost.
The Discover Summer offer includes: 15% off Signature Suites, Breakfast and dinner daily, All resort amenities, and special discount on ferry tickets.
Where Is Mackinac Island And How Do I Get To It?
Mackinac Island is in the straights of Mackinac between the Lower Peninsula and the Upper Peninsula of Michigan. If you hear someone say Yopper, that is the nickname for someone who lives in the Upper Peninsula or UP. You can fly into Detroit, served by all of the major airlines, and get a rental car to drive up to either Mackinaw City in the Lower Peninsula or go across the Mackinac Bridge to St. Ignace. You can take the ferry over to Mackinac Island from either location.
This picture is the Ferry Terminal in Mackinaw City. You can drive in there to purchase a ticket and drop your suitcases. Tickets are for a specific time and you want to purchase the round trip ticket. When all the seats are sold for a specific time that ferry is full, you can only purchase tickets for a later one.
Because the parking area at the terminal is almost always full, you need to also purchase a remote parking pass. The person selling you the tickets can help with how long you need to purchase that pass for based what day you are purchasing the return ticket for. You put your bags in a designated area for the ferry that you have tickets for and they put your bags on the ferry and have them available to you when you get off the ferry.
When you pull into the Terminal the machine will give you a ticket. As long as you leave the terminal within an hour to go to one of the remote lots, you don’t have to pay anything. That gives you plenty of time to unload your bags, pay for the ferry and parking, leave your bags in the designated area and leave to drop your car off in one of the remote lots. There are several remote lots, all just a few minutes’ drive from the terminal with shuttle busses bringing you back and returning you to pick up your car. You just need to remember what lot you are in and where in that lot. I suggest emailing yourself when you park the car with the location specifics. I left Beth in the Terminal waiting area and did the remote parking by myself and did the same thing on the return. You cannot leave kids unattended there and of course, you never would.
The ferry is for passengers only. There is an enclosed cabin on the main deck and an open deck on top. Depending on the weather the top deck may be closed if there is a lot of wind kicking up waves in the straight. It is about a 20 minute ride. When you land your bags will be lined up where you get off the boat. Walk down the pier into the town with its one main street to get a cab to the hotel. You can take either one of the Grand Hotel carriages or one of the other horse drawn cabs that will take you anywhere. Both are the same price to go to the hotel and tips are expected. The Grand Hotel carriages are much nicer looking but if you don’t see one and one of the other cabs is available, do you want to wait around for the fancier carriage?
I suggest taking an early ferry over. We drove up and spent the night in a nice B&B in Mackinaw City and got the 9:30 ferry over to Mackinac Island. The hotel policy is that check in is at 4:00 PM but you can check in early and leave your bags there and have the day to start exploring. Our room was open so we got right into our room. Your bags will be brought to your room by a bell hop and a tip is expected. You will be told that on the day of your departure your bags need to be outside your room by 9:00 AM and they will be taken to the ferry and brought over to your terminal. When you get off the ferry there is a large tent with all the bags and you claim your bags there, get your rental car, load up and drive back to the airport.
The drive to and from the Detroit airport and Mackinaw City is a little over 4 hours and longer to St. Ignace. And you are paying for a rental car that is sitting in a parking lot. But I know of no better options. There are no commercial flights onto Mackinac Island. The closest airport with commercial traffic is Traverse City and there are not lots of connection fights available. With the time waiting for a connection and the drive from Traverse City to the Terminal, you are probably taking more than 4 hours and you still have a rental car sitting in the parking lot.
If you enjoy the beauty, history, and atmosphere of the old classic hotels, you will be delighted by the Grand Hotel and it probably will not be the only time you stay there. If you enjoy very good food with a nice wine list and great service you will have a wonderful time at the Grand Hotel. Whether it is a get away for the two of you or a few fun days with the family, consider the Grand Hotel!
This post has the information for the four wines that are discussed in the youtube video “Cabernet Franc Wine Tasting – “The Other Cabernet”. You can find that video at https://www.youtube.com/watch?v=u6hnVo5ShSk.
This video includes the recorded briefings from two people who joined the live virtual tasting that I did. The wine maker from Barboursville Vineyards, Luca Paschina, joined us for an excellent discussion on his Cabernet Franc and some great insights and history of making fine red wine in Virginia. We also had a Winery Ambassador from the Willamette Valley Vineyards, McKenzie Wolfe-Webb, join the call and talk about their Griffin Creek Cabernet Franc . My thinks to Luca and McKenzie for joining me to discuss Cab Franc.
As you will see when the video shows some of the people who participated in the live virtual tasting, a platter of cheese can charcuterie would be a great accompaniment.
Below are the wines that are discussed in this Cab Franc tasting. Two of them are widely available and two of them are each only available from a single source.
Lazy Bones Cab Franc – Trader Joes pretty much has an exclusive on this wine so you will need to get to one of the Trader Joes that carries wine to get it. Price is usually $7. When I posted this video on youtube in early August 2022, , most Trader Joe’s had run out of the 2020 vintage of Lazy Bones and were waiting for the 2021 vintage to start shipping. Hopefully when you Go to Trader Joe’s they are back in stock.
Perro Callejero Cabernet Franc from Argentina made by Mosquita Meurta. Wine.com has it for $21 and B-21.com has it for $15 but is very expensive for shipping on orders under $50. Reports are some COSTCO have it for $10 but no way to know which ones do so you may want to check next time you are in a COSTCO that carries wine.
Laroque Cabernet Franc –Laroque has many wines at different price points so be sure you are ordering their Cabernet Franc. The label tells us is from the Citi de Carcassonne with just Laroque in the name. it is Domaine Laroque but Domaine does not appear on the label. Sources:
Wine.com carries it for $15
Saratogawine.com has it for $12
Empirewine.com has it on sale as of this writing for $10
For those local to the DC area, Calvert Woodly has it in stock for $11 and no shipping charges
Barboursville Cabernet Franc Reserve –. Sources:
Wine.com carries it but at $31 it is the most expensive source. Wineworksonline.com has it for $24.
This is the only one of the four that is carried by Total Wine for $21. Chain stores like Wegmans and Safeway that carry wines often have this one, particularly in the DC area. Calvert Woodley also has it on the shelf for $22.50.
You can get it from the Barboursville web site for $25 and they ship to most states.
If you have trouble finding these wines you can check www.wine-searcher.com and put in the wine you are looking for and they will give you a list of web sites that have it for sale.
I recommend that you open all of the wines 30 minutes before you start the video for this wine tasting and pour each wine into a separate glass. About 2 oz is a good amount for a tasting.
Below is a place mat for the five wines you will be tasting. As we progress through the tasting you will be able to compare the wines that are different price points and from different countries. The placemat will help you keep track of which wine is which.
We are in the heart of summer BBQ season and this blog is a tutorial on smoking beef brisket aimed at those who have not done this before or did not get good results when they did try it. It is for smoking a 4-5 lb. brisket, either the point or the flat, on a Kamado type grill but with suggestions for adjusting it if you want to try a whole brisket that is 12-16 lbs and/or use other kinds of grills. All the terms used like point, flat, and stall are explained below. Much of the information in this blog comes from the Aaron Franklin video on smoking Brisket –https://www.youtube.com/watch?v=VmTzdMHu5KU.
Basic rules for brisket
Cook to the temperature , not to the clock. This is important enough that it gets several mentions below. Brisket must be cooked until at least an internal temp of 200° and 205° is optimum. The most common mistake that people make in smoking a brisket is to use some recommended guide of minutes per lb. The result is generally something that is almost impossible to chew instead of breaking apart in your hands.
A 4-5 lb. brisket will usually take at least 8 hours to cook, more depending on how you handle the stall, and then an hour to rest before slicing. If you want to smoke a brisket to eat that day for dinner, you should plan to start your file in the Kamado grill at 7:00 AM so the temp is stabilized at 250° by 8:00 and the meat can go on then.
Brisket will keep warm and ready to eat for several hours if wrapped in a warm towel and put in a Styrofoam cooler.
BBQ is a cooking technique, not a sauce. To be considered BBQ the protein needs to either be grilled over an open flame (not a gas grill) or be smoked for part of the cooking process. Adding a sauce labeled BBQ to a piece of meat does not make that BBQ. Sauces primarily accompany the protein (meat or fish) and people can add the sauce to their plate if they want. Some dishes call for a sauce to glaze the protein as part of the recipe but for brisket the sauce is generally served on the side at the table. My Hot & Sweet Sauce recipe is at the bottom of this blog.
Kamado Recipe
This recipe is for smoking beef brisket on a Kamado style grill. I have a Kamado Joe but this should work equally well for a Big Green Egg. It should not be difficult to adjust this recipe for other types of smokers but I suggest looking at some smoked brisket recipes for that style grill and adjusting this recipe based on what other recipes are calling for. The Kamado style grills use ceramic heat deflectors to create an indirect head environment. Offset smokers like a Traeger already have that indirect heat so all references to deflector plates can be ignored. Doing a smoked brisket on a charcoal kettle grill like a Weber is very difficult because of the long cook time, difficulty in maintaining a 250° stable cooking temperature, and adding additional charcoal creates fluctuations in the cooking temperature.
Brisket 101
A full beef brisket is made up of two different muscles that overlap. The biggest one which has a rich layer of fat running through it is called the point. The thin one is called the flat. Interestingly, the flat is often the last to hit the 205° desired internal temp even though it is much thinner than the point. A full brisket is about 12-16 pounds which is a lot of meat and needs a lot of grill surface to hold something that large. Many stores will sell just the point or just the flat.
The grain on the two muscles runs in different directions and you need to slice brisket against the grain. If you smoke a full brisket, after the 1 hour resting time you want to cut it to separate the two muscles. To do that below are the directions from www.bbq-experts.com:
First, identify where the point and flat are on the brisket.
That fat seam is called “the nose,” and that’s where you want to start separating the two.
Follow the fat seam as it curves back and under the flat.
Keep lifting the flat with your non-cutting hand and slicing through the fat seam until the point tapers out.
You can also do this to create two smaller briskets and smoke the point and the flat at different times, freezing the one that you want to do later.
Cooking Time:
The challenge for brisket is to make it tender enough to enjoy eating. Smoked brisket needs to cook for a LONG time at a low temperature to break down the connective tissue so that the meat easily pulls apart in your hands. Even a small brisket, 4 lbs., will take at least 8 hours to get to the right temp to come off the grill. A full brisket can take 16 hours and some people smoke them overnight. If it anything other than a small brisket, I will cook it the day before I serve it to have enough time for it to get to the right temp and then rest for at least an hour. I slice it and refrigerate the slices overnight because getting the whole brisket warm enough to serve and them slicing it is a real challenge. I generally do a 4 lb. brisket because I don’t have that many people to feed and it is very preferable to eat it the same day you smoked it.
As a result of the long cooking time, smoked brisket is always at the well done stage. The analogy is beef stew where again tough cuts of beef are cut into cubes and cooked for a long time as part of the stew so them become tender.
I strongly encourage you to use so many minutes per pound ONLY for rough planning. The brisket needs to keep cooking until it hits at least 200⁰ internal temp regardless of how long that takes and 205⁰ is the ideal target. Anything less than that temp will mean that the meat will be very tough and not at all enjoyable. It needs to cook at 250⁰ for many hours to break down all the connective tissue so it can pass the key test for brisket. When you cut a slice of the brisket and hold it up in your hand it should be so tender that it folds over you hand and you can easily pull a bite sized piece off the slice with your fingers. The brisket needs to be that tender to enjoy eating. Using an internal probe that constantly tells you the internal temp is the best way to do this. I use a unit with up to six probes so I can have one on the cooking surface next to the brisket letting me manage the temperature to be 250° at the cooking surface. The temperature gauge in the dome of the Kamado is a long way away from the cooking surface and will often show a very different temp than the probe at the cooking surface. I use another probe in each piece of meat being smoked to track their internal temp. Using a handheld probe that you poke into the meat requires you to open the Kamado every time you want to find the internal temp which is not good for your cooking time and you don’t know when The Stall starts or ends or just when it hits that target 200 -205⁰. For full brisket plan on about 1 ¼ hours per lb. 3-4 lb. brisket – 7-8 hours at 250⁰. Smaller cuts take significantly longer per lb. But cook to the internal temp, not to the minutes per pound.
Slow cooked smoked meat like brisket and pulled pork have something called The Stall during their cooking. Generally, around 160⁰ of internal temperature that temp will not change for up to a few hours and can even go down a few degrees. Science has determined that juices have come to the surface of the meat where they evaporate, and that evaporation has a cooling effect that slows down the cooking. You have two choices to deal with The Stall.
Factor it into your timing for the cooking. When I am doing a smaller 3-4 lb. brisket, Ican just let it keep cooking through The Stall and plan that it will be at least 8 hours on the grill and another hour to rest before eating the brisket. Getting the meat on the grill before 8 AM means I can have it for dinner that night even with The Stall.
The Texas Cheat – when you hit the stall, take the brisket off the grill and wrap it in foil sealing it and put it back on the grill. The foil seal takes away the ability to evaporate so the cooking time can be an hour or two faster than just cooking through The Stall. You can also wrap it in pink butcher’s paper if you have a roll and tie it with twine. The heat is low enough that the paper does not catch on fire. When I am doing a larger brisket, the cooking time is long enough that I use the Texas Cheat and when I don’t want to get up really early i will also do it for a smaller brisket. There is no taste impact. It got the name Texas Cheat from when it started to be used in BBQ competitions. Since I keep a temp probe in the brisket the entire cooking time, I found it better to wrap around the probe than to try to reinsert it into the right spot through the foil or paper. When the internal temp gets to 195°, take the brisket out of the wrap and let the surface dry out and crisp up a little while it gets to the 205° final internal temp.
I use Hickory wood for the smoke. About six chunks, 2-3 inches on a side. small wood ships are not good for this long smoking process. I saw a very good write up that soaking the wood in water is not good for the smoking, so I don’t do that. Oak or Pecan is also good with brisket. The fruit woods like Apple and Cherry are pretty mild for brisket. Mesquite is a matter of taste. It will give the strongest smoke flavor but not everyone wants that strong a smoke taste and some people are allergic to Mesquite. I don’t use any Mesquite. Hickory is the heaviest smoke that I use. According to Chef Michael Symon, the meat will absorb smoke flavor until it gets to 140° internal temp but after it gets to that temp, it does not absorb any additional smoke. You could even move it to your kitchen oven at 250° once it gets to that temp if you have issues like weather that make keeping it on the grill difficult.
When the internal temp is at 180⁰, or when you take off the foil if you used the Texas Cheat, you can do a probe test with a skewer or fork to check that the meat is starting to be tender in every portion of the brisket because the probe goes in easily. The thinnest portion of the brisket maybe the last to be tender. Keep cooking until the brisket is totally tender, when the internal temp comes up to 200 – 205⁰.
Dry Rub one hour before putting on the grill
1/8 cup each of kosher salt and ground black pepper for a 4 lb. brisket. This is the standard for Texas style brisket, which is generally considered the home of the best brisket. Adjust accordingly for larger briskets. Shake well in a container to mix them thoroughly. The heavier salt will sink to the bottom so reshake periodically to keep the mixture even. Pat the rub on all sides of the brisket. Sprinkle it across the brisket, not making a crust to cover the meat. Does not need to be rubbed in. Put the rub on an hour before it goes on the grill and let it sit on the counter to come up to room temperature. The picture shows the brisket with the rob on it.
Use a drip pan under the rack that the brisket is on. Put 1 cup water and ¼ cup apple cider vinegar in the drip pan. I sometimes add a thickly sliced onion but I don’t think that it really adds much flavor. The picture shows the multilevel cooking environment I can set up with my Kamado. the white circle are the deflector places over the coasl creating an indirect heat. they are in th elowest position so just the smoke comes up around them. The drip pan is on the racks in the upper position and I have the temp probe for the cooking tem there as well. The brisket goes on the upper rack above the drip pan. I can also use the upper rack to do larger amounts of food like multiple tacks of ribs in cone cooking. The drip pan should be a throw away aluminum pan because the residue after 8+ hours of cooking will not be removable or useable for anything.
The grill should be lit for an hour before the meat goes on the Kamado so the ceramic is uniformly up to temperature. Adjust as needed for the smoker you have to get it to a stable 250⁰.
Add the hickory chunks and put the deflector plates in place and close up the smoker until the smoke runs clear. The heavy white smoke that comes out initially can add an unpleasant taste so wait a few minutes for the wood to start to put out clear smoke and then put the drip pan on the accessory rack, put the racks in place in the upper position and then put the brisket on the rack with the fat side and close the grill. For all BBQ the fat side of the meat should be closest to the heat source so I put the brisket fat side down.
Keep the cooking temperature where the beef is sitting on the rack as close to 250⁰ as possible for the full cooking time. The thermometer on the Kamado is up at the top of the dome and not representative of the temperature down where the brisket is cooking. I use a second probe on the rack right next to the brisket to monitor the cooking temperature and have both probes sending me the internal and cooking temps to my phone. I can then adjust the two vents to get the 250° cooking temp that I want. There is no need to open the grill any time during the cooking. That will only slow down the cooking on a Kamado. No need to mist or baste the brisket during cooking. If you want to do the Texas Cheat and wrap the brisket when it stalls around 160°, you need to open the Kamado to do that but close it up while you are doing the wrap. When meat is at least 200⁰ internal temp (205° is better) and fully tender, wrap in foil and hold for an hour and then carve.
Carving the Brisket
Slice across the grain with slices about 1/8” thick. The grain runs different for the thin part of the brisket, called the “flat” than it does for the thick part of the brisket called the “point”. If you have the full brisket, separate it into the two muscles so you can carve each against the grain using the approach mentioned above.
Not thin slices like sliced meat from the deli. The slices should be about the thickness of a pencil.
Test – does a slice fold over when held and easily come apart with a tug of the hand. That is a perfectly cooked brisket.
BBQ Sauce for the brisket
For most BBQ the sauce is an accompaniment that is added at the table by each person in the amount they want and, if several sauces are offered, the style sauce they want. Not everyone agrees and the most argument for having sauce on the meat during smoking is about ribs. For Texas style brisket, no sauce is ever added during the cooking. Below is the recipe for my Hot & Sweet sauce that I serve with my brisket. Adopted from Aaron Franklin’s excellent YouTube video on brisket. I prefer to make the sauce the day before I smoke the brisket.
½ cup – good for 5-6 people. Really good sauce so no problem if you have some left over.
1 cup – larger group eating a larger brisket and some sauce for left over.
Ingredients:
1/2 Cup
1 Cup
1 Tbs
2 Tbs
Butter
1 Tbs
2 Tbs
Finely chopped onion
1/2 cup
1 cup
Catsup
1 Tbs
2 Tbs
Apple Cider vinegar
1/2 Tbs
1 Tbs
Light brown sugar
1/8 cup
1/4 cup
Molasses – If you don’t have some good blackstrap molasses you can use honey. But I think the molasses really makes this sauce different
3/4 Tsp
1 1/2 Tsp
Chili powder – I use a mixture of Guajillo, Ancho, and Chipotle with maybe a tiny dash of Habanero
1/4 Tsp
1/2 Tsp
Kosher salt and ground black pepper – can use some of the left over rub if you did not use it all
3 Tbs
1/4 cup
Orange juice
1 dash
2 dashes
Worcestershire sauce
Heat – you can use any relatively mild chili powder or combinations. Ancho adds some smokey flavor. Chipotle adds some depth. Habanero adds a lot of heat so be very careful with it if you add that to the mix. Add to get the level of kick that you want but you can’t really go backwards to make it less spicy. You need to let the sauce simmer for at least 15 minutes after adding any chili powders to get any idea of the impact. It will only be the next day where you will taste the real heat, generally a little less kick that shows up a little later in the taste. I don’t have measurements if you want to use different chili peppers instead of powder so I can only say add to taste and again, that taste will evolve considerably over time. The goal of this sauce is to get the upfront sweet taste first and have the heat kick in later to get the hot and sweet taste.
Sweetness – Goal is to get the upfront sweet taste first and have the heat kick in late for the hot and sweet taste. Less sweet than most store-bought sauces.
Approach:
In a stainless-steel pot melt the butter and cook the onions in the melted butter. Aluminum pans may react a little with some of the ingredients so stainless steel is recommended. When the onions are translucent add the other ingredients and, using a very large wisk, combine them together. Let simmer for at least 20 minutes and taste. Correct to your taste buds and let simmer a little longer and then remove from the heat.
Three choices:
Save as is with the onion making it a little lumpy. The finer the chopped onion, the less this is a problem. This is what I generally do.
Put in the blender to liquify the onion. If you use any chili peppers instead of powder blending is recommended
I have done to live virtual wine tastings for Pinot Noir. Based on the feedback from those two I have recorded a wine tasting that you can access on youtube so you can get the wines that are discussed and join this wine tasting at your convenience!
The link to that recorded wine tasting is https://youtu.be/llKu8Ta84os . Because it is free, youtube will add their ads to it.
I have recorded a virtual wine tasting for Pinot Noir and posted that on youtube. You can get the wines for that tasting and then stream it and enjoy this tasting when, where , and with whomever you you would like. The link to that recorded wine tasting is https://youtu.be/llKu8Ta84os . Because it is free, youtube will add their ads to it.
I suggest that you open all five wines about 30 minutes before you start the recording to give them a chance to breathe. I also suggest that you have five wine glasses for each person doing this wine tasting so you will be able to compare the wines from the four major regions. Having a glass for each of the wines will let you do that.
The wines for this wine tasting, and recommendations on where to get them are below. The approach here is to start with a simple Pinot Noir table wine to introduce the grape and then compare wines in the same $18-25 price range for the four major regions producing excellent Pinot Noir: California, New Zealand, Oregon, and the Burgundy region of France.
Castel Rock Pinot Noir Willamette Valley – Sources:
Total Wine carries it in many stores for $13. Check on line if they have it in a store near you.
Web stores the generally carry this wine: Saratoga Wine Exchange – $12, B-21 – $13, WineDeals.com – $13
Wine.com appears to have stopped carrying this wine after the 2017 vintage but you can check if that has changed
Castel Rock makes 9 different Pinot Noir wines so make sure you get the one from the Willamette Valley which is the one we will start this wine tasting with. Very little variation form year to year so any vintage will be fine.
Raeburn Pinot Noir 2020 – Sources:
Wine.com – $25
Total Wine – $19
MacArthur Beverages in DC – $19
Online wine stores that generally carry this wine: B-21 – $22, Mission Wine & Spirits – $20, The Wine Buyer – $20
Oyster Bay Pinot Noir 2020 – Sources:
Wine.com – $16
Total Wine – $14
Online wine stores that generally carry this wine: GarysWine.com – $15, Empirewine.com – $14, Wine Republic – $15
Willamette Valley Vineyards Whole Cluster Pinot Noir 2019 – Sources:
Wine.com – $26
Total Wine – $19
Online wine stores that generally carry this wine: Saratoga Wine Exchange – $18, Garyswine.com – $20
Online wine stores that generally carry this wine: B-21 – $21, 305 Wines – $21
If you have trouble finding these wines you can check www.wine-searcher.com and put in the wine you are looking for and they will give you a list of web sites that have it for sale. I welcome your feedback on this recorded virtual wine tasting.

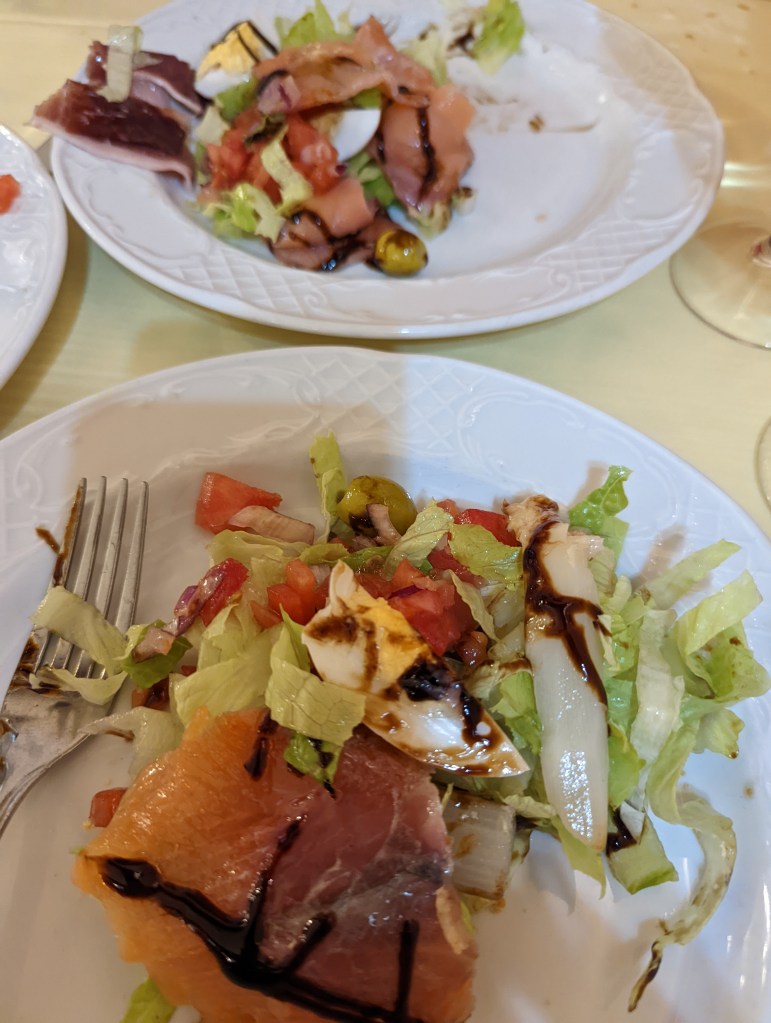

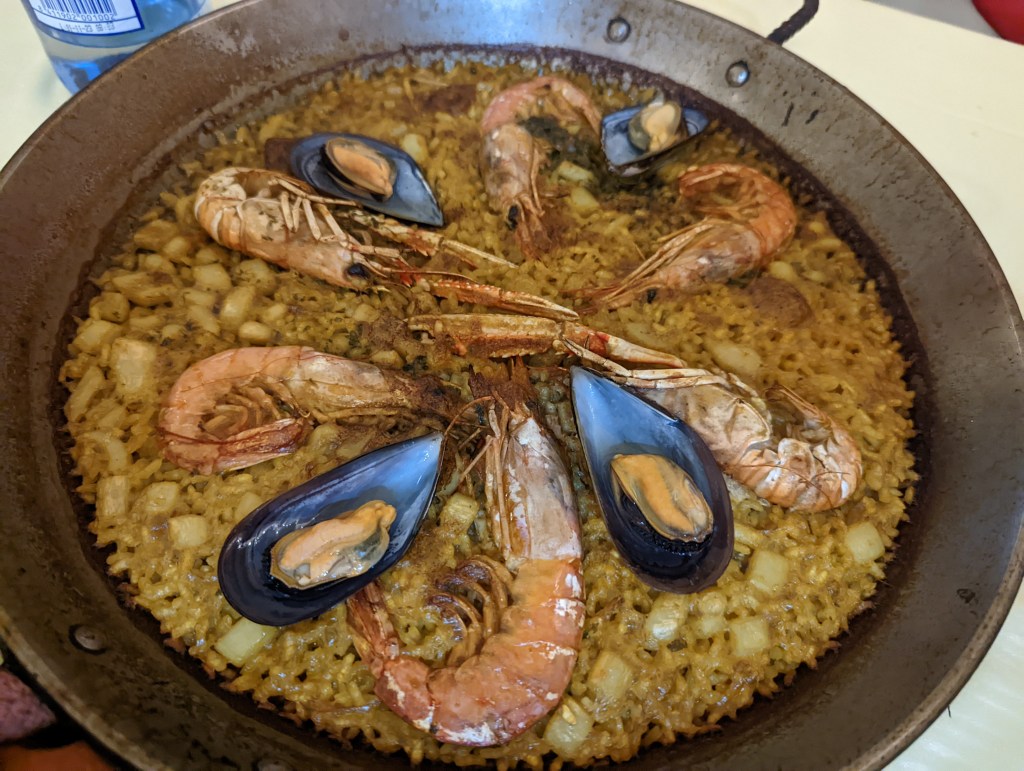
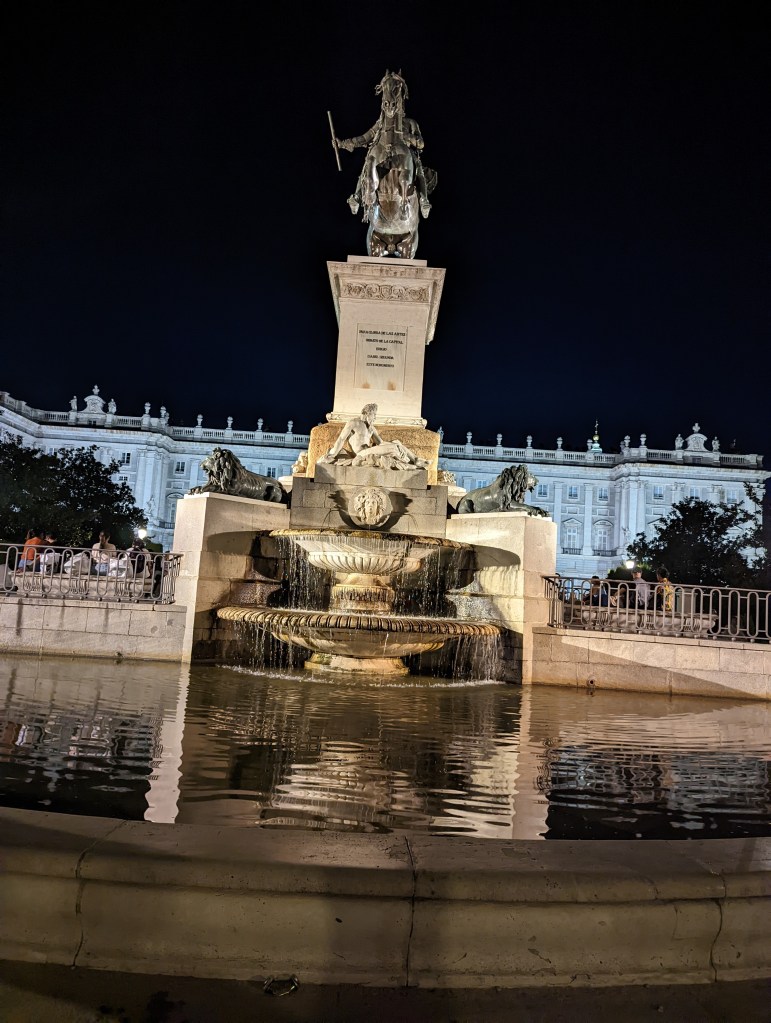
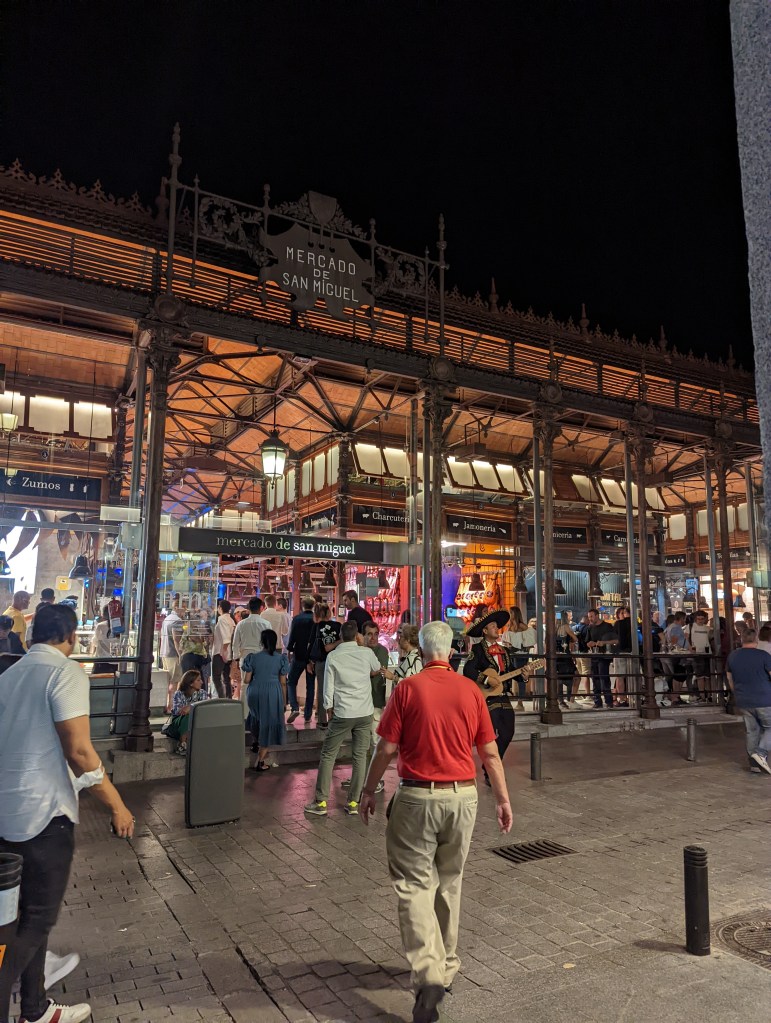
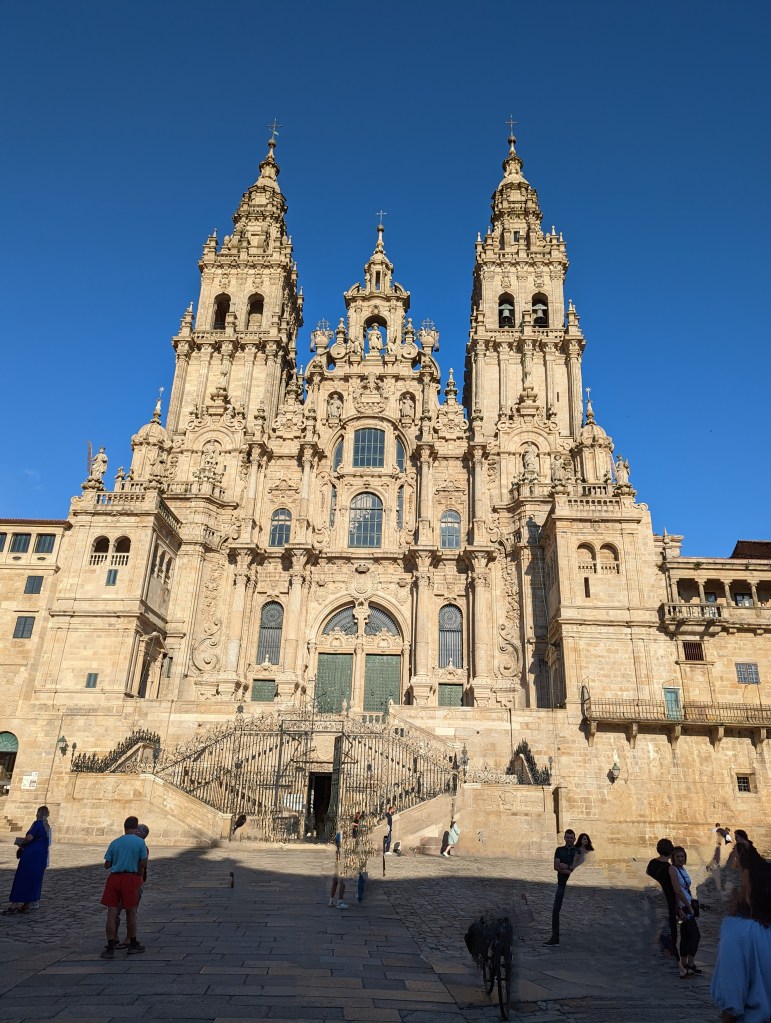
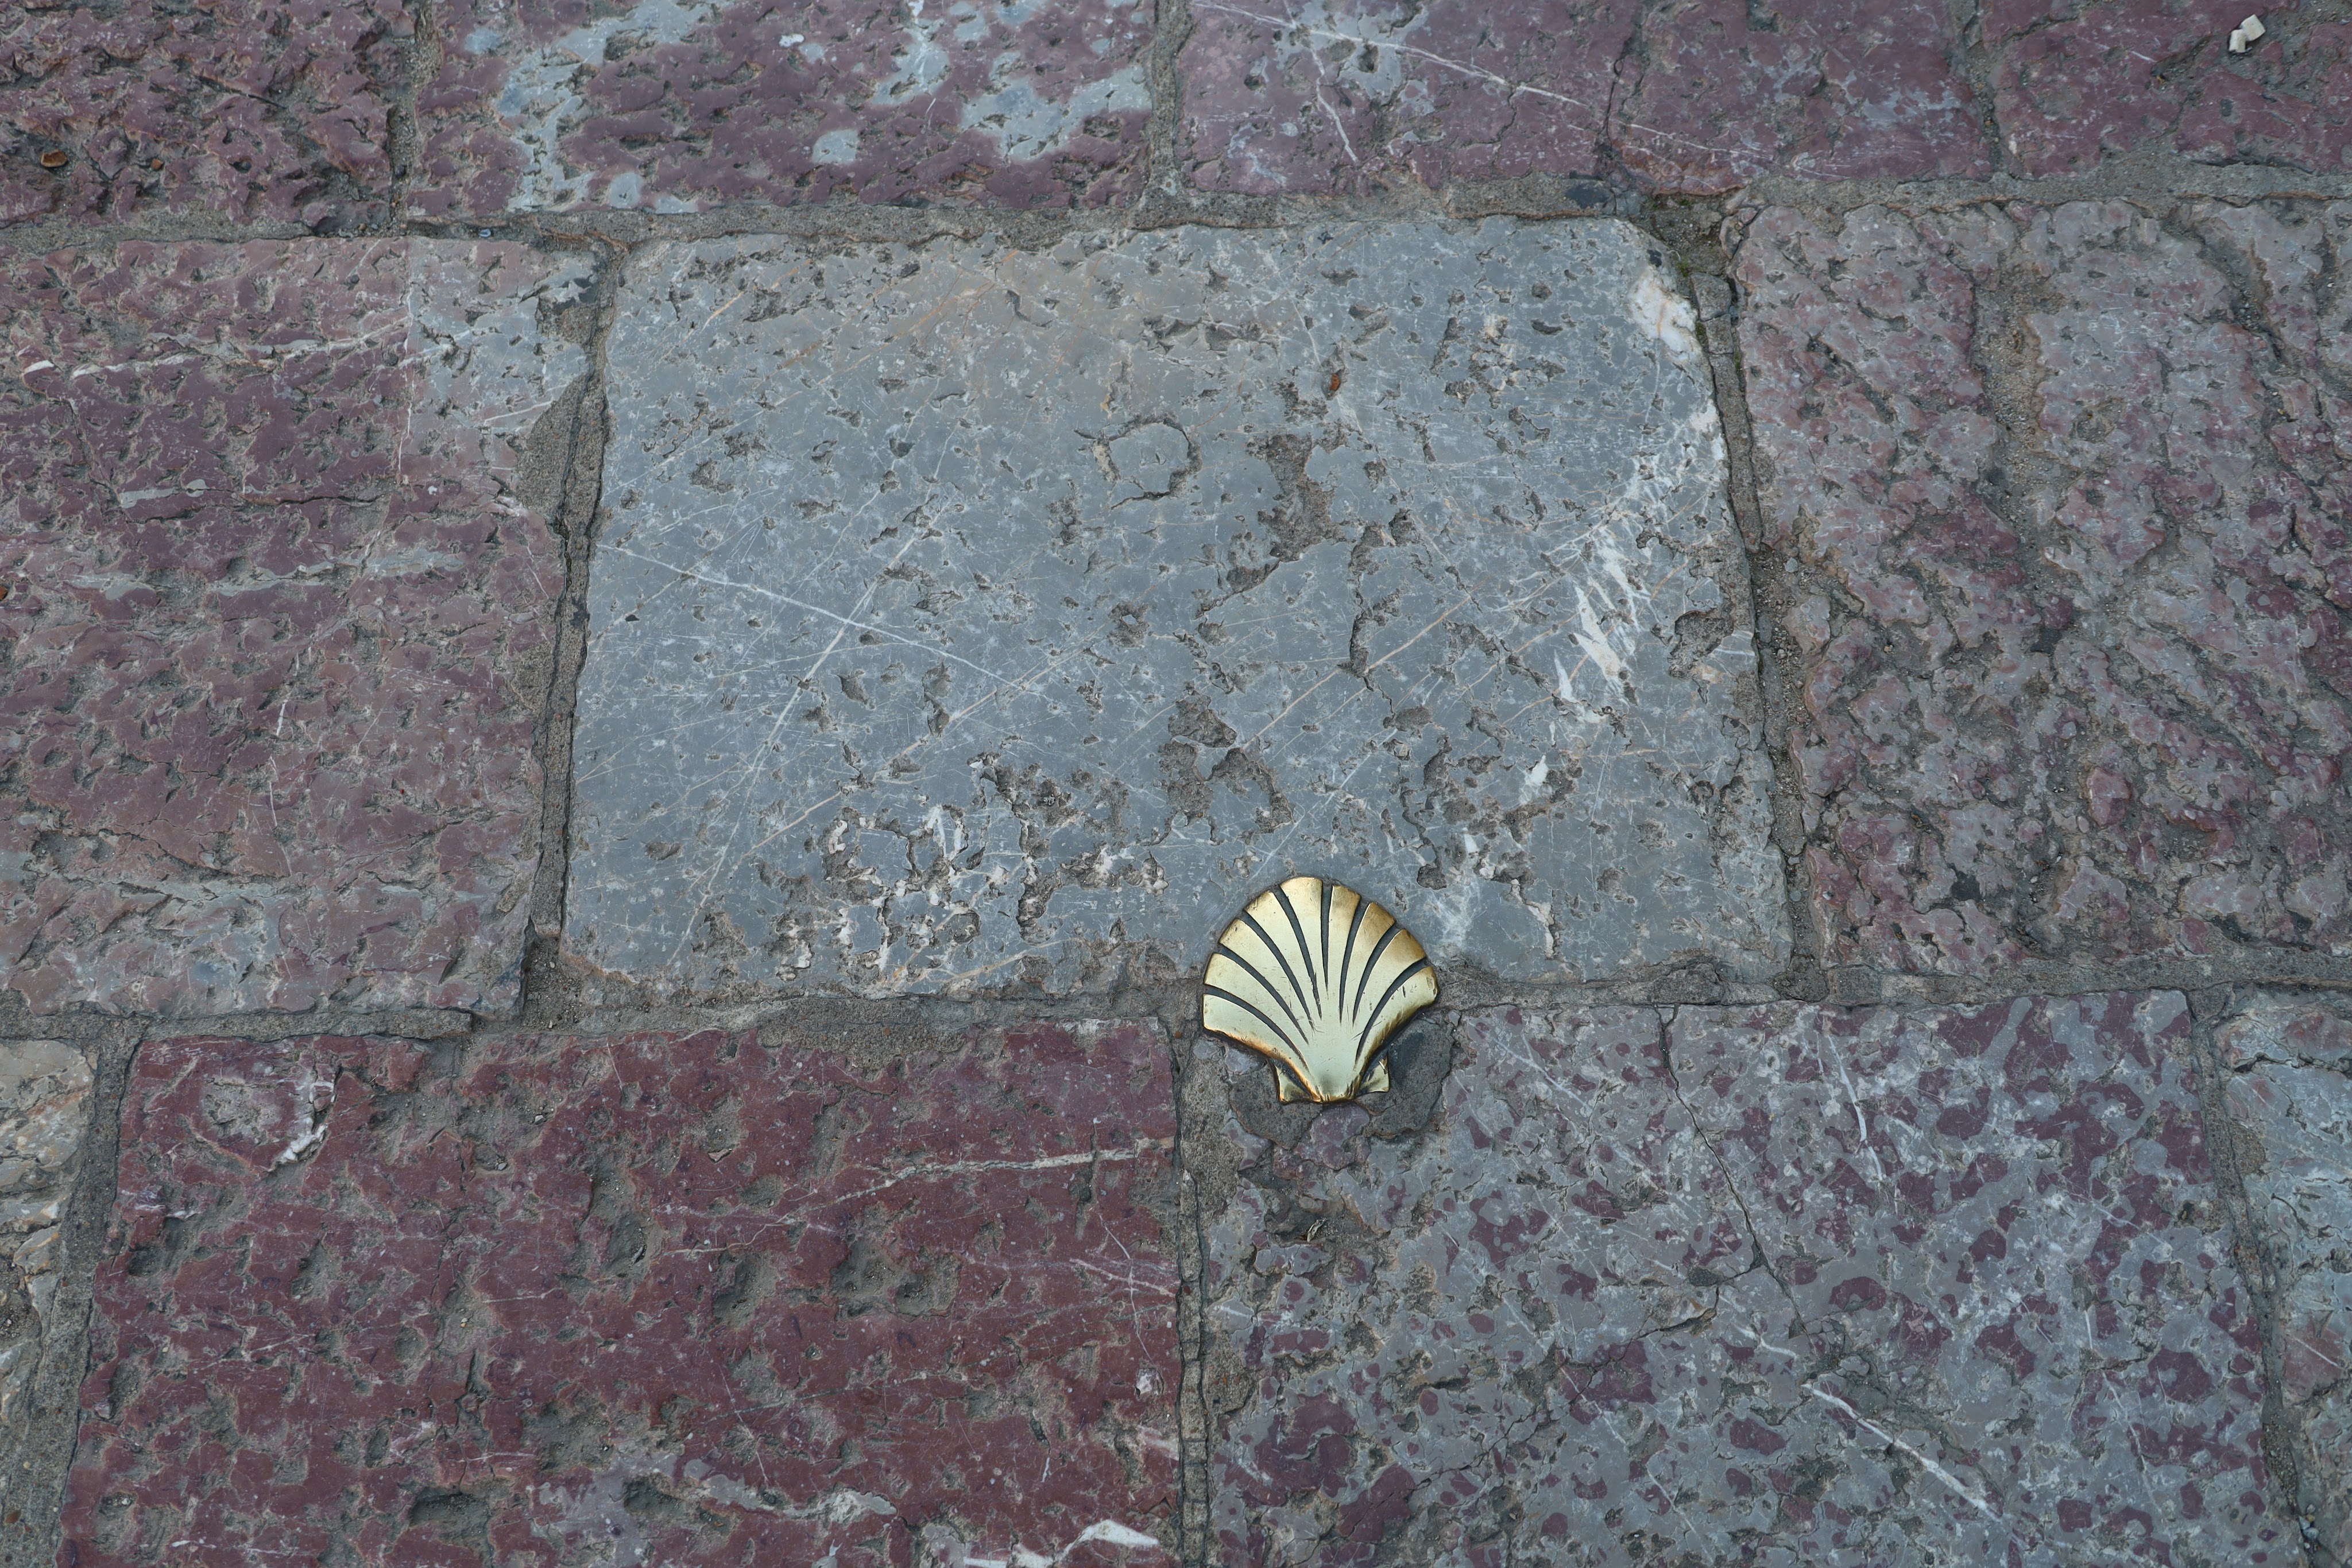

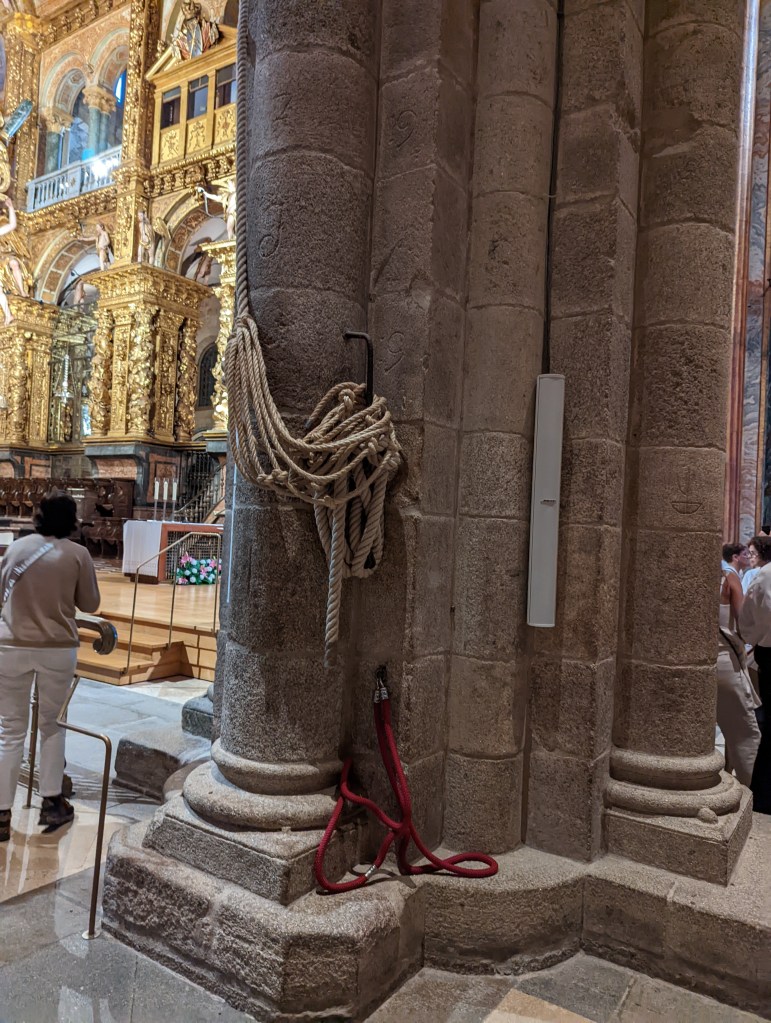
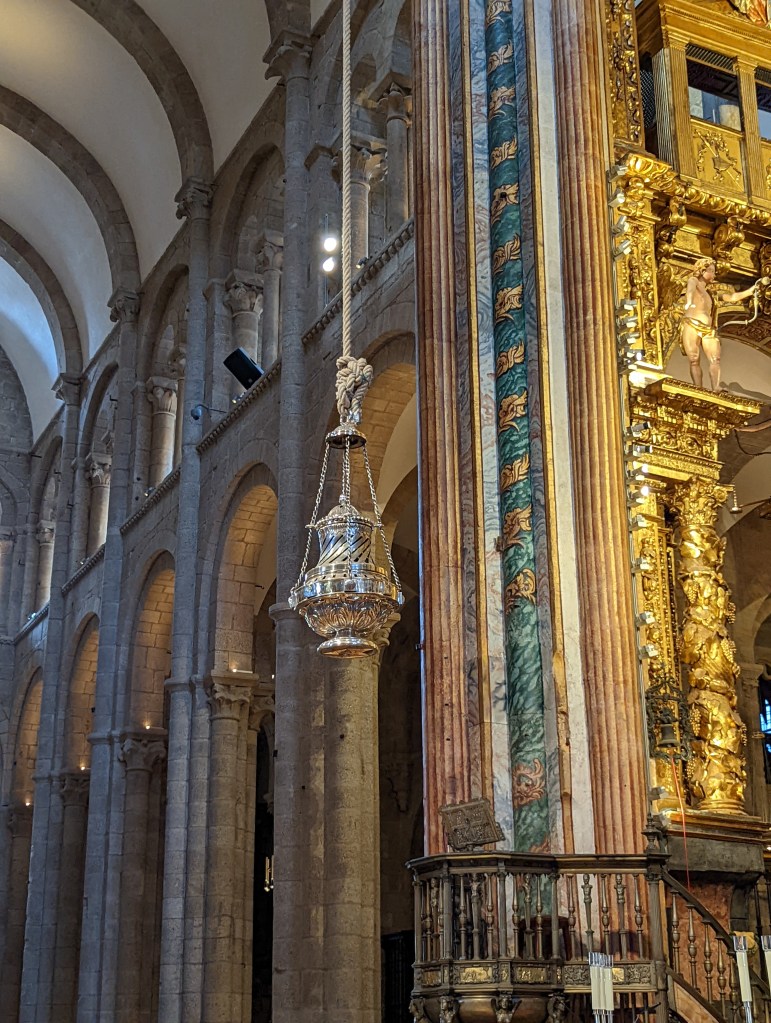
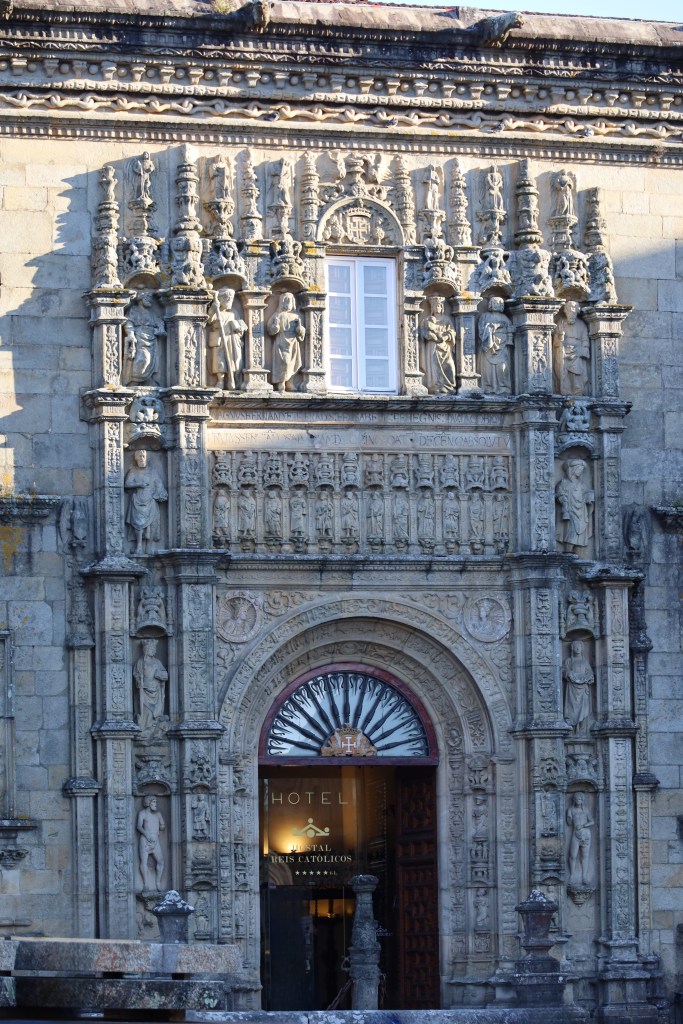
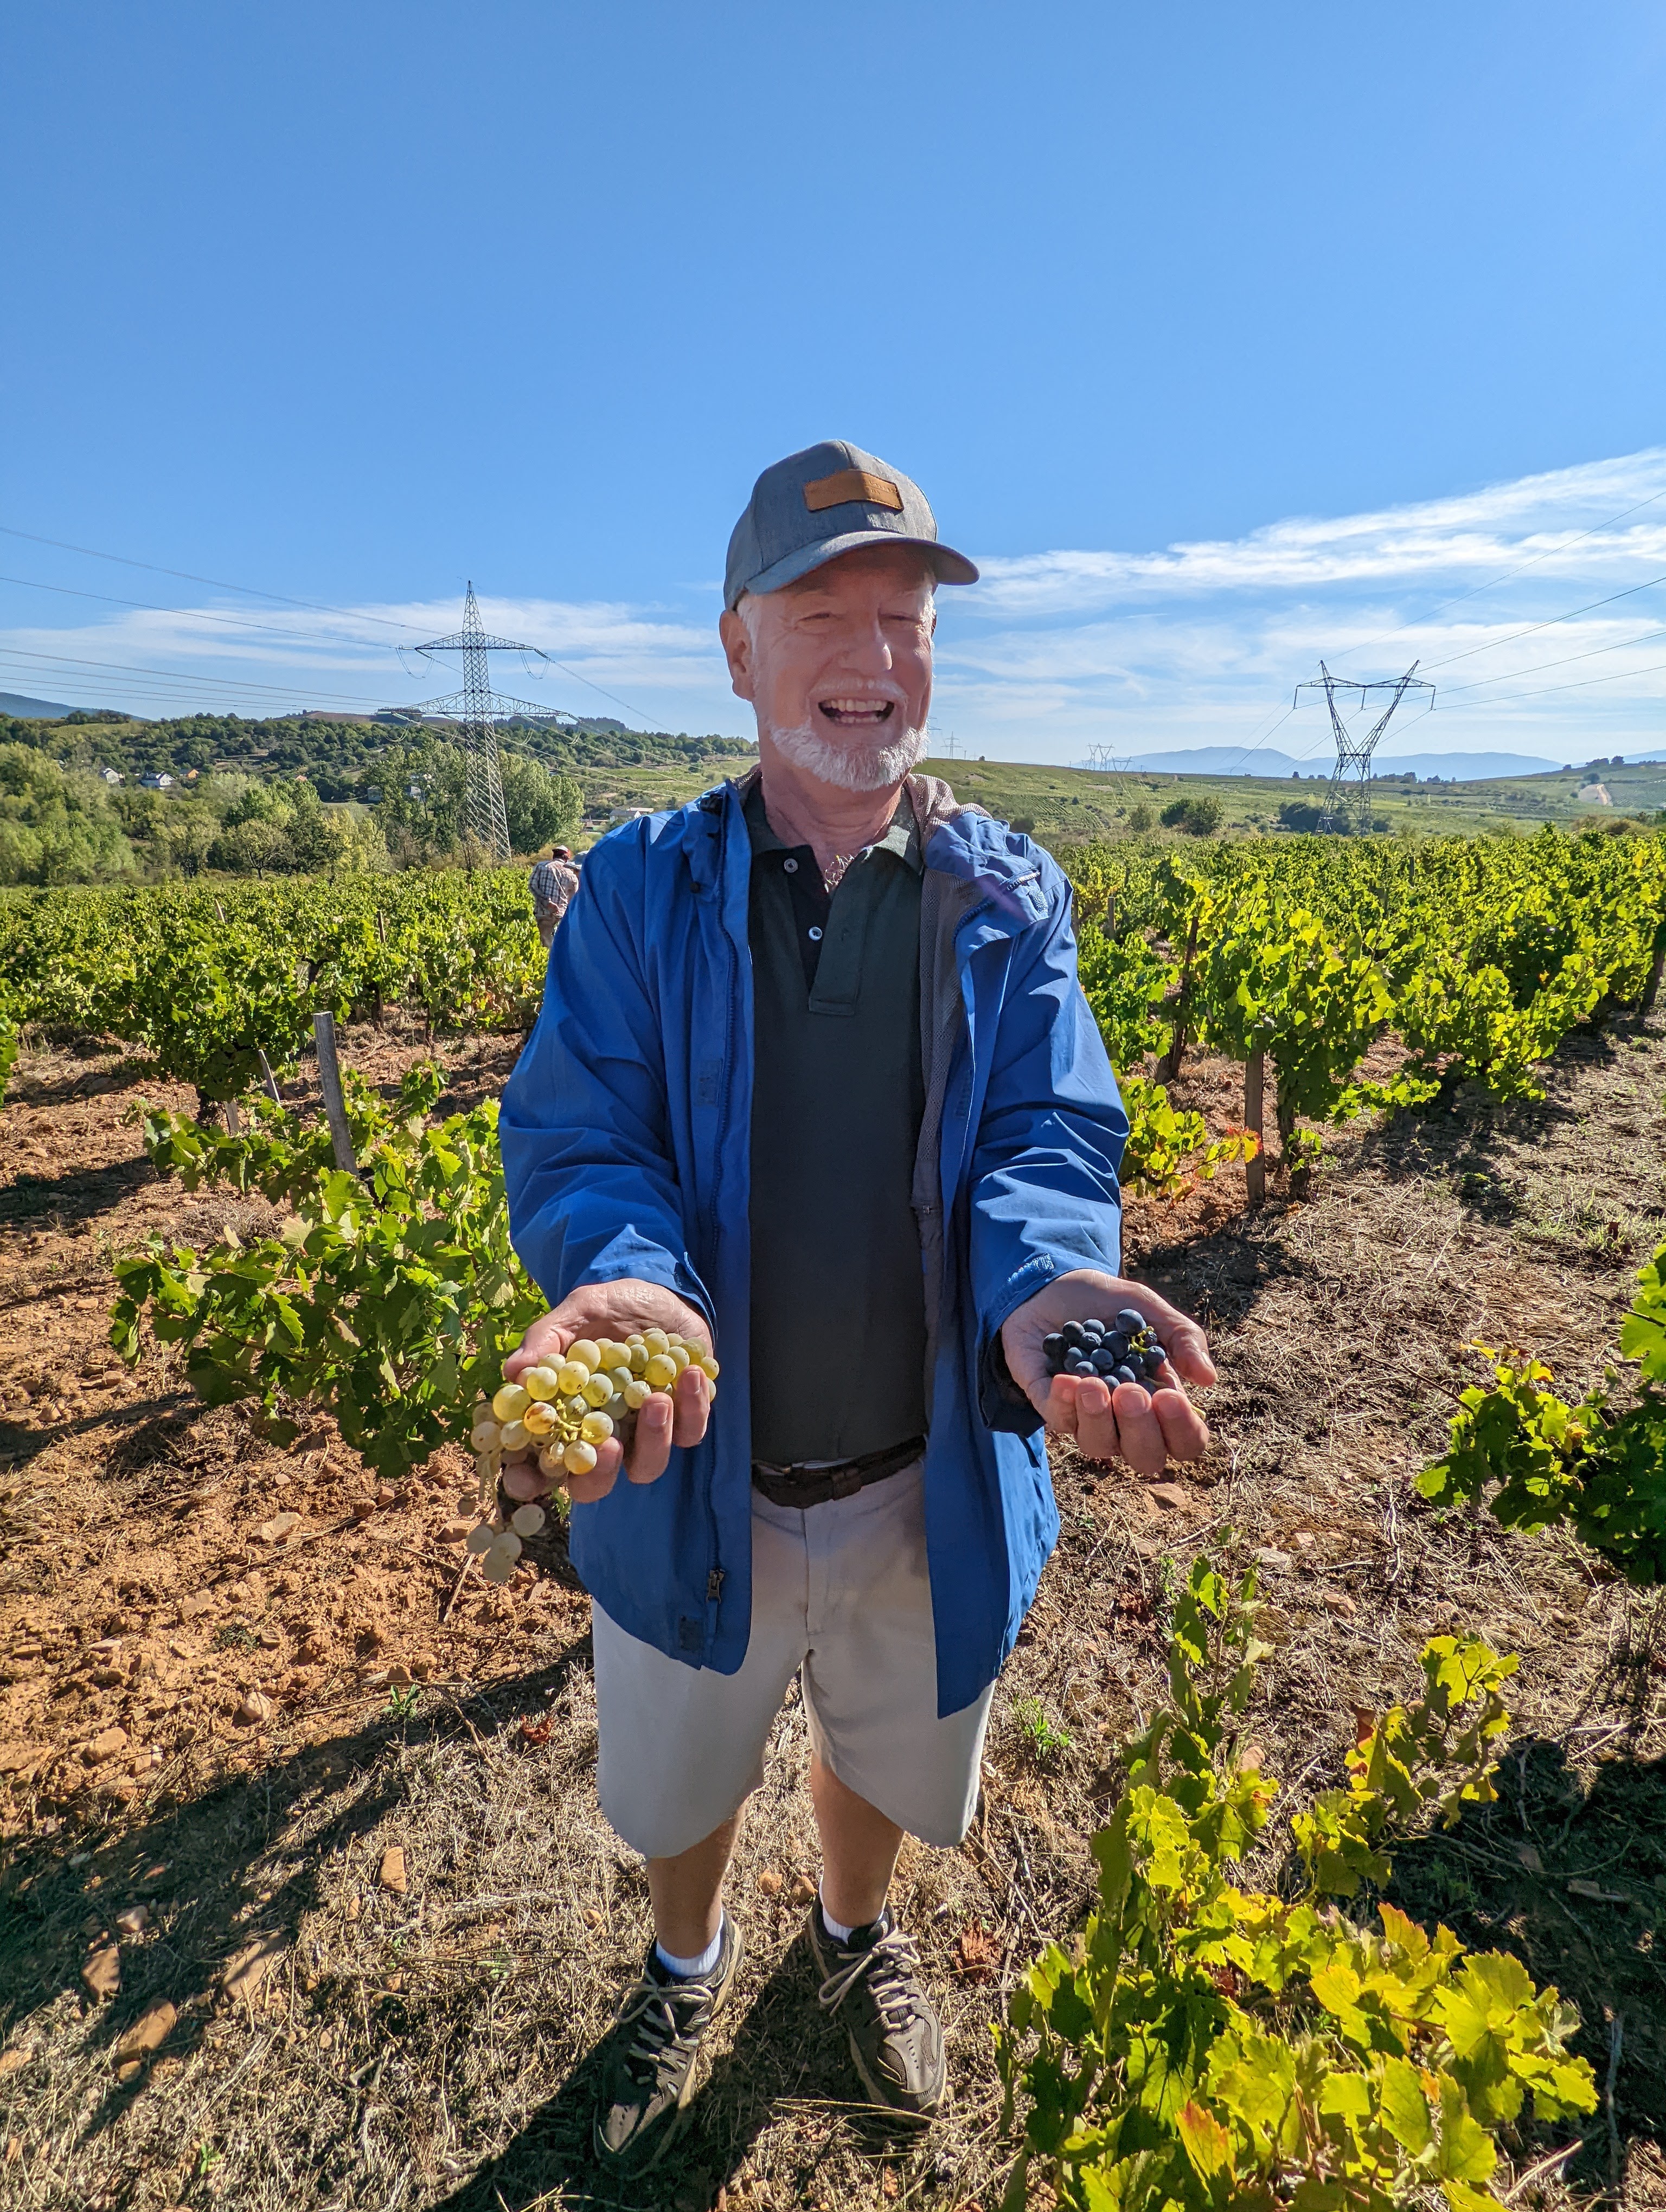
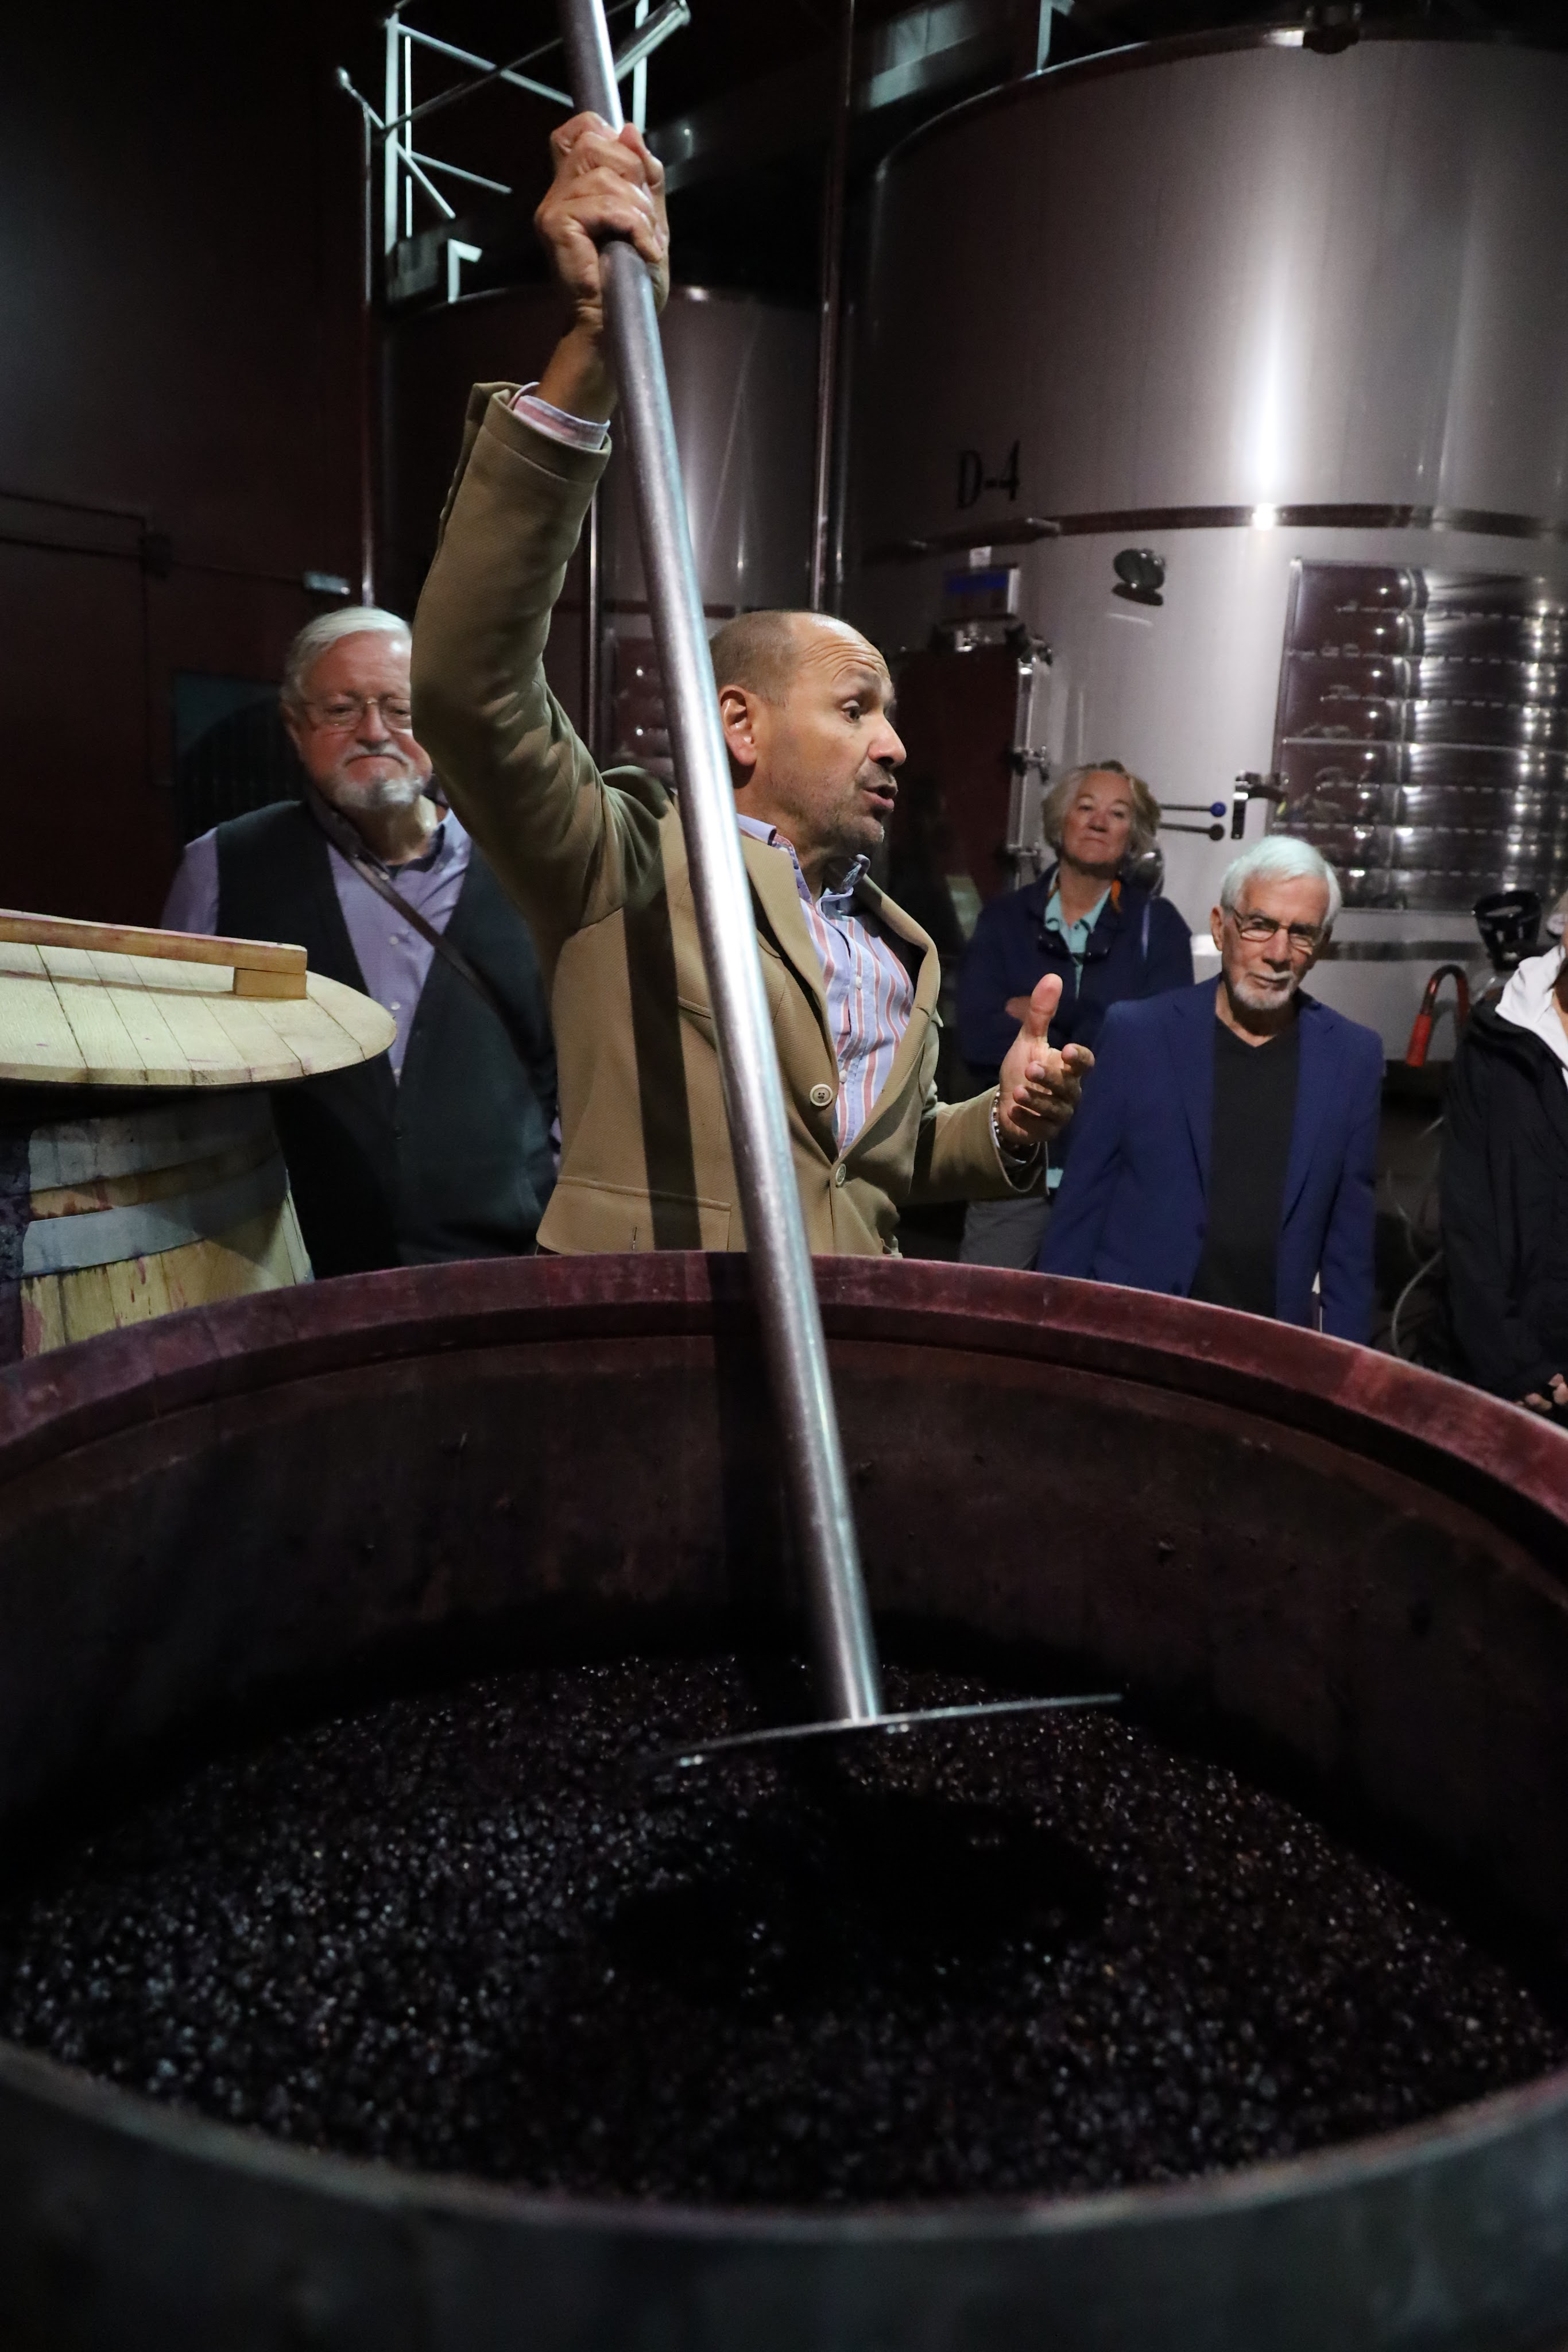
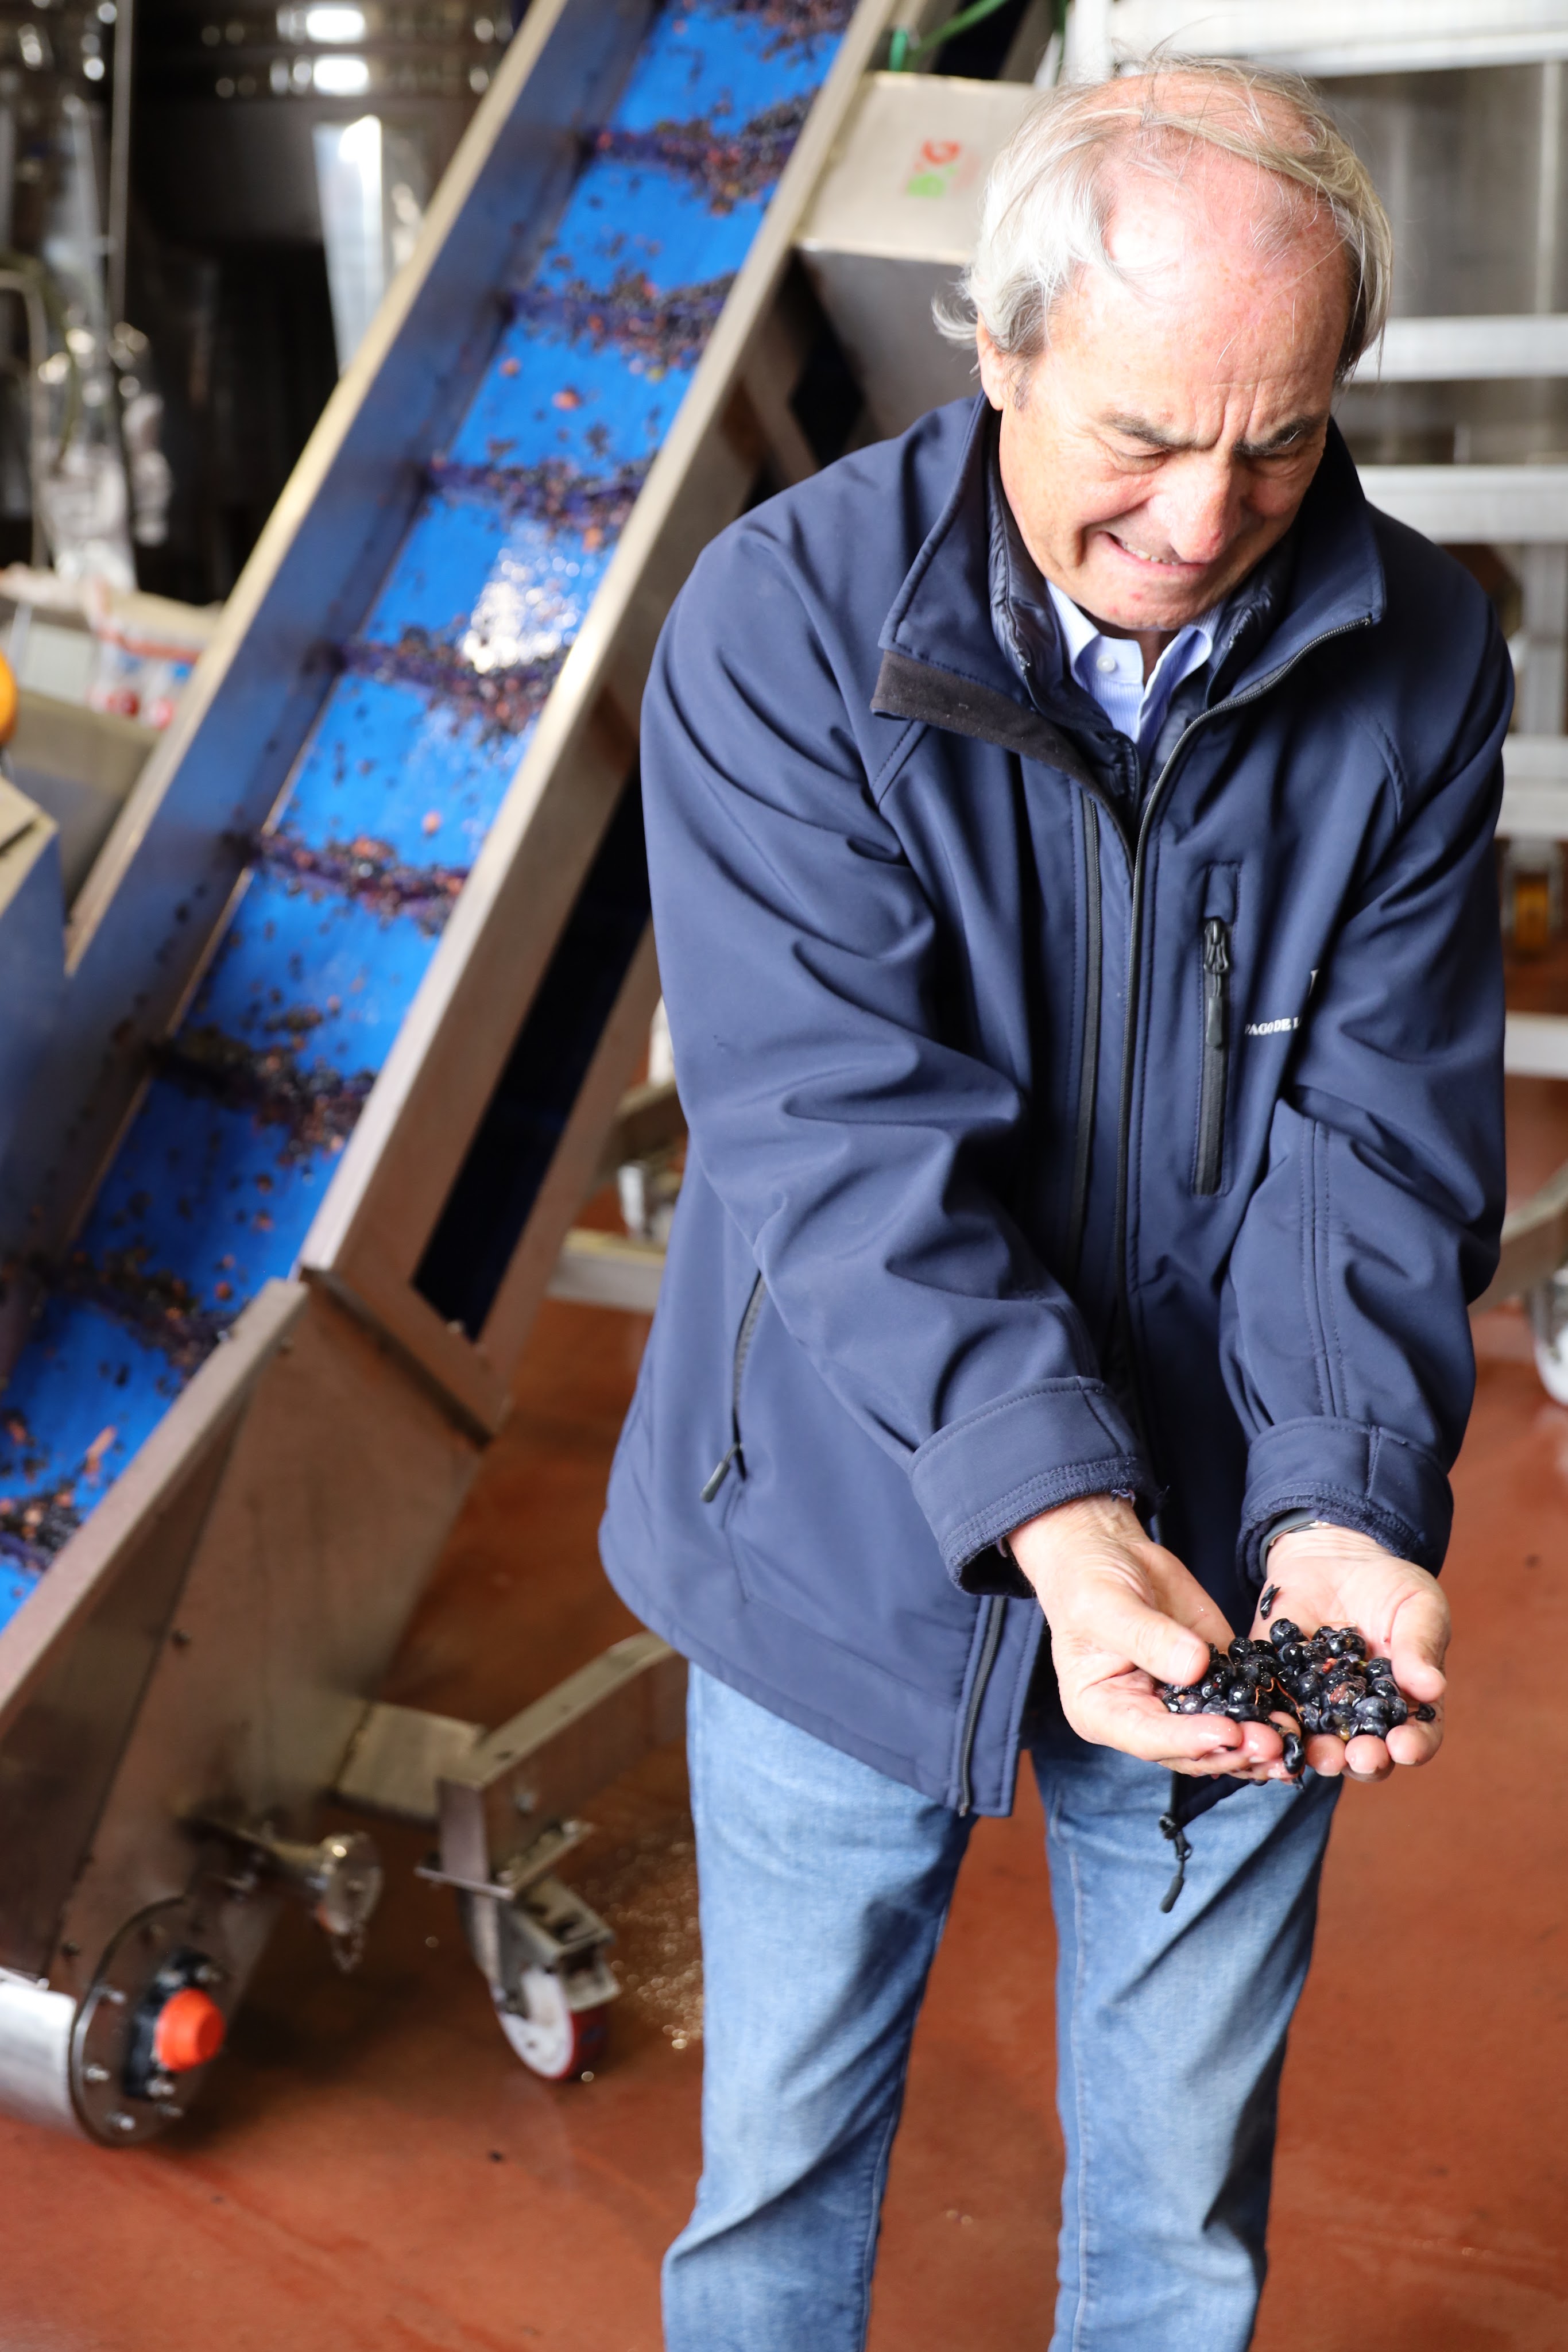
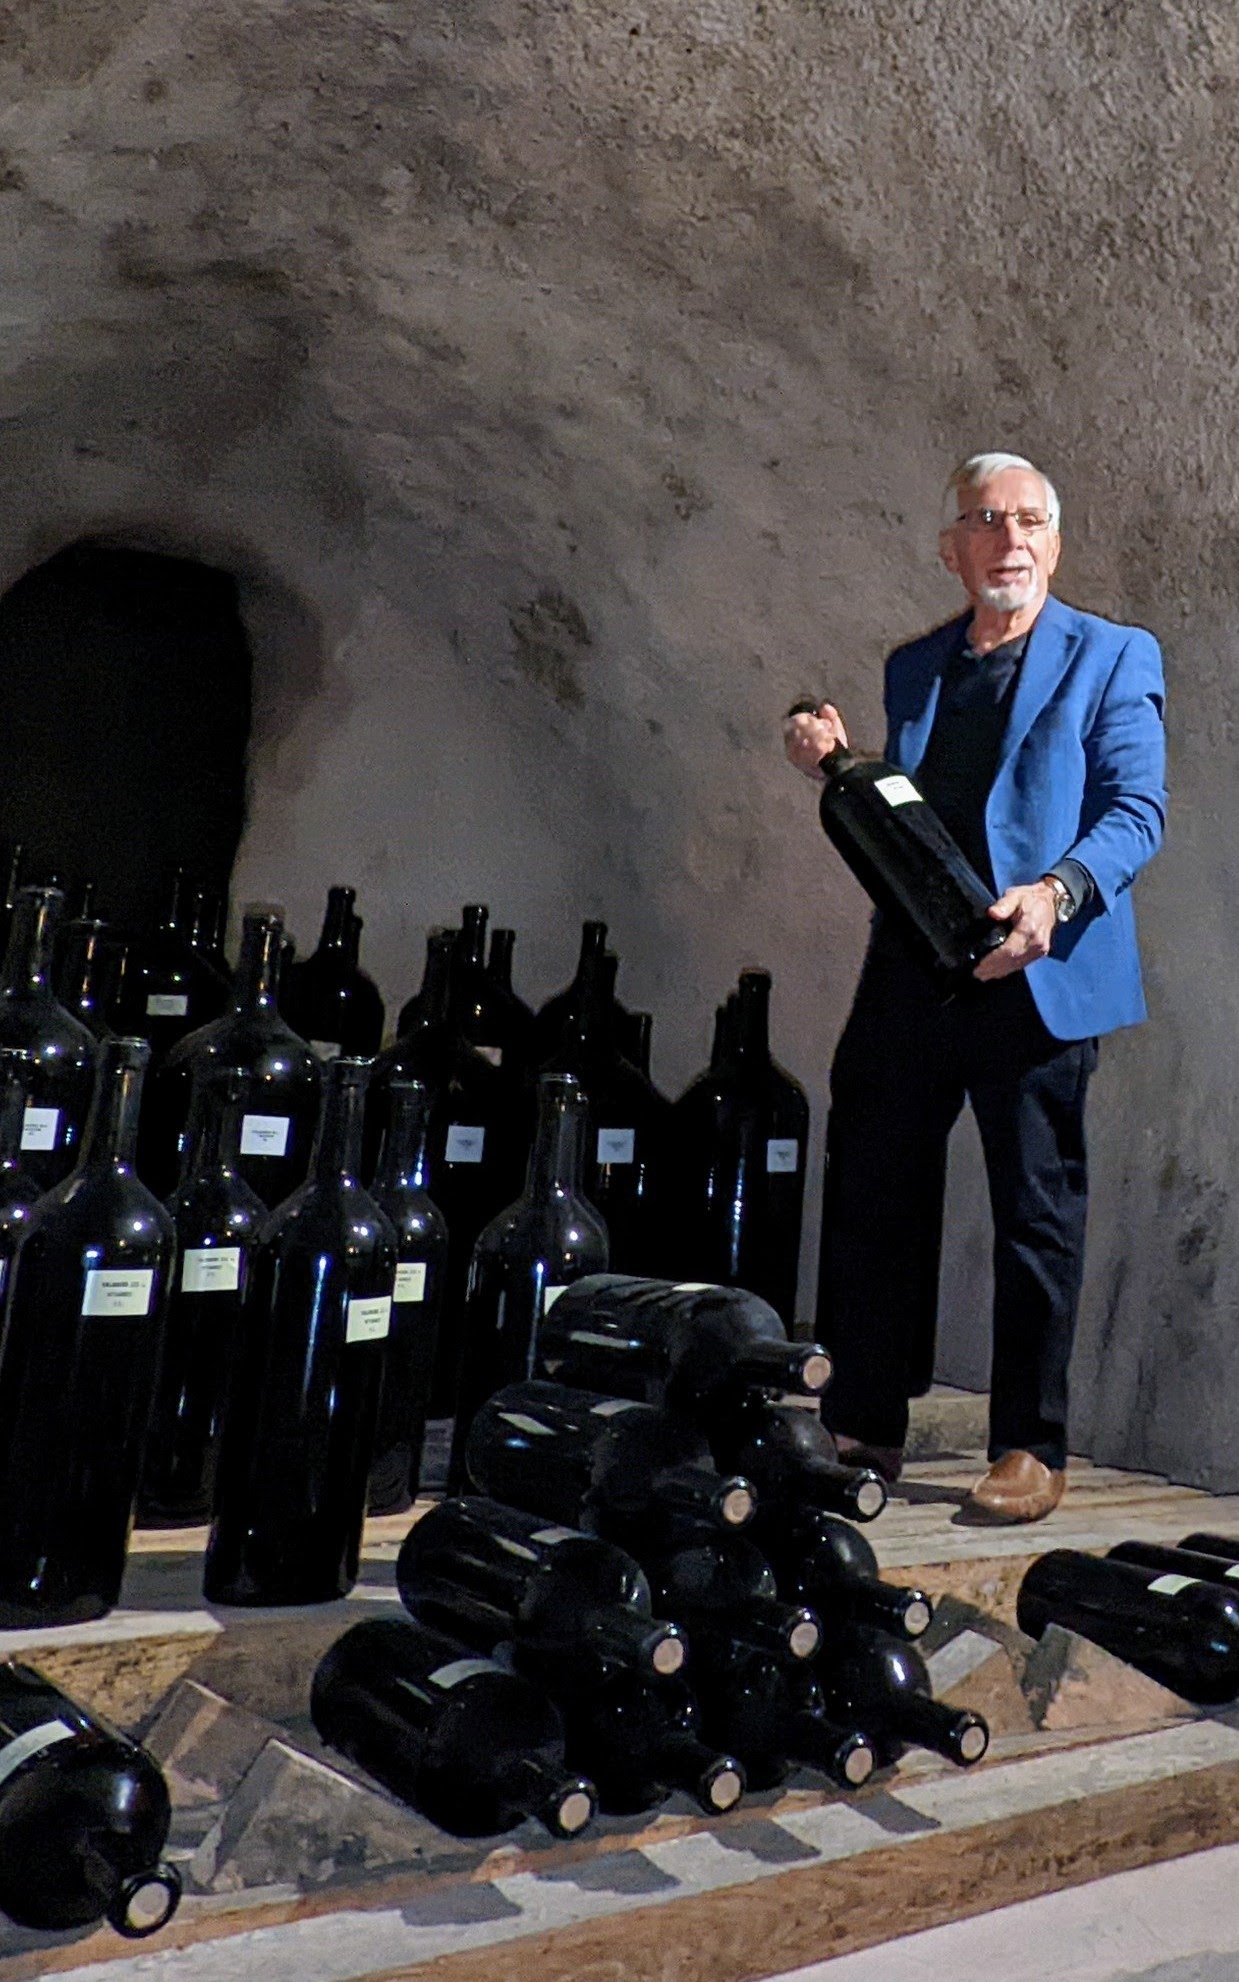

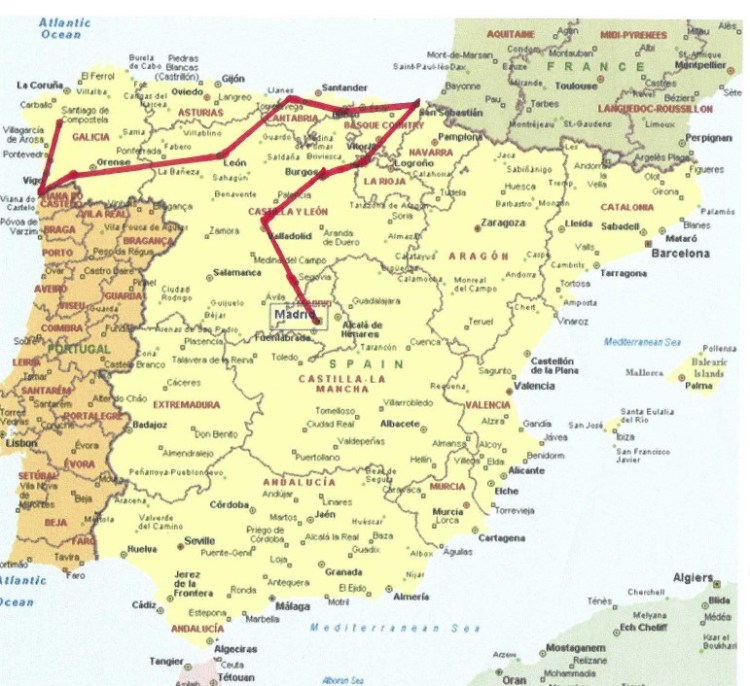
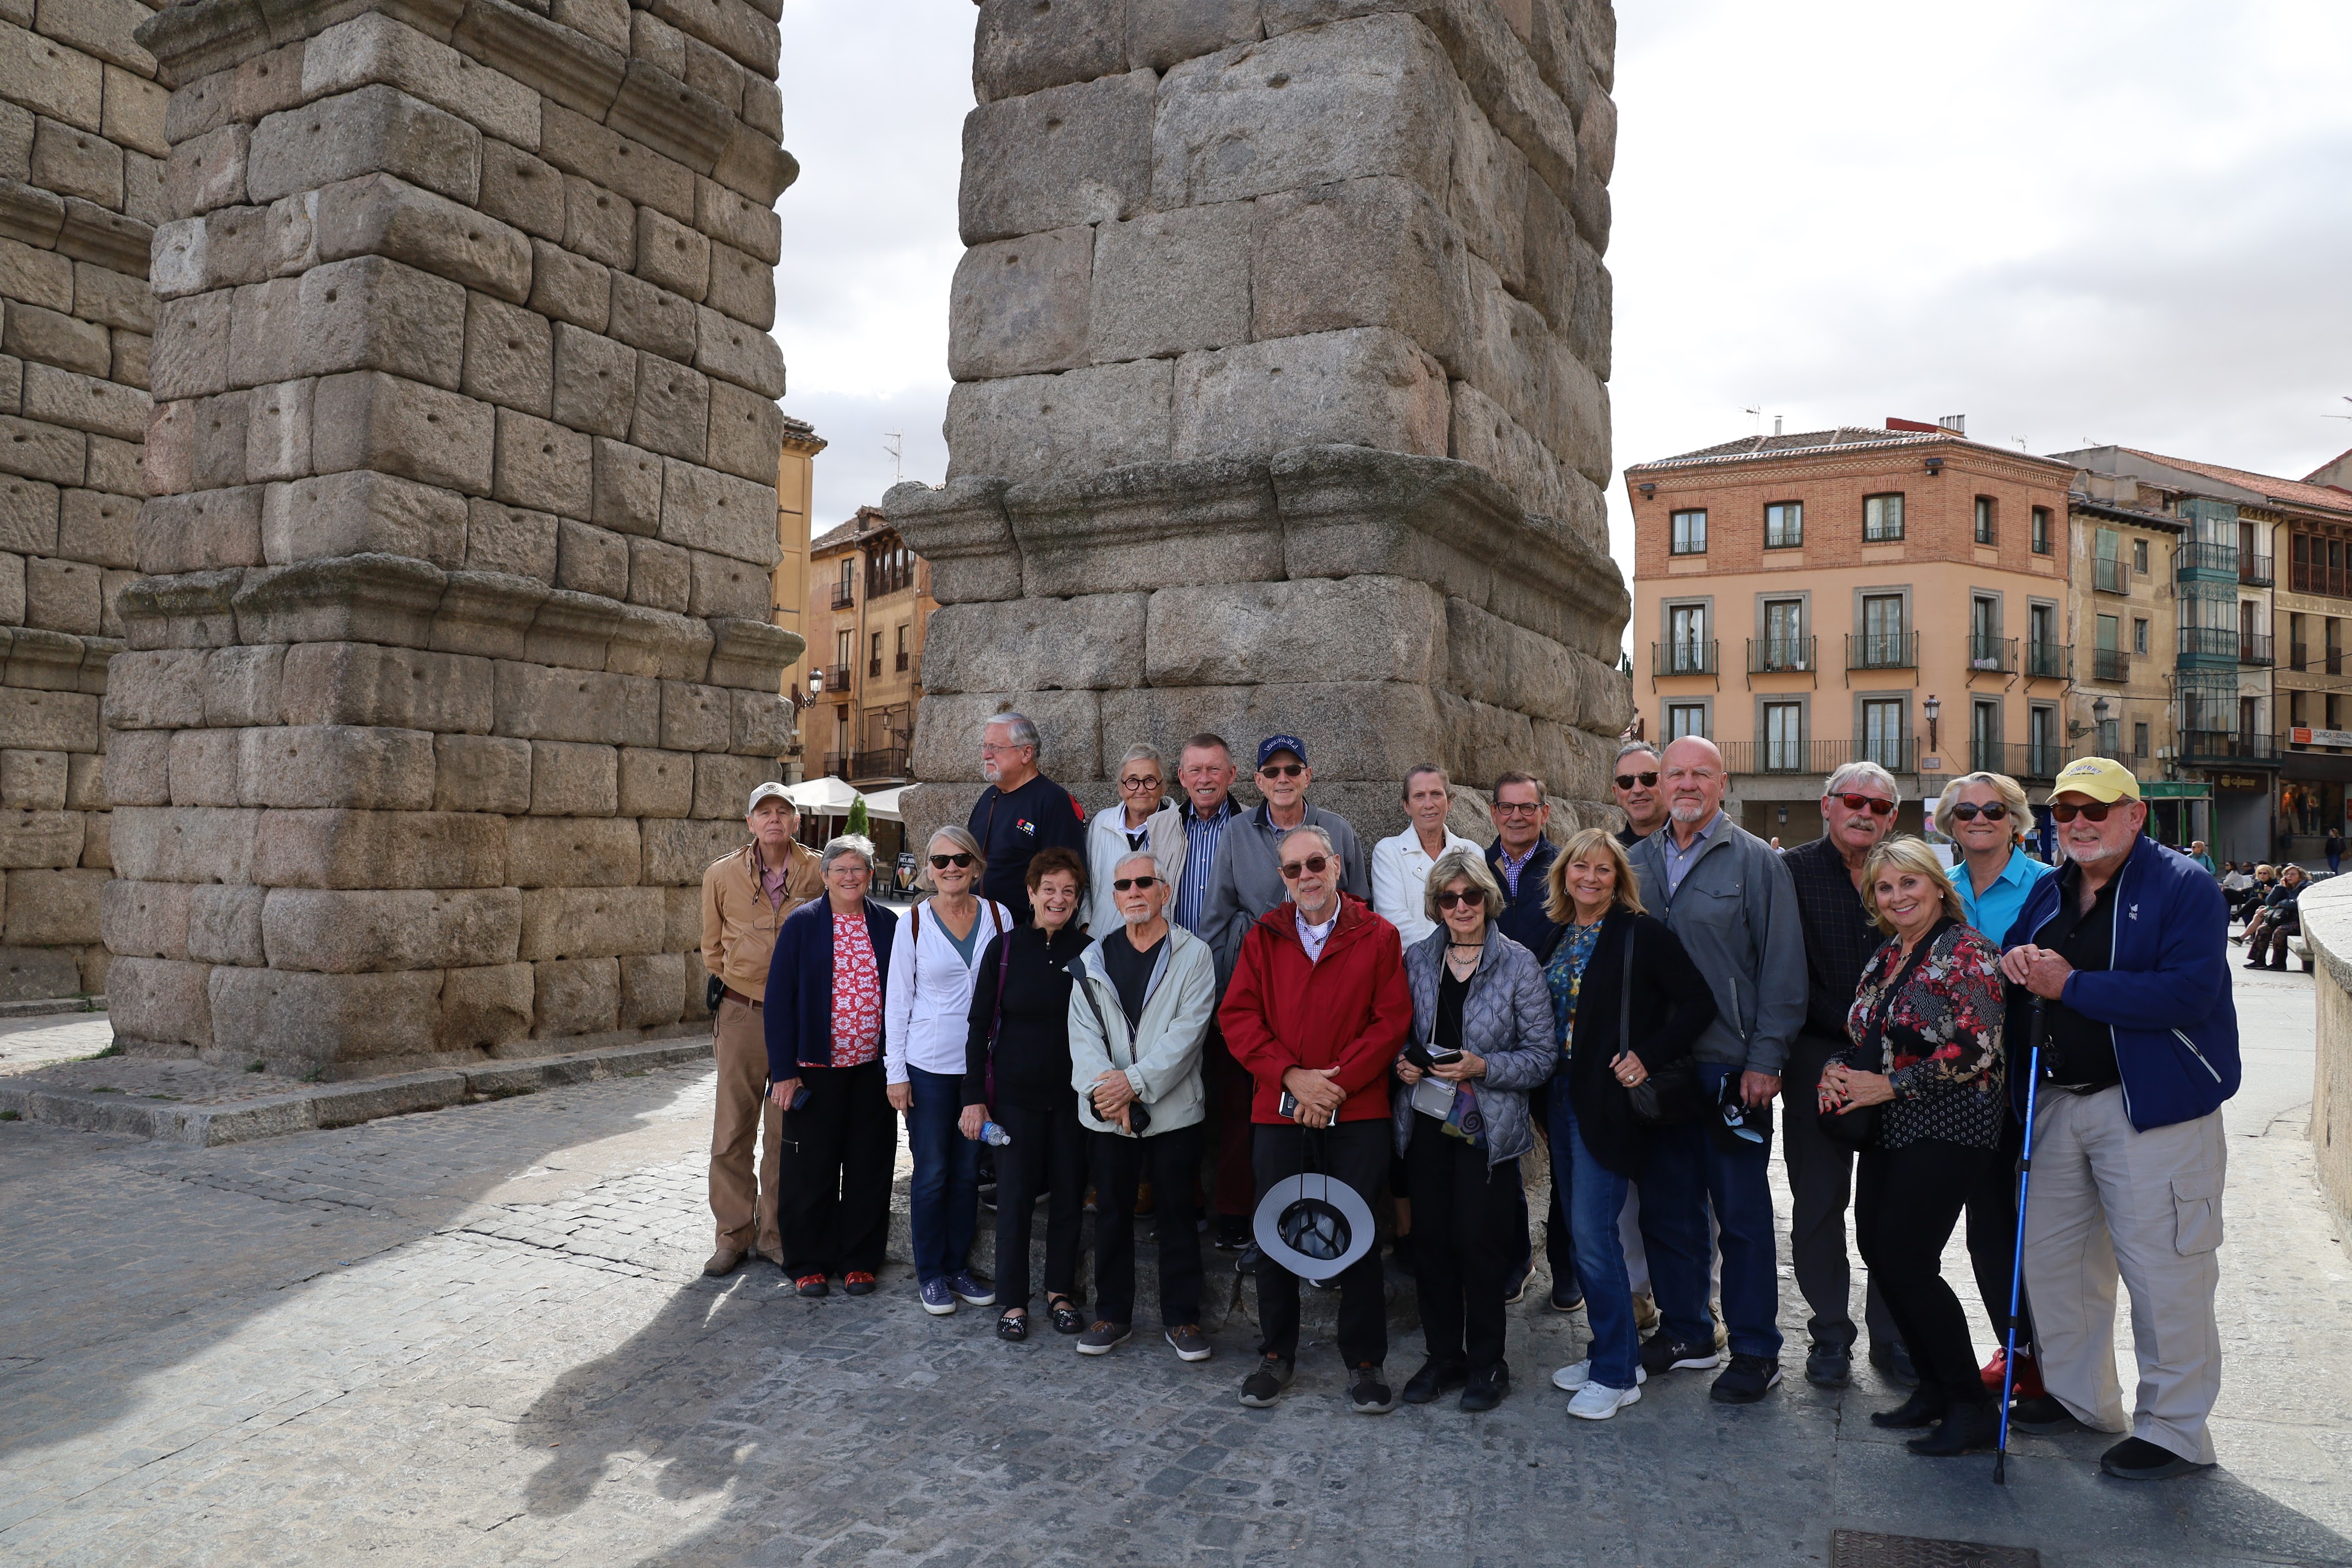
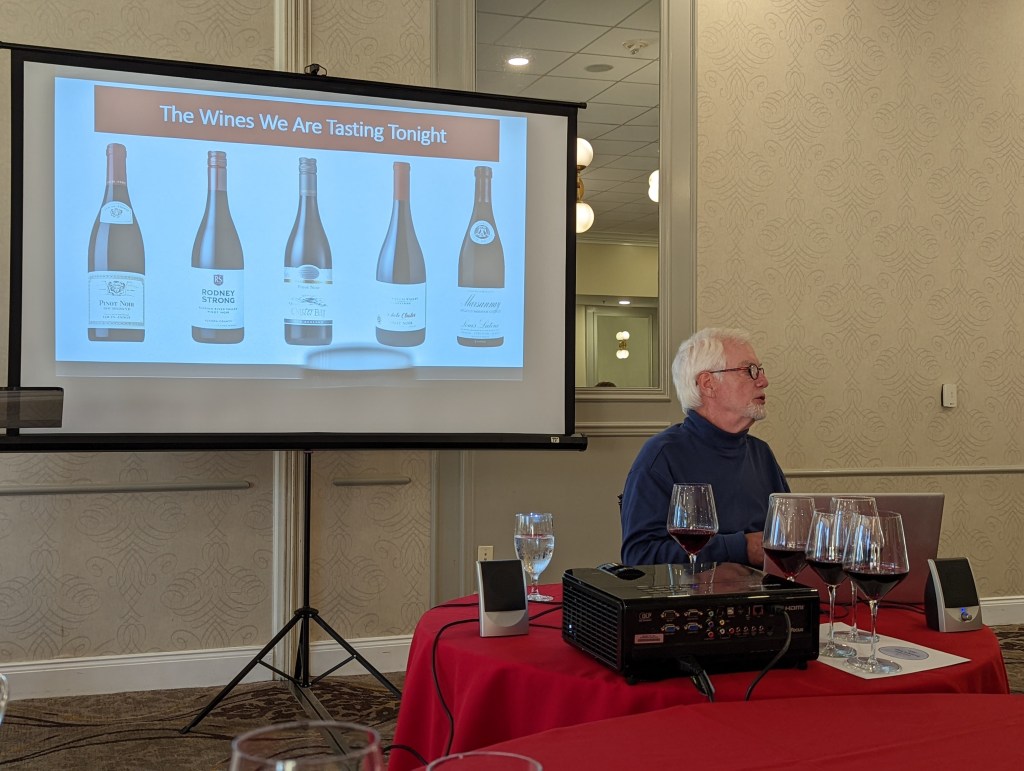

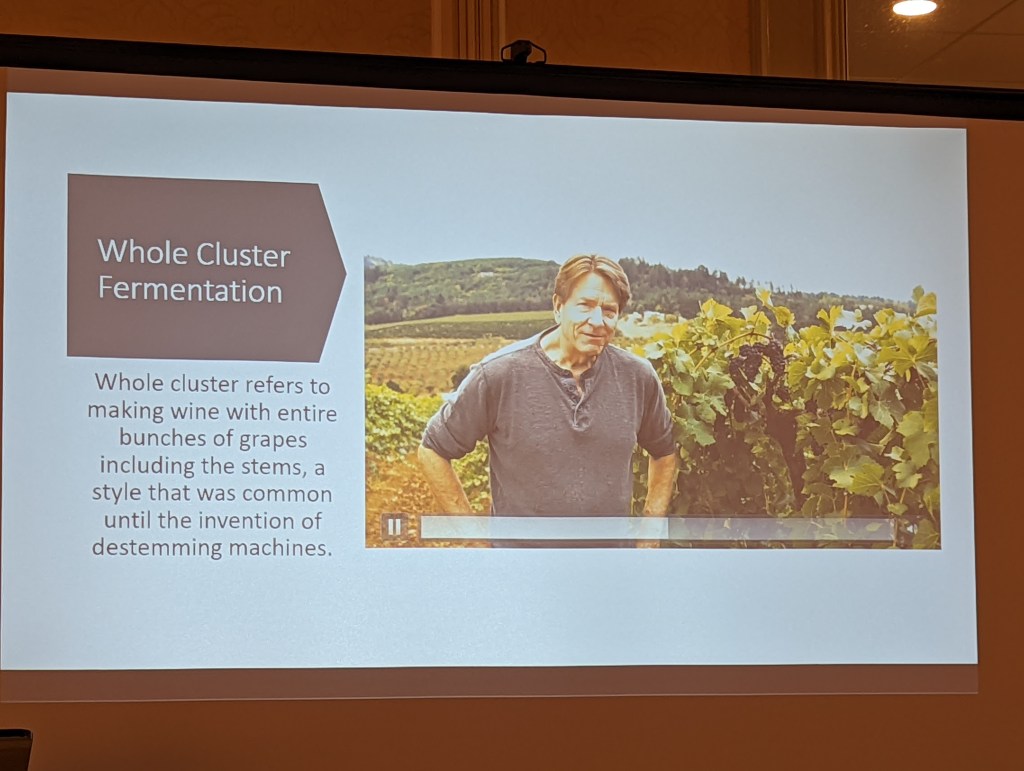
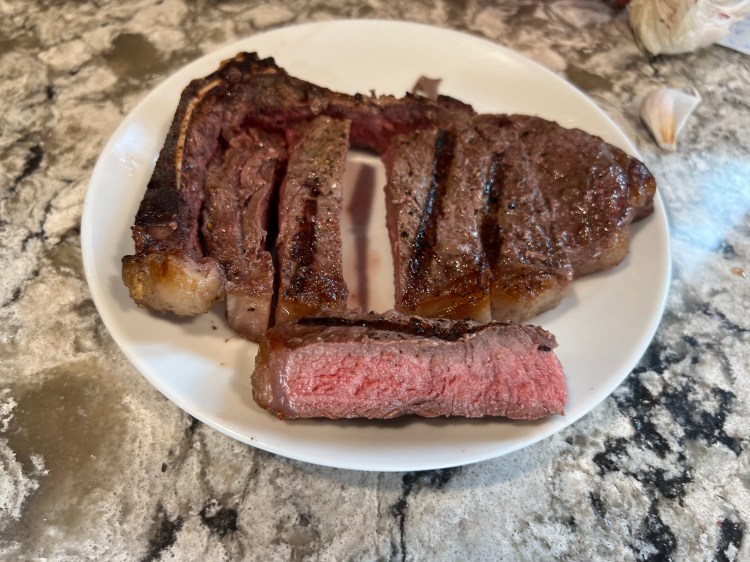
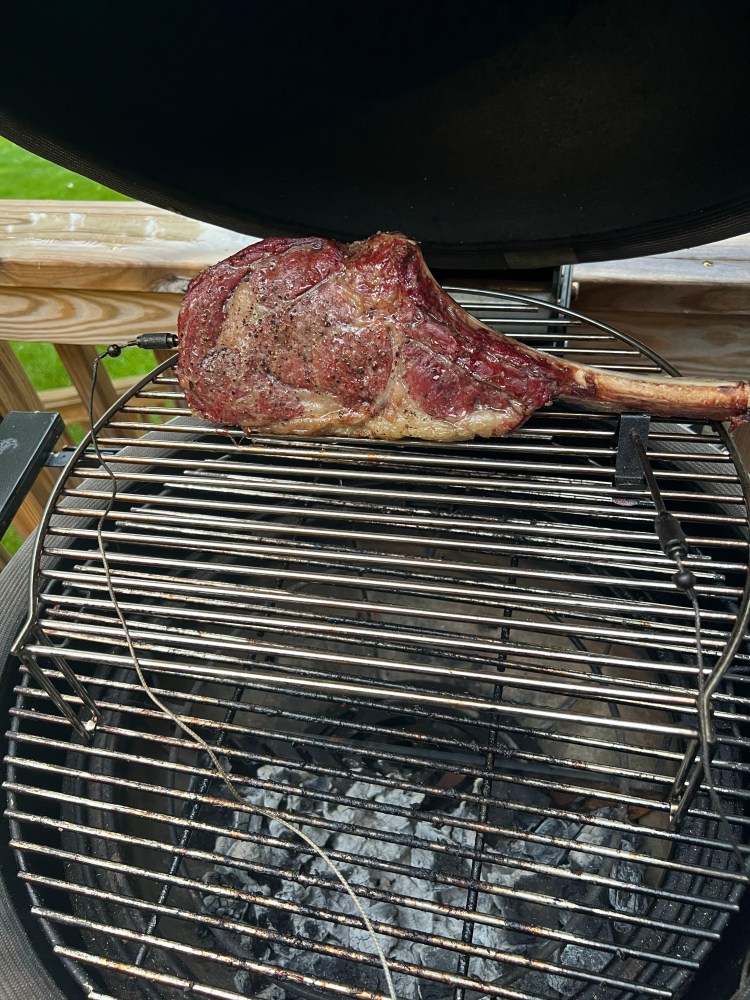
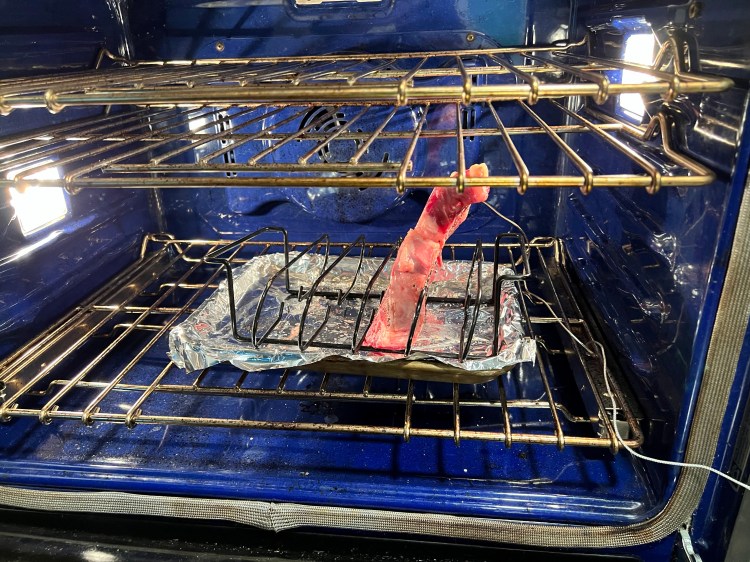
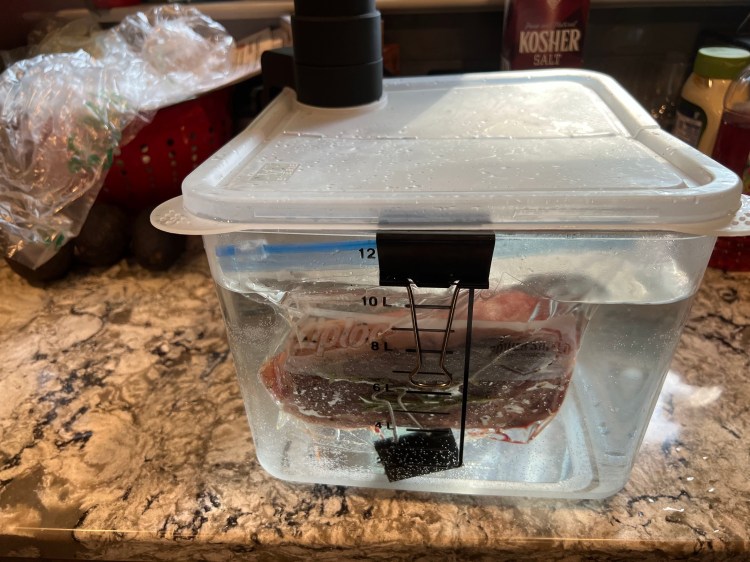
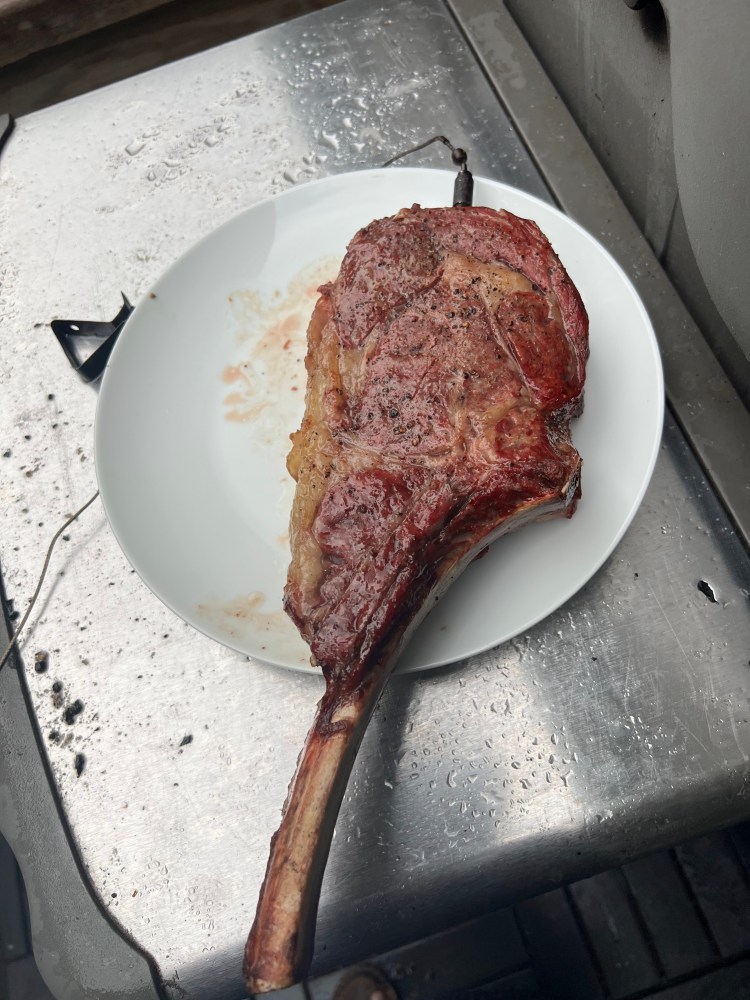
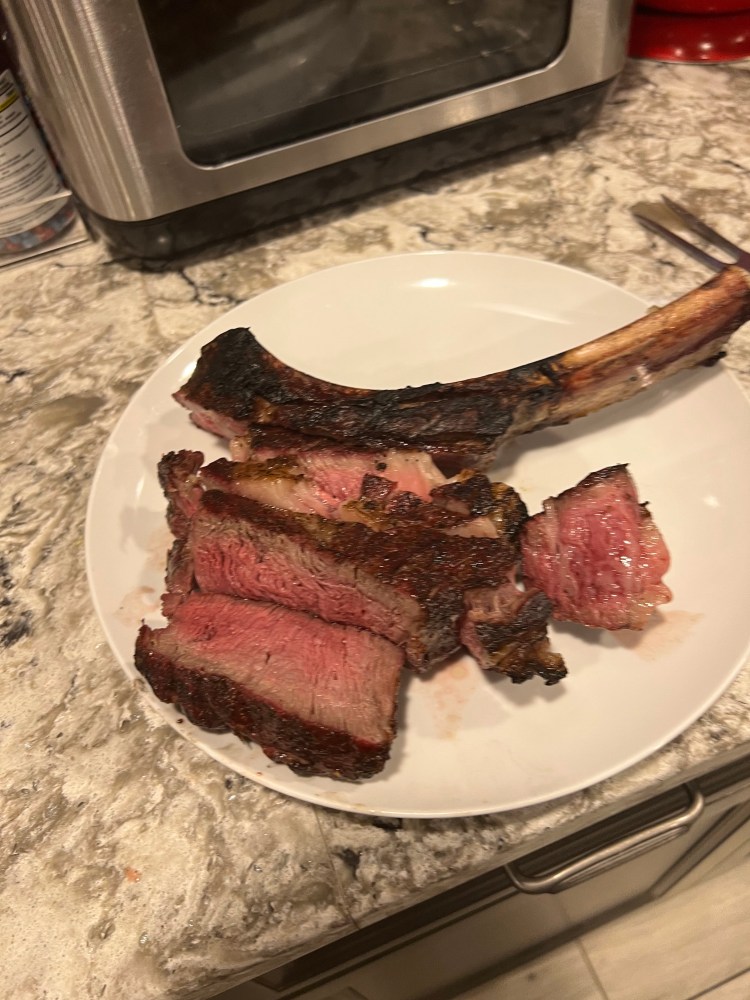
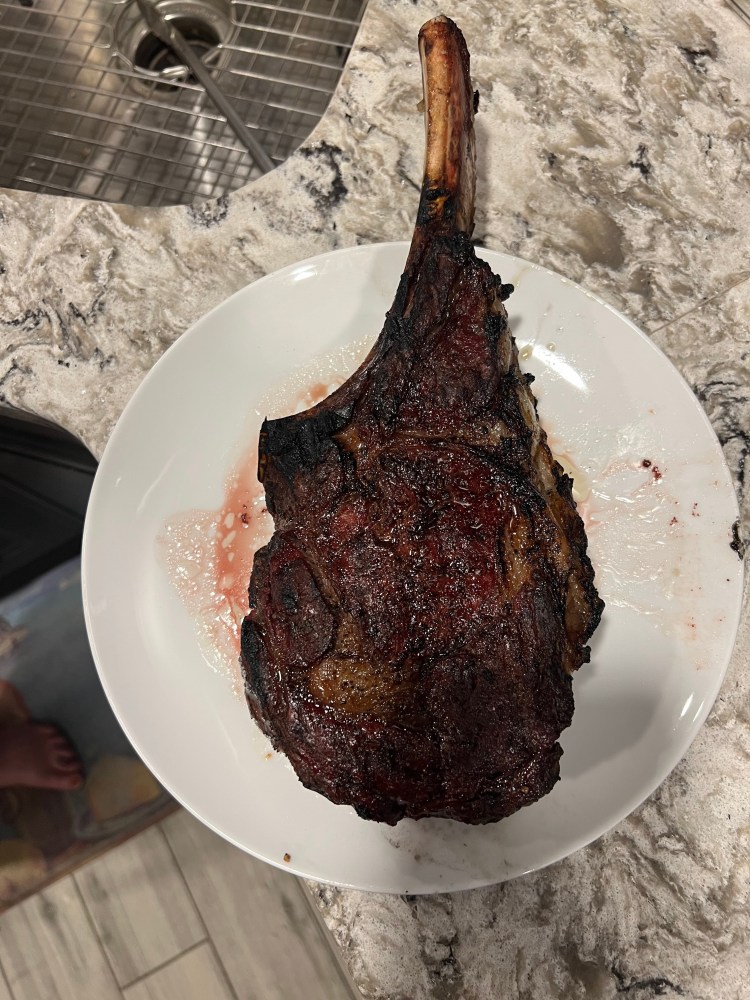
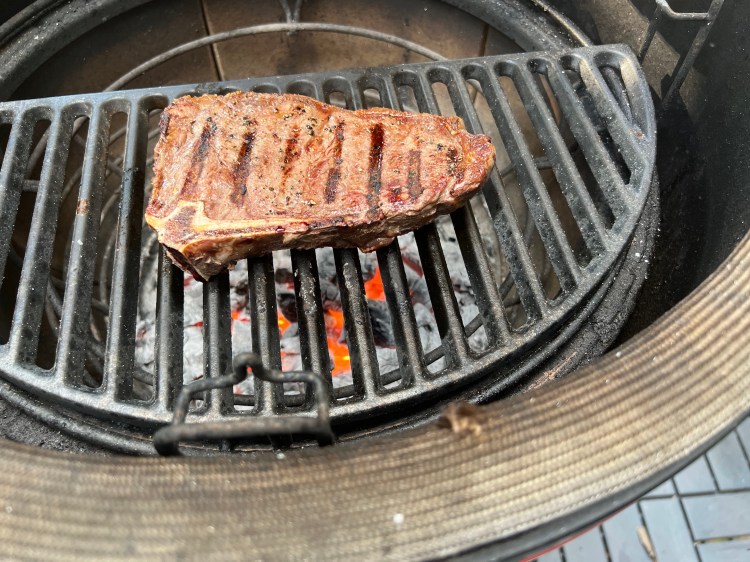
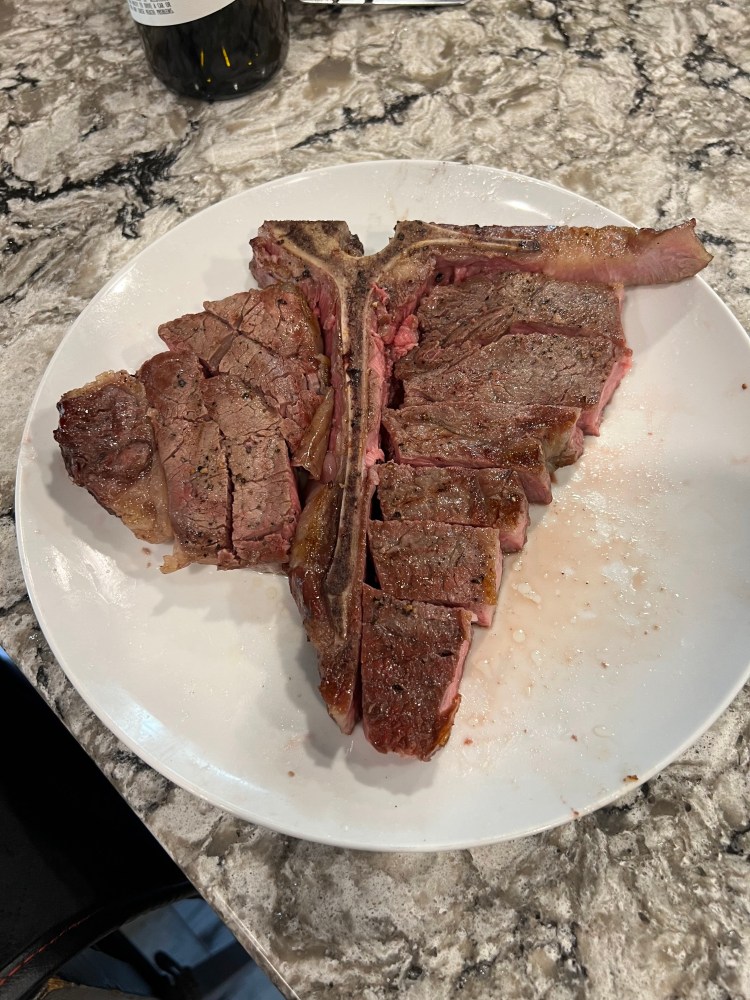
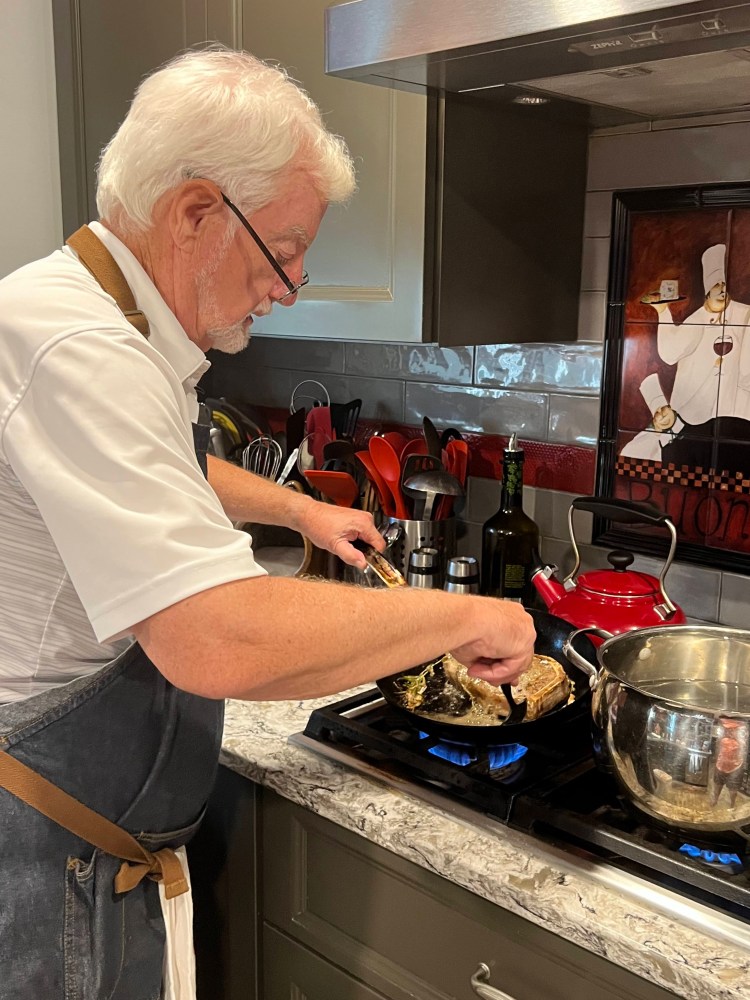
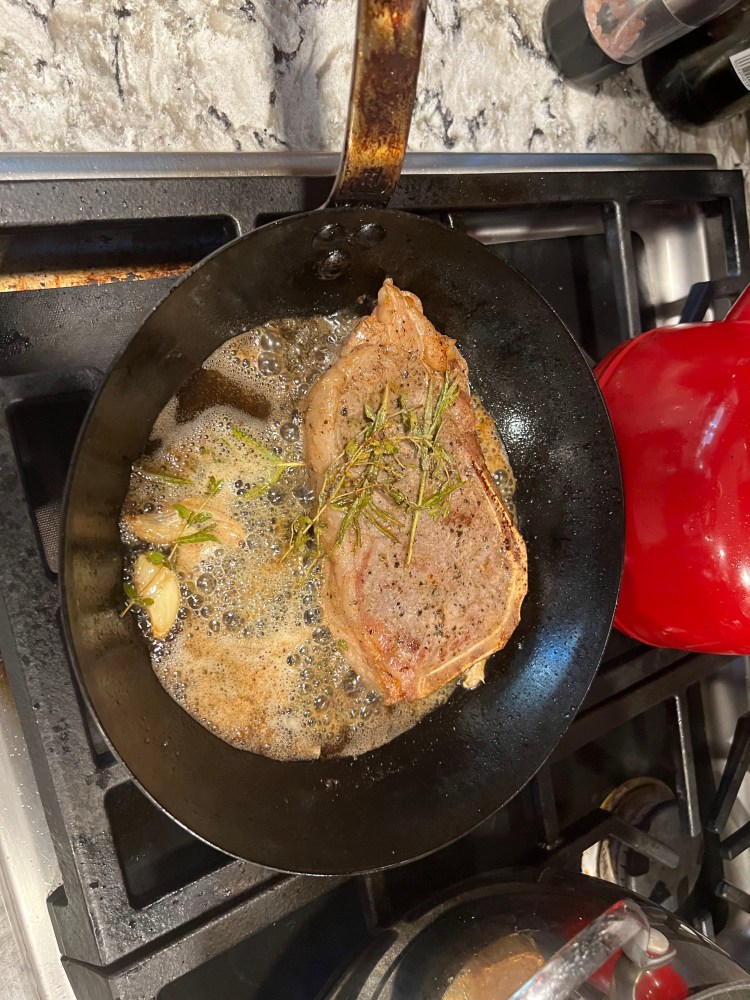
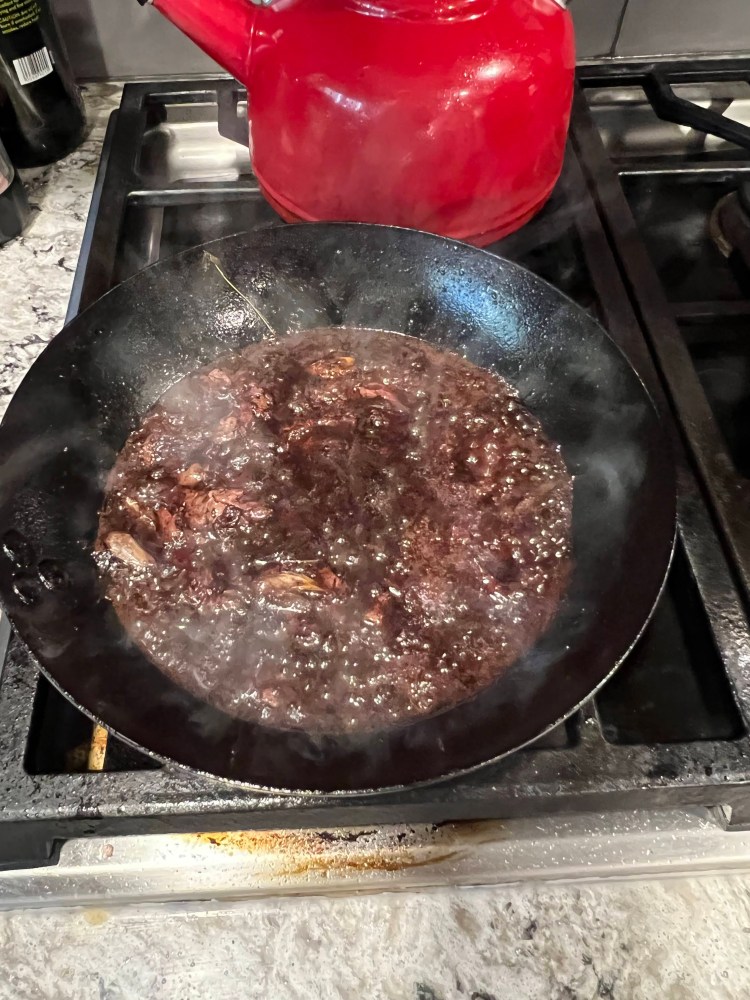

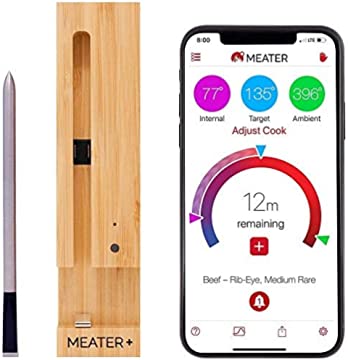
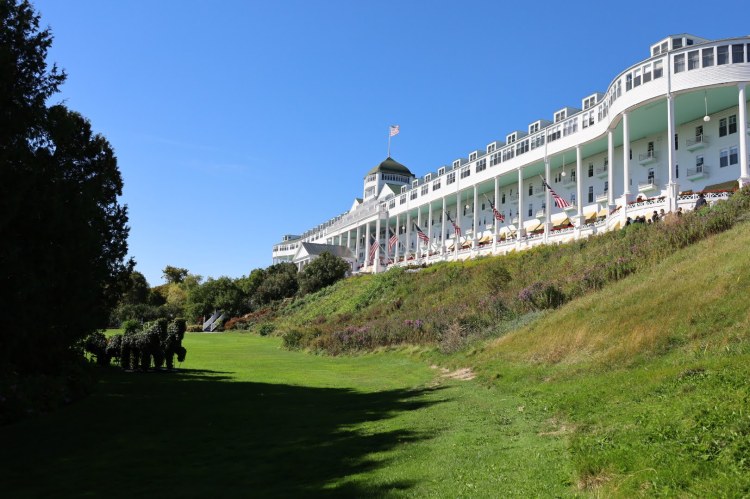
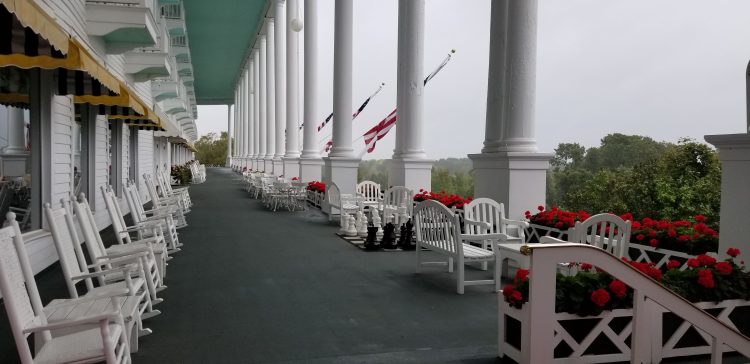
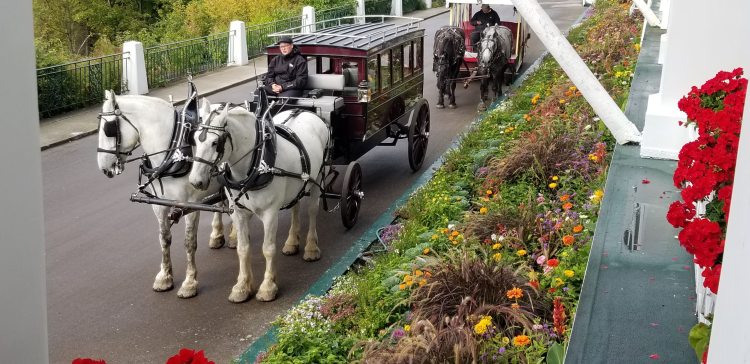
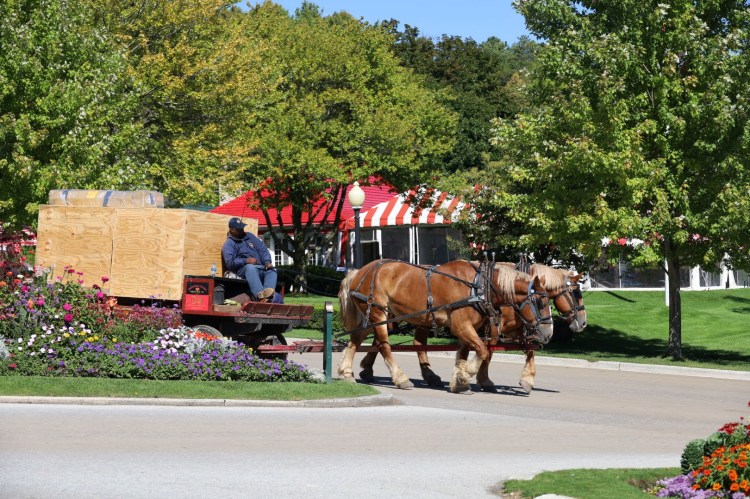
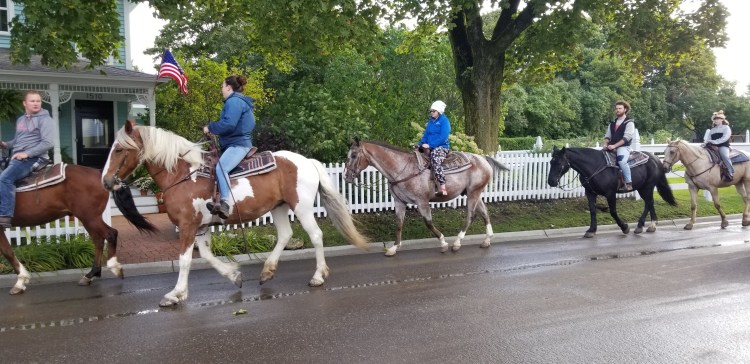
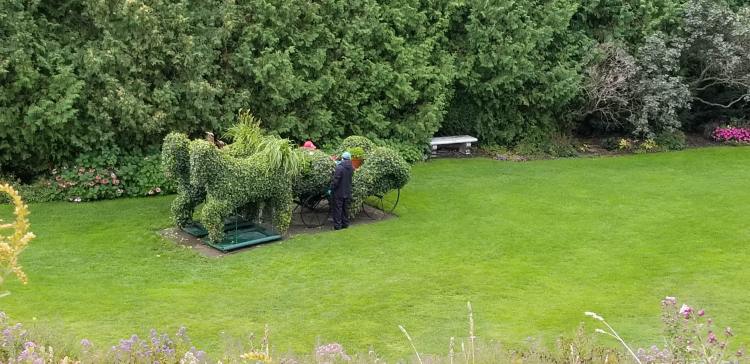
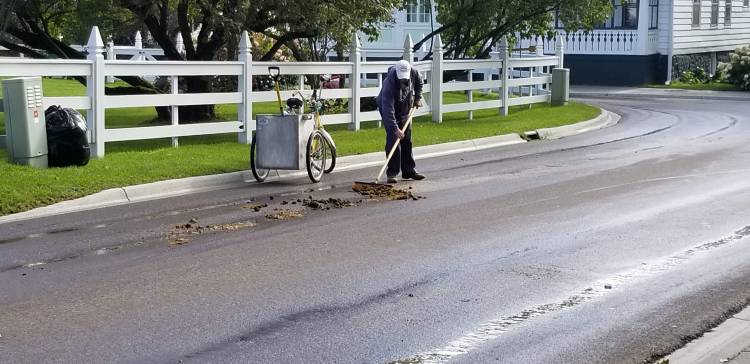
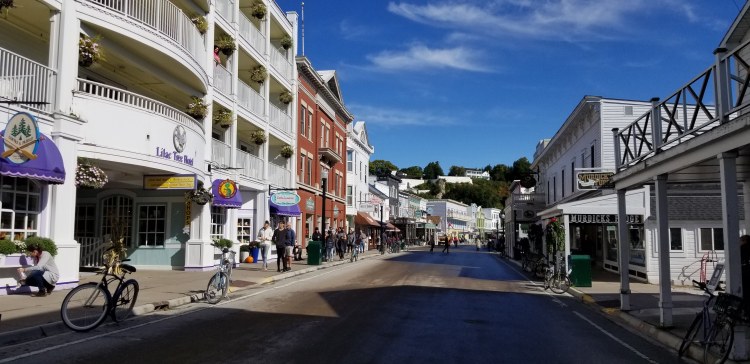
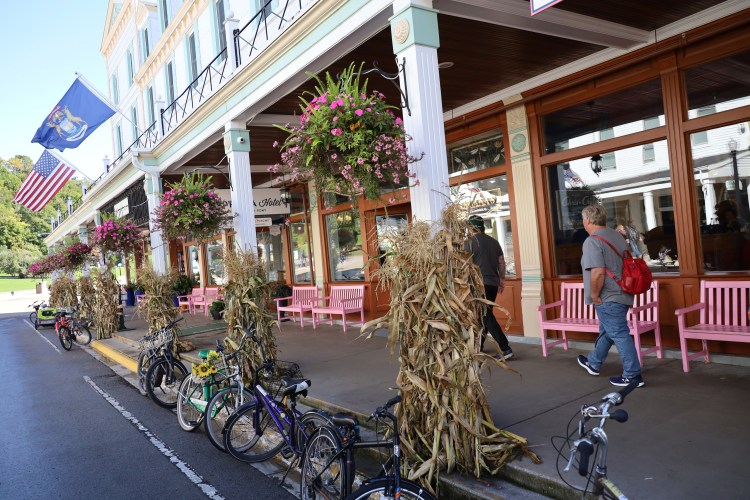
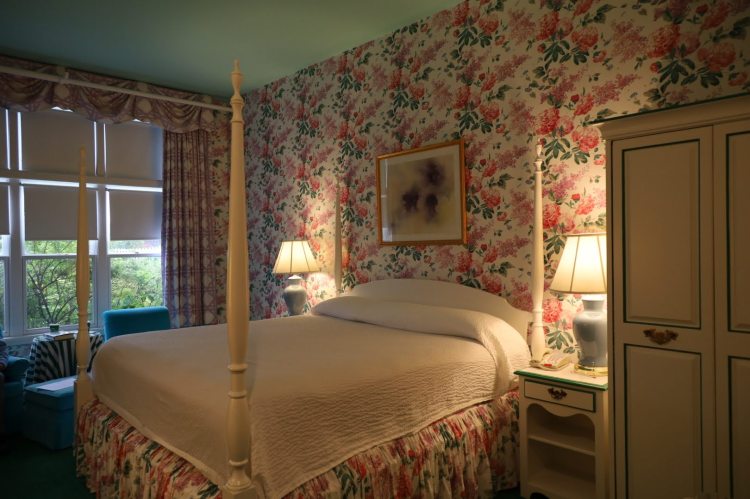
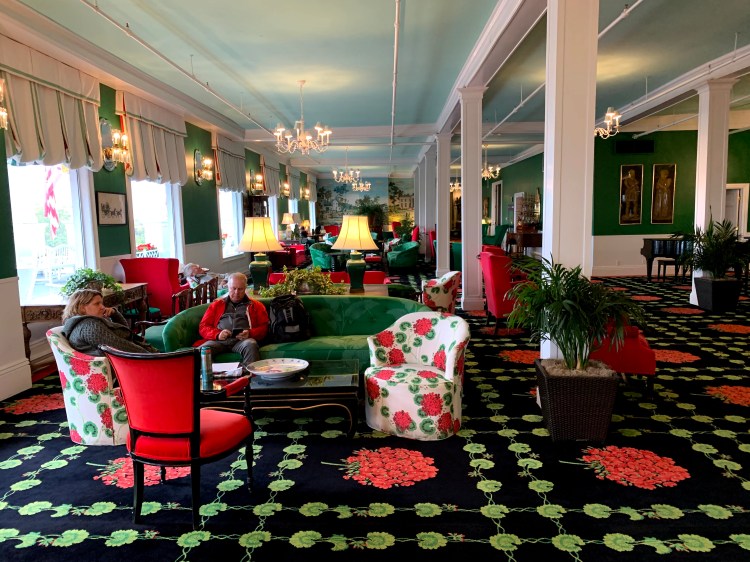
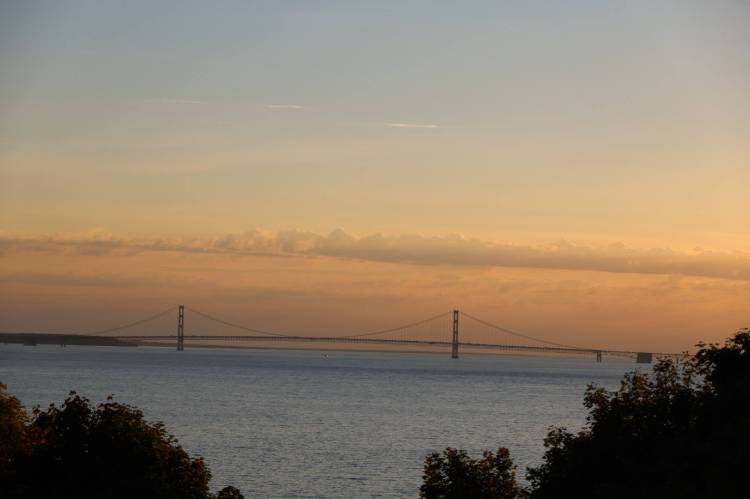
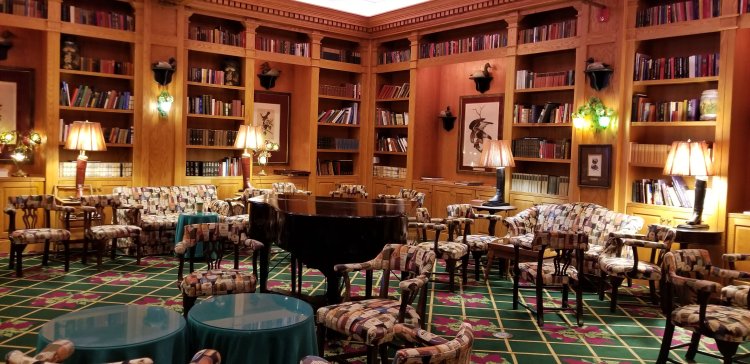
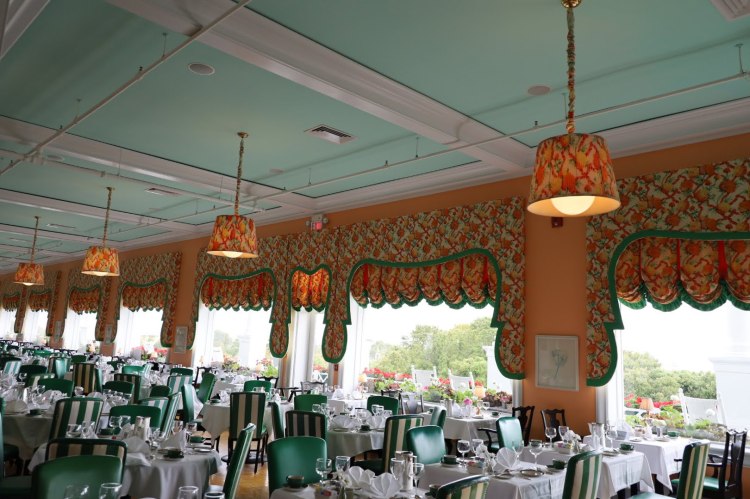
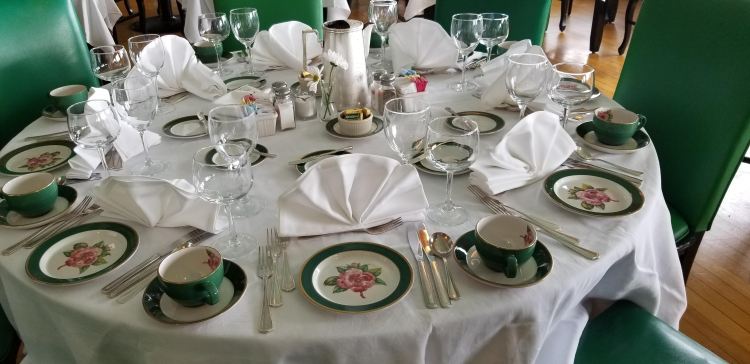
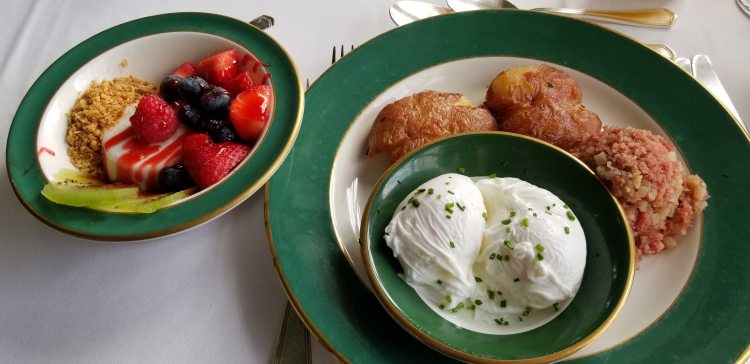
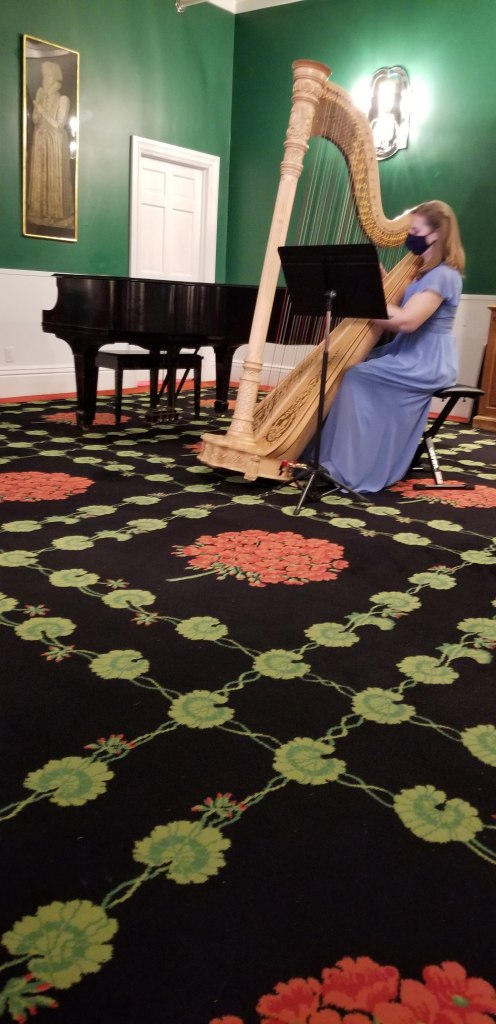
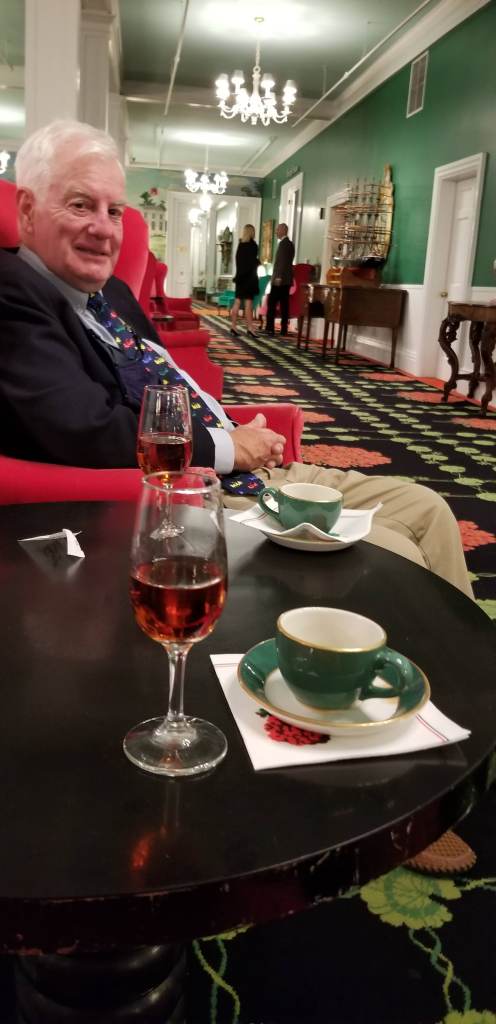
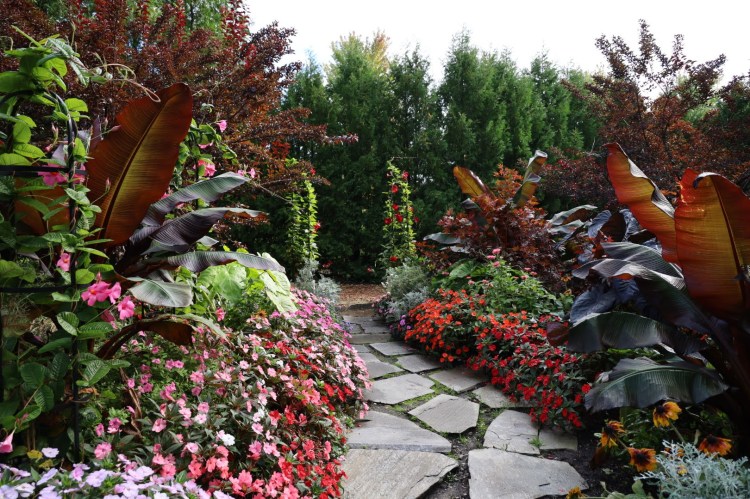

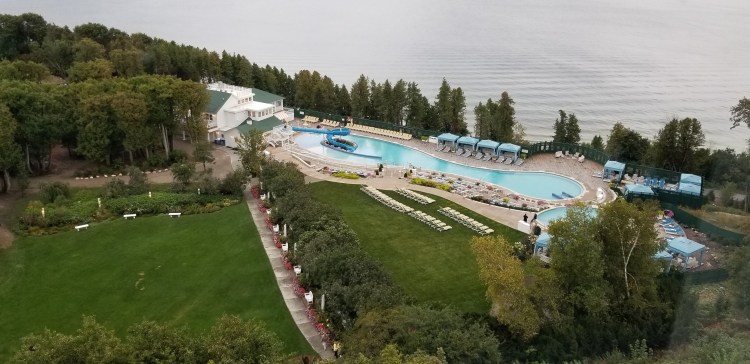
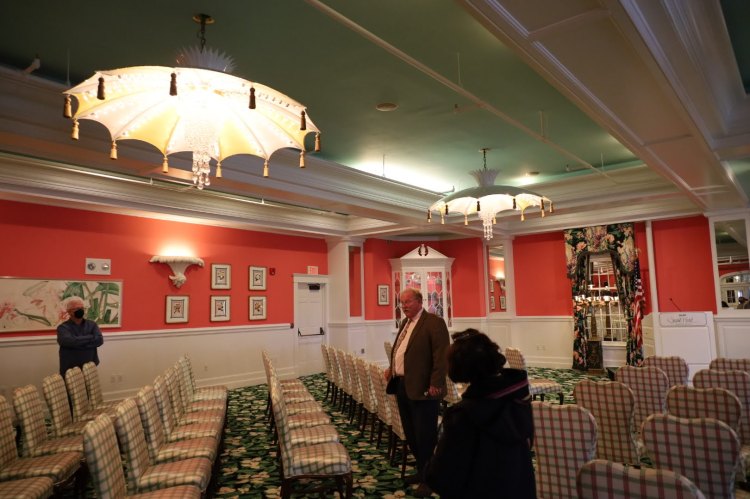
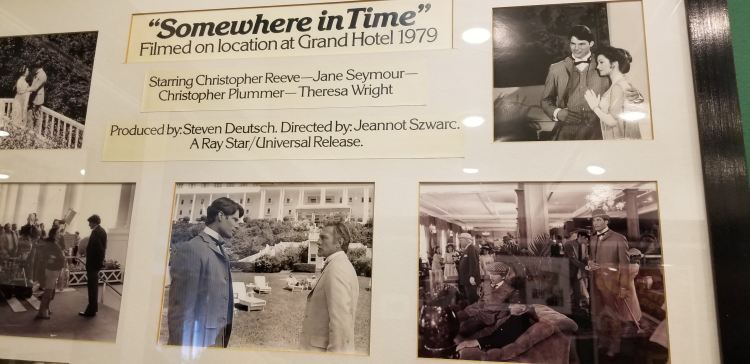

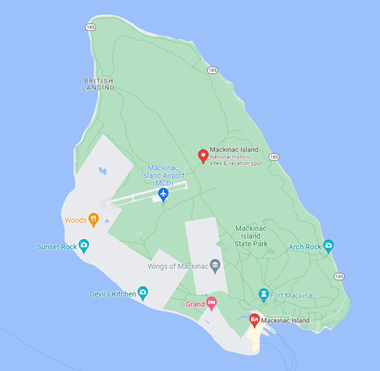
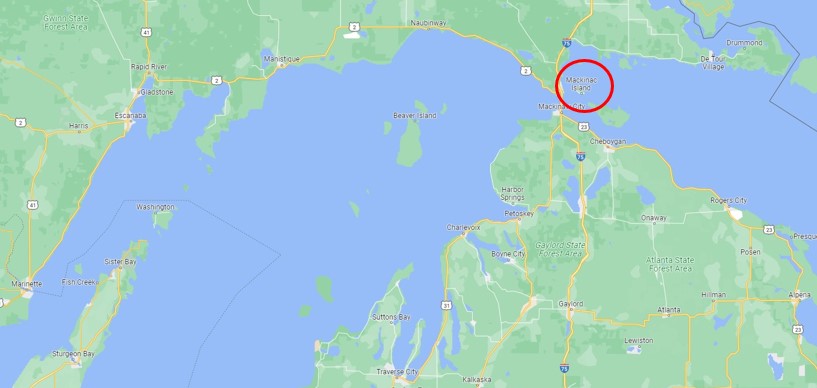
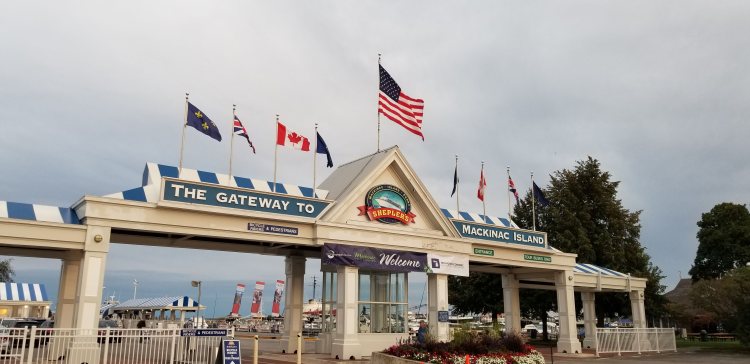
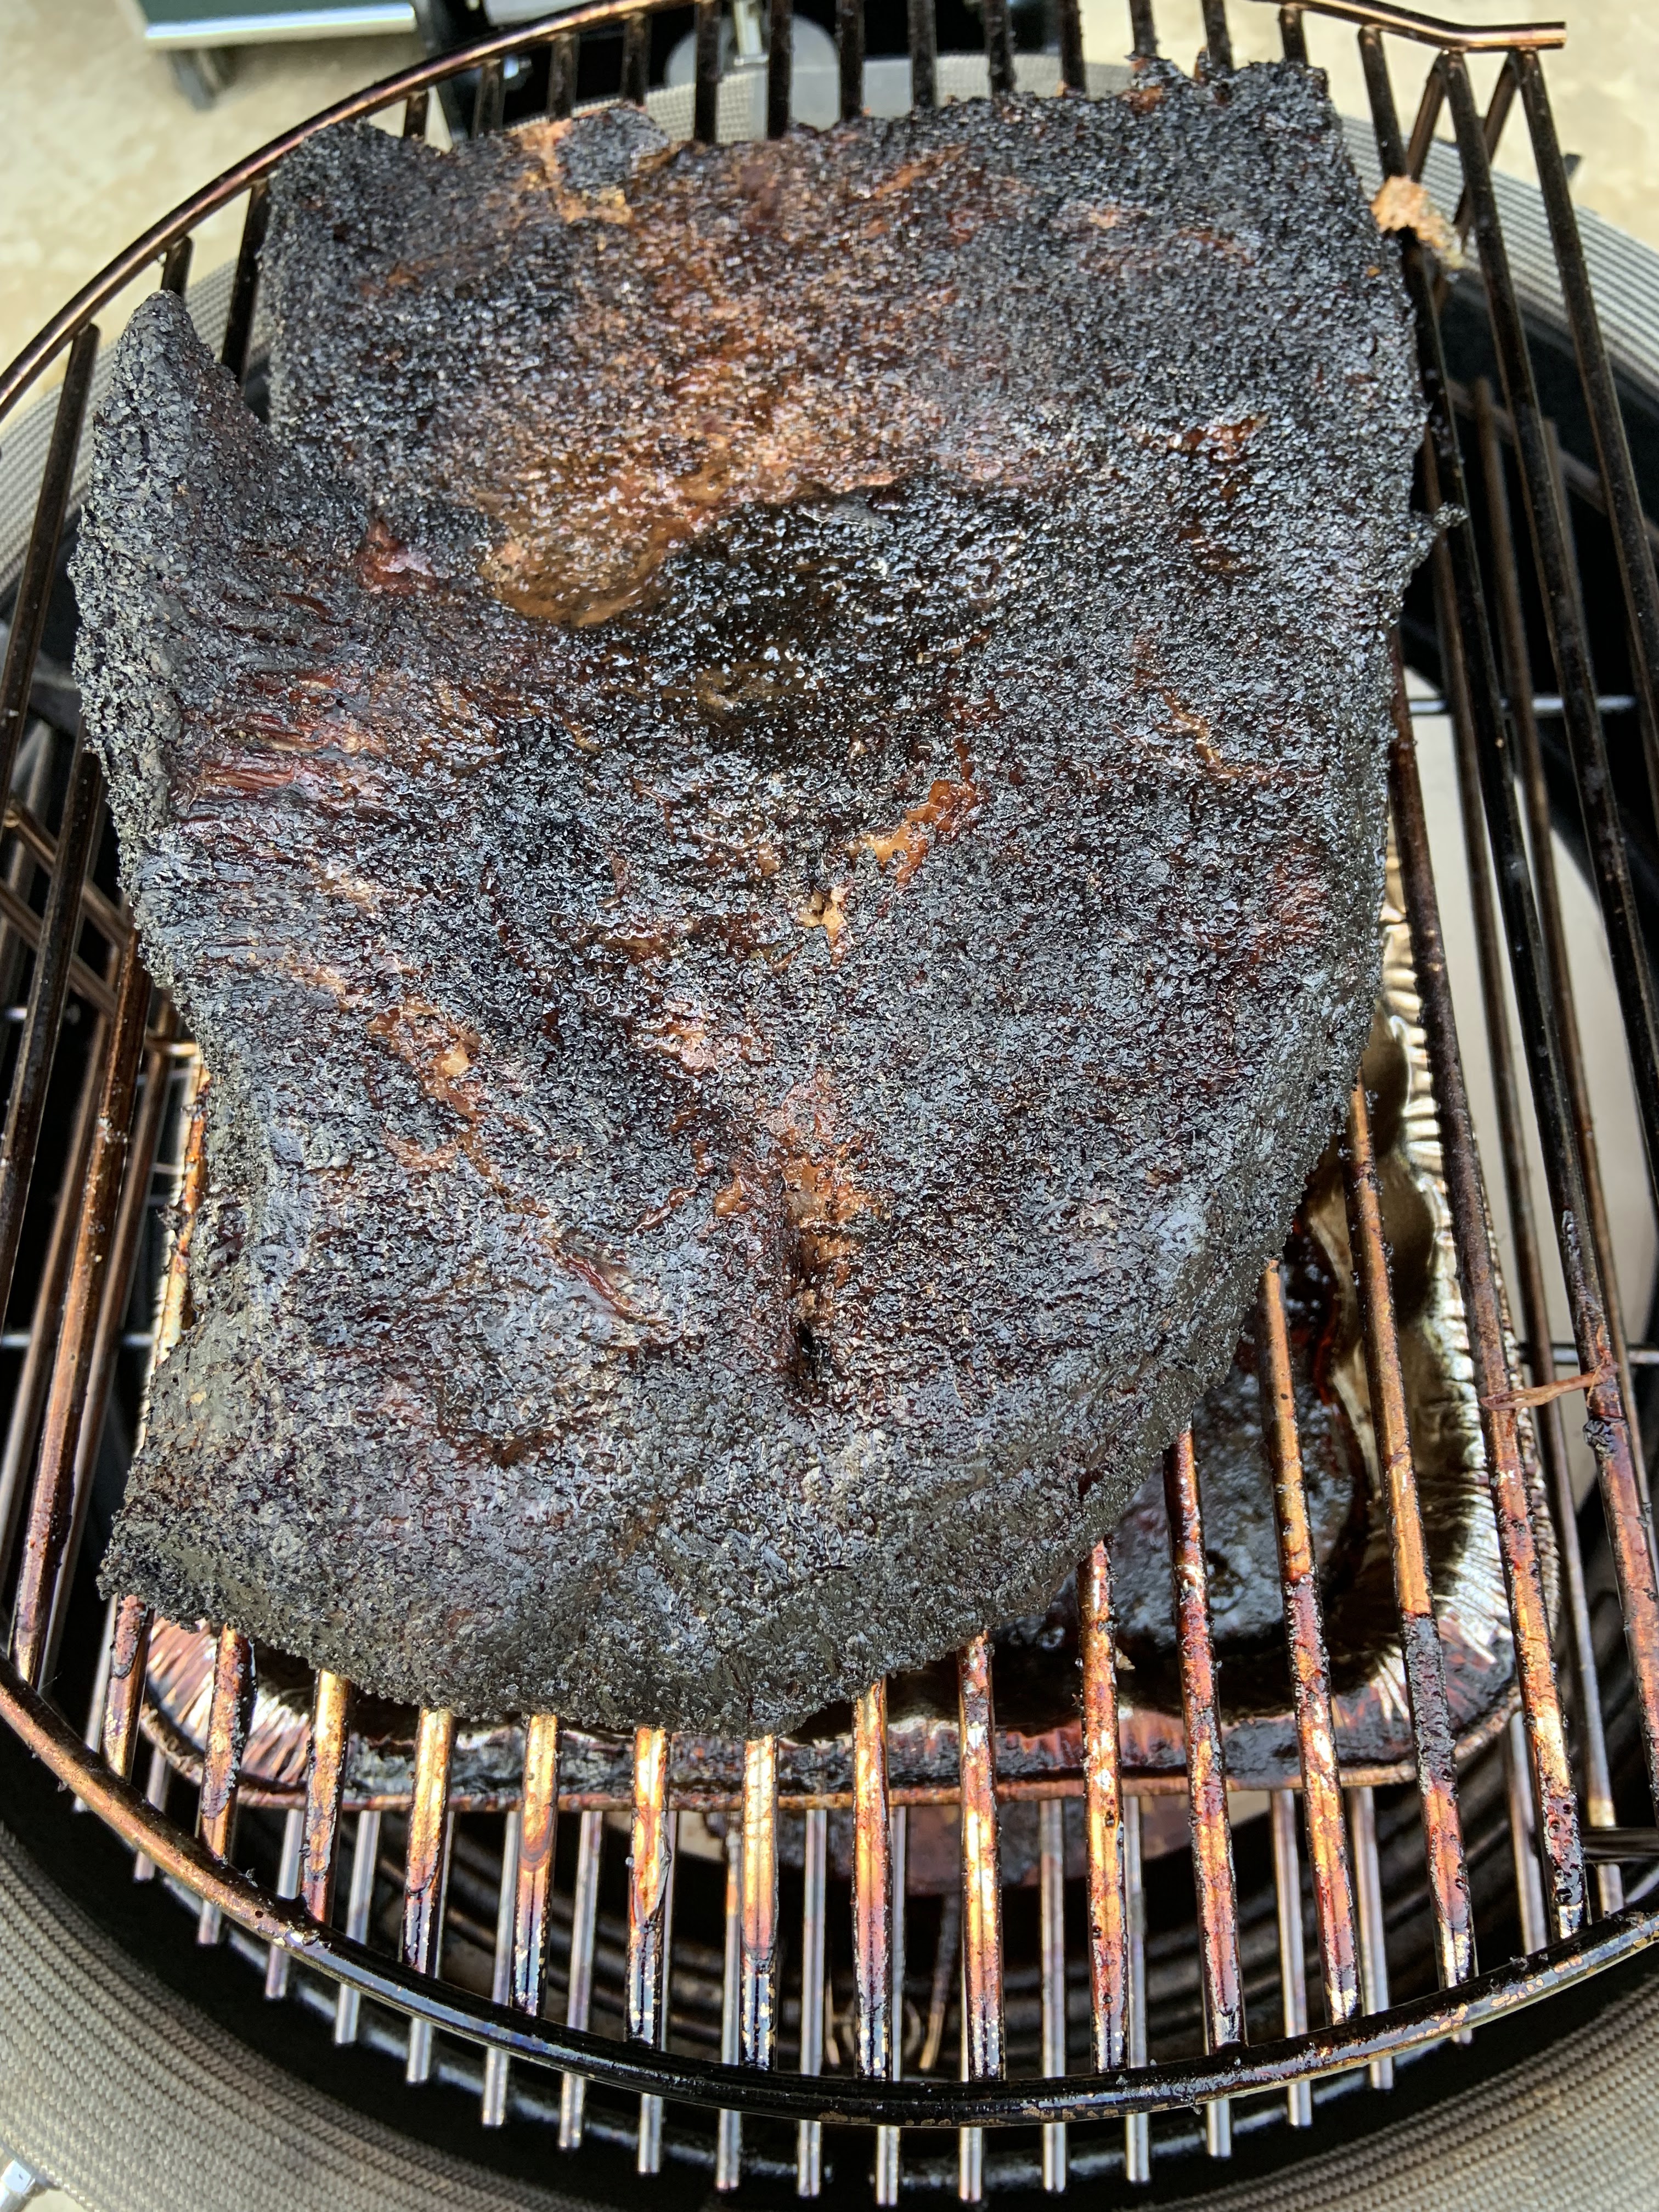
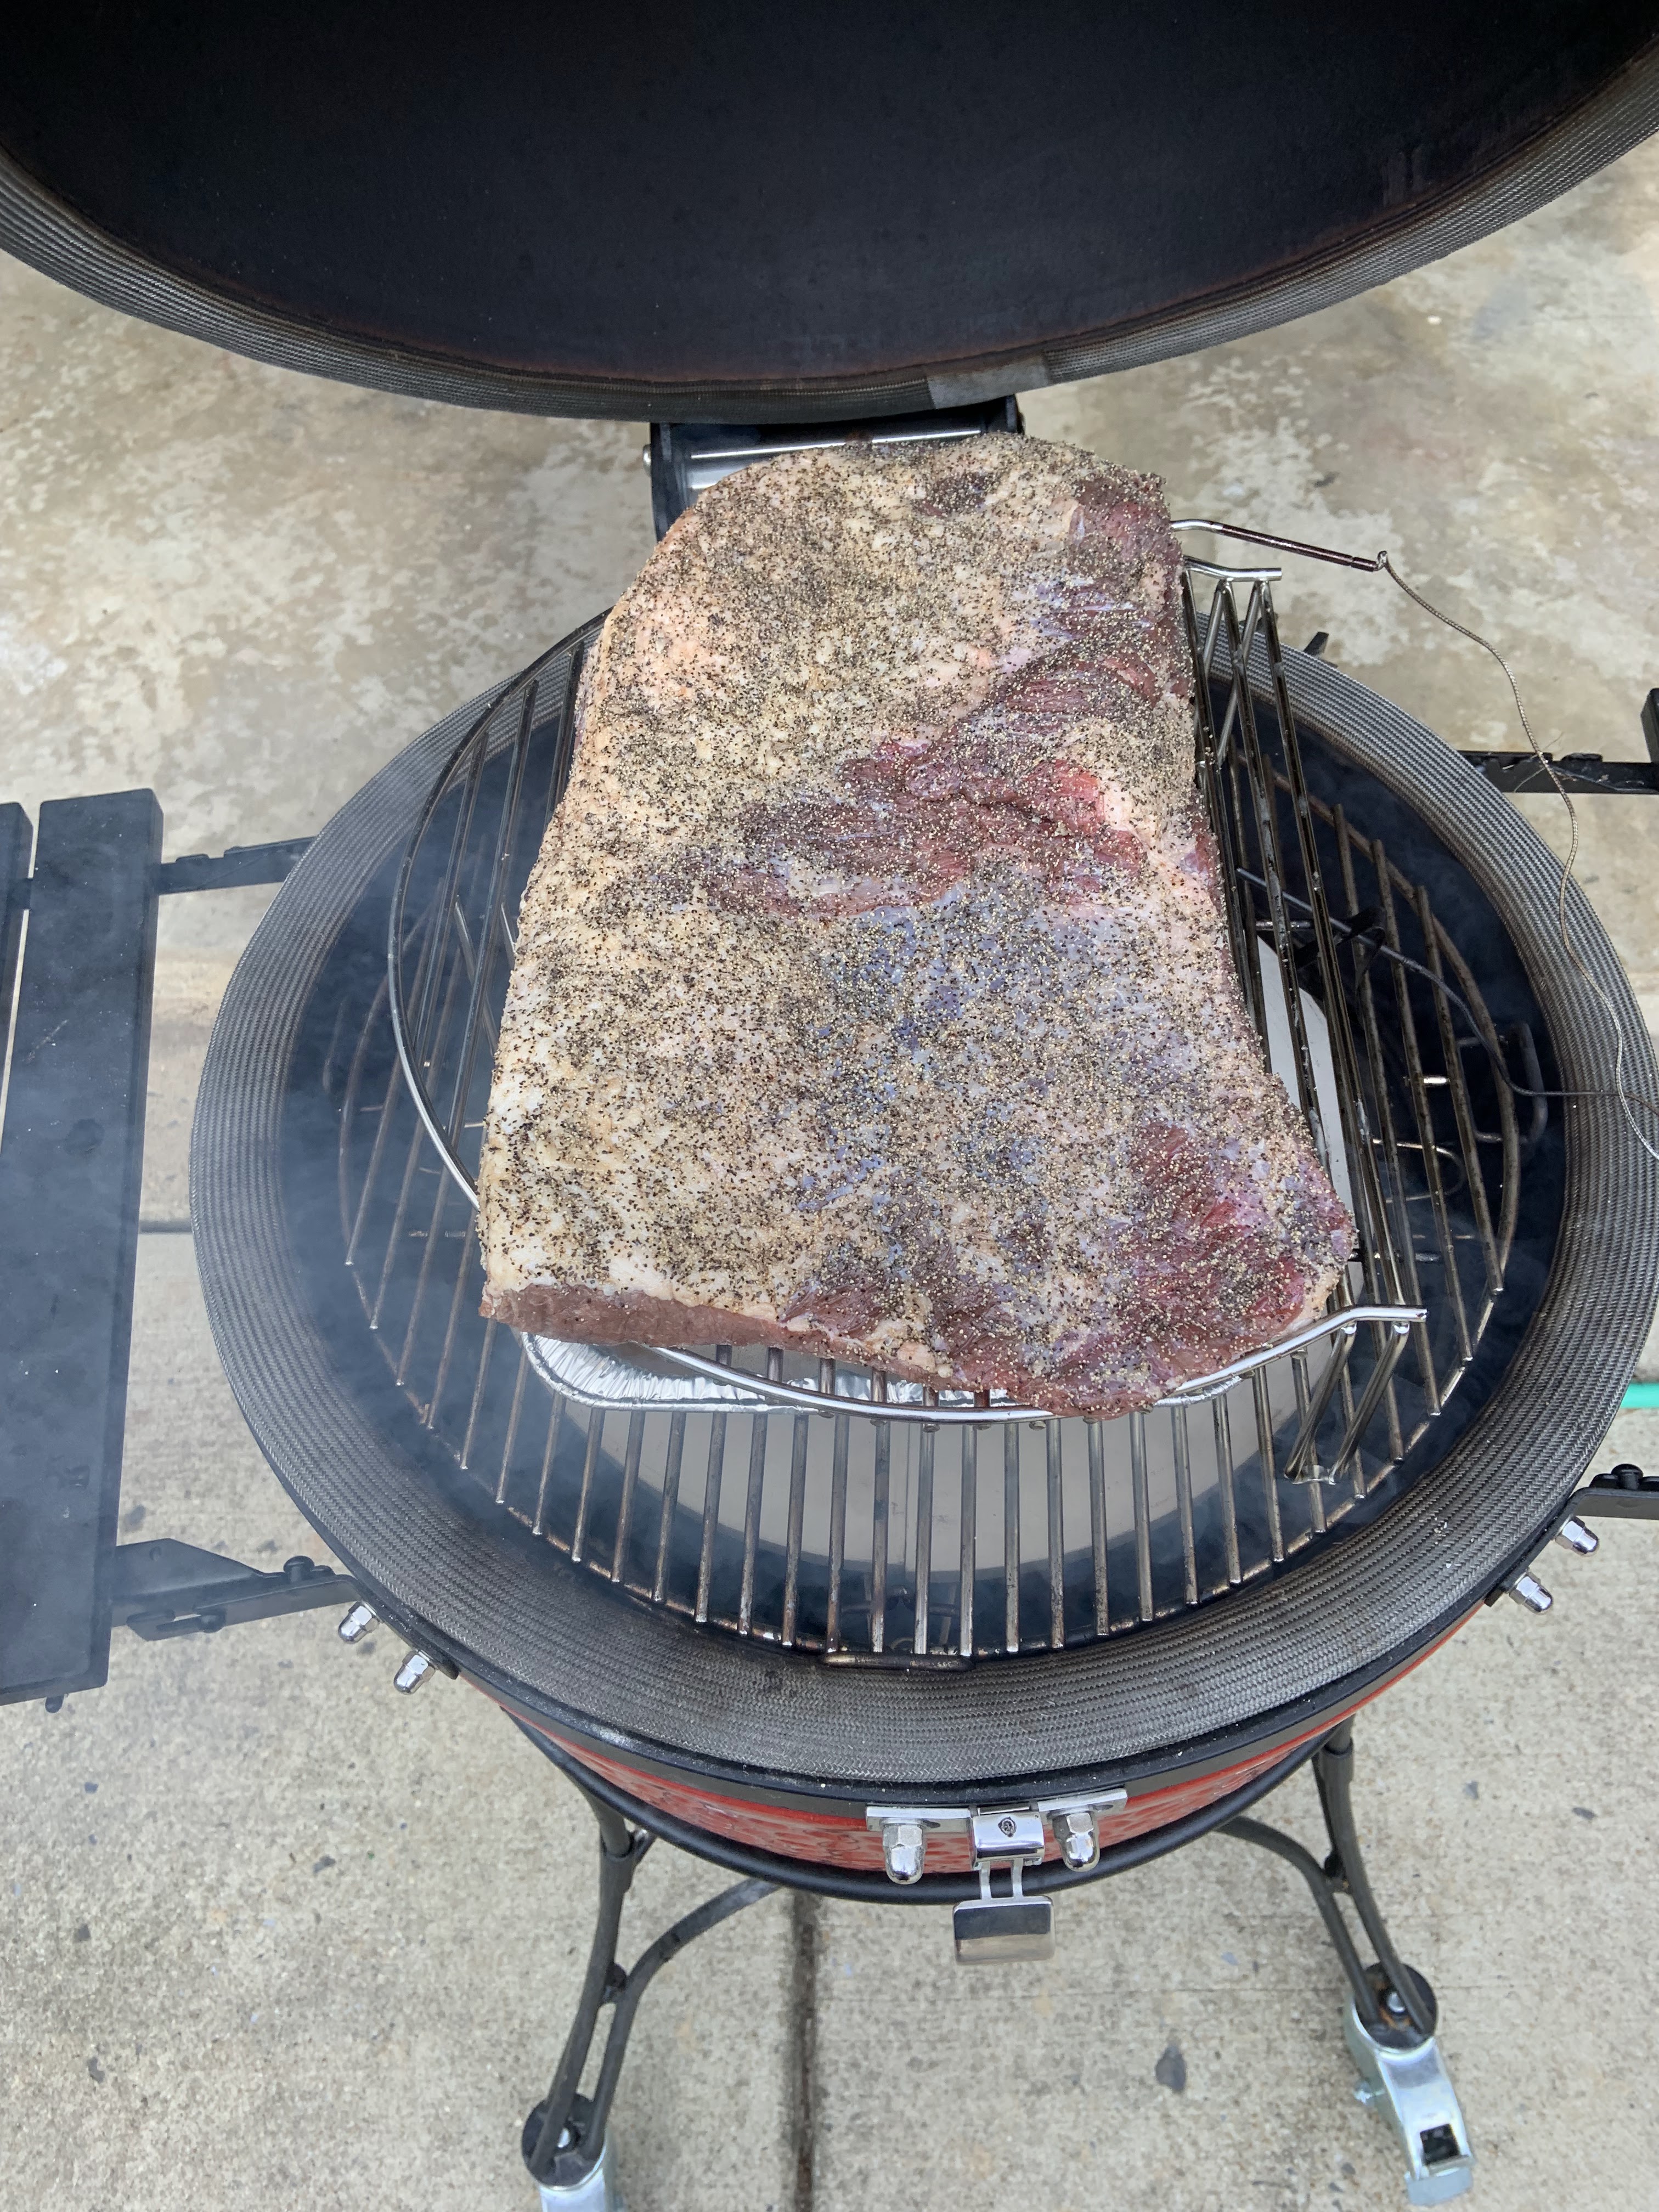

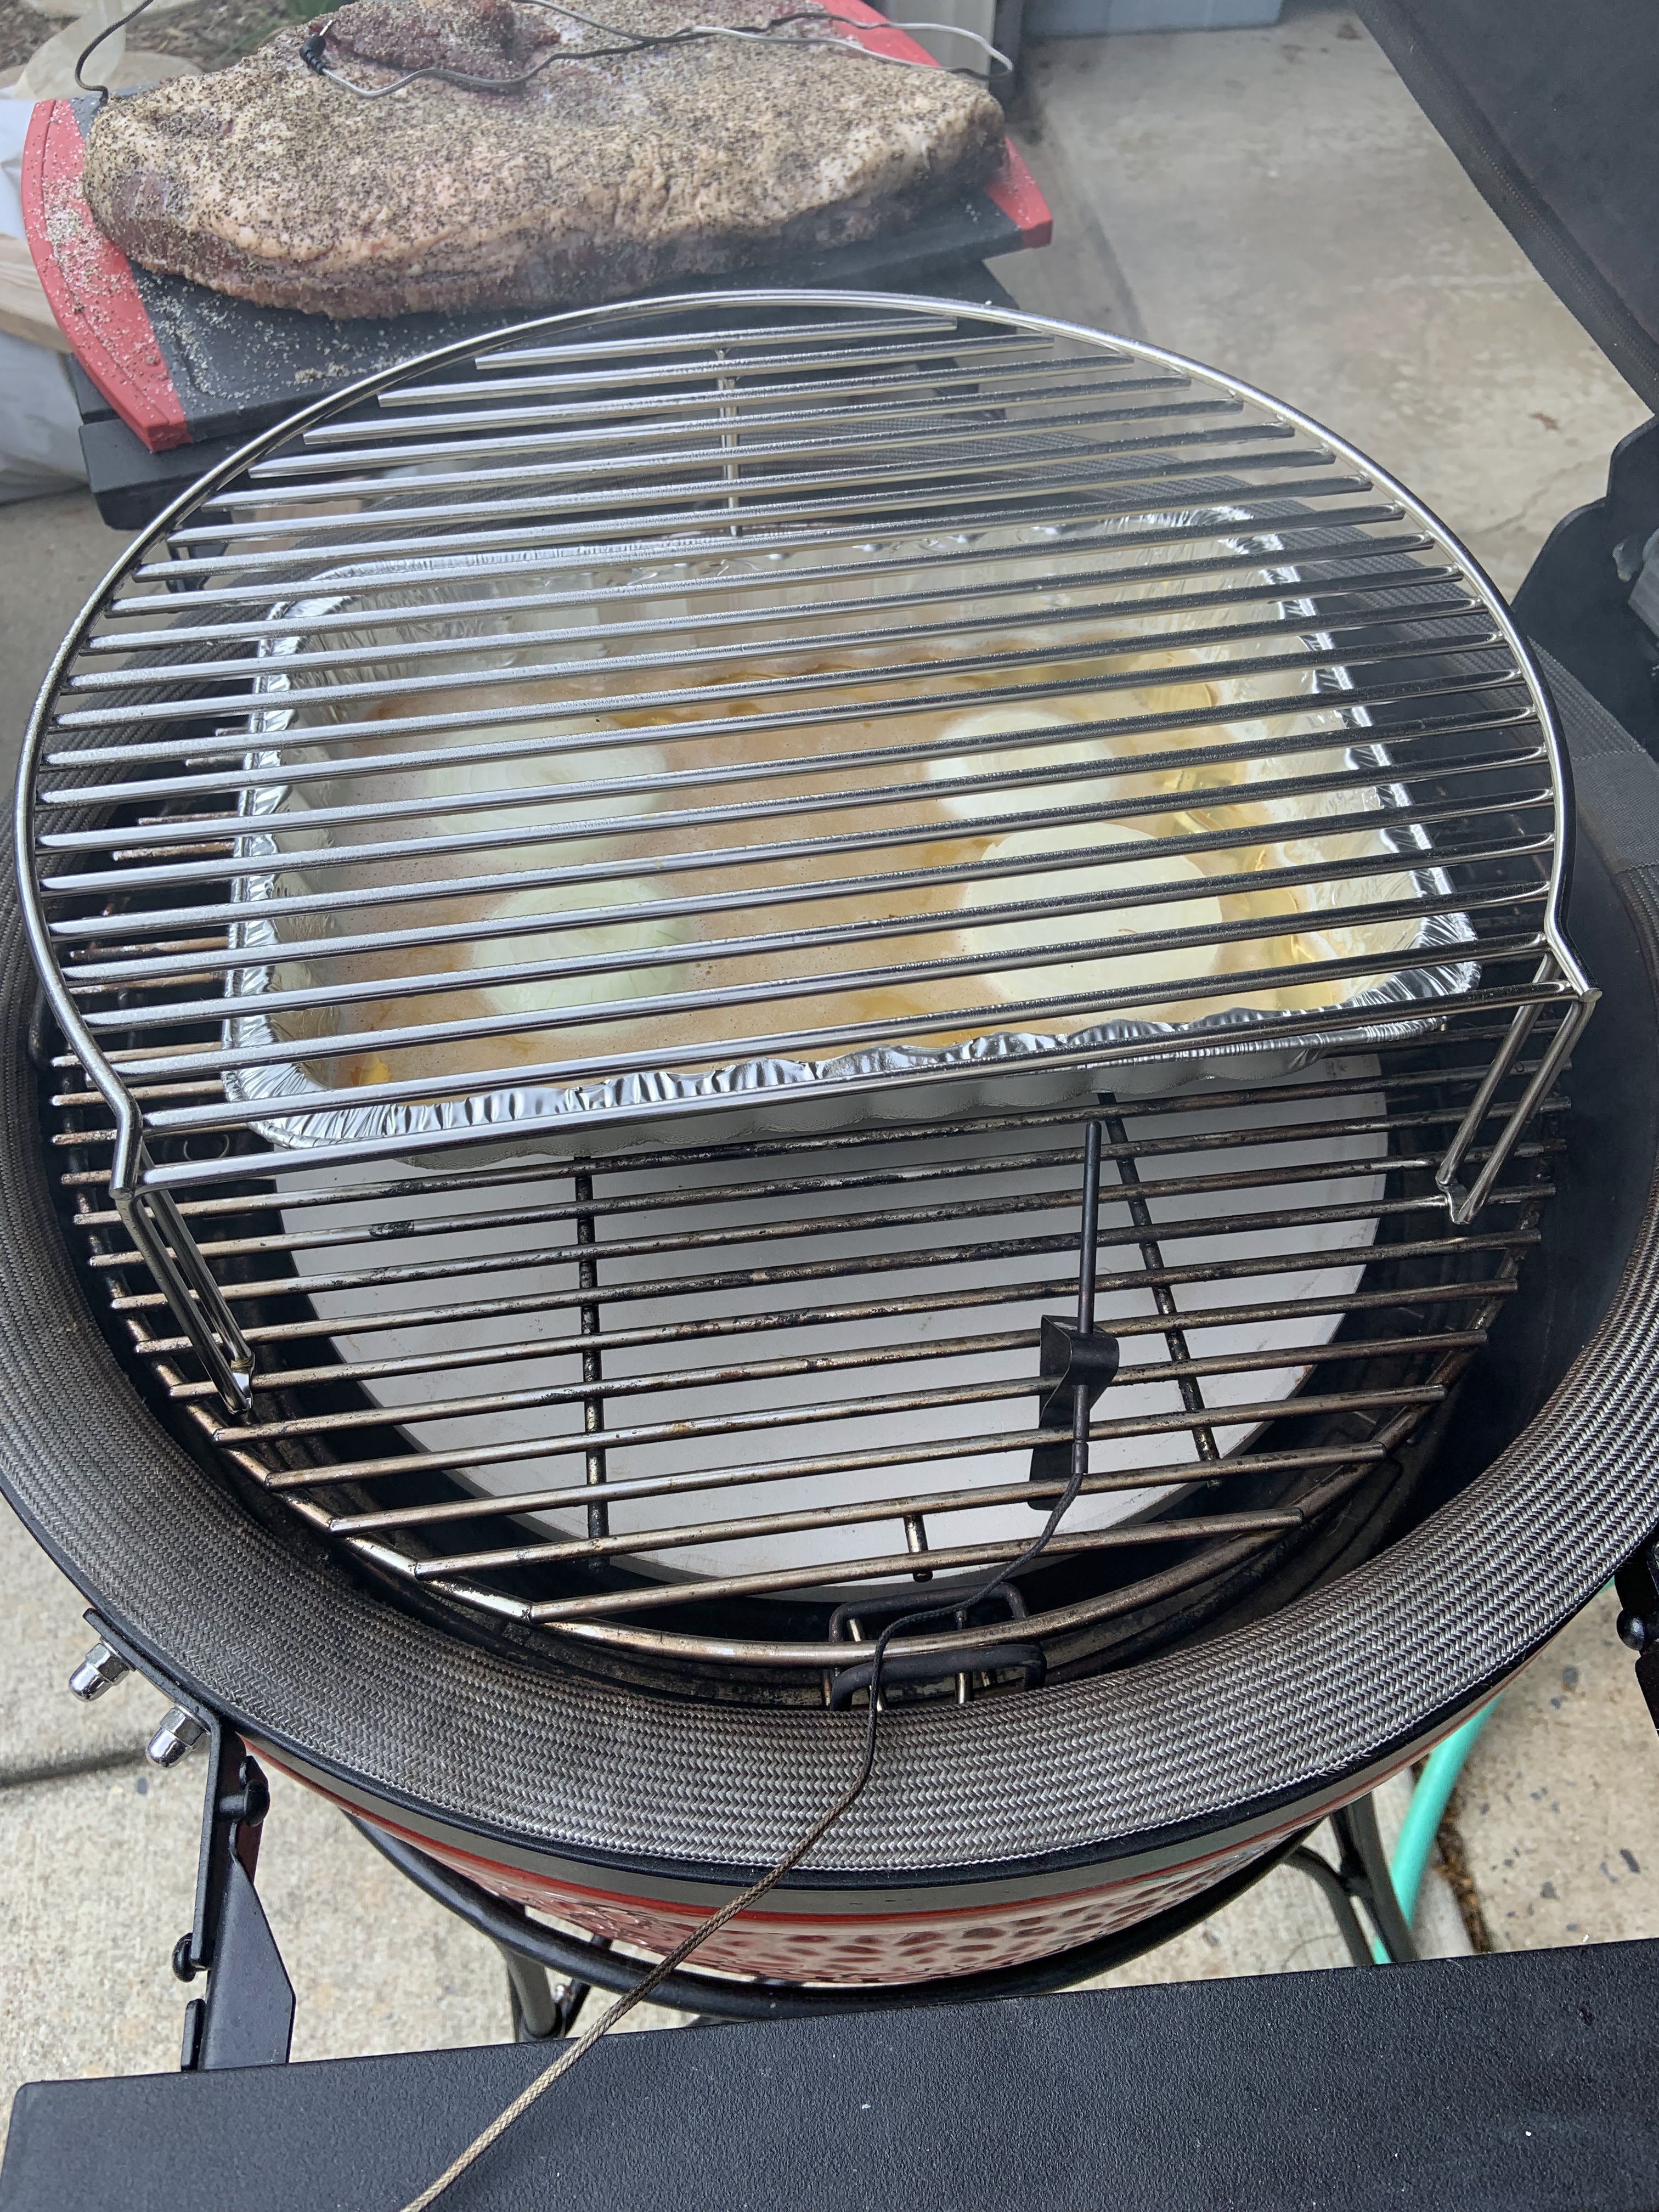

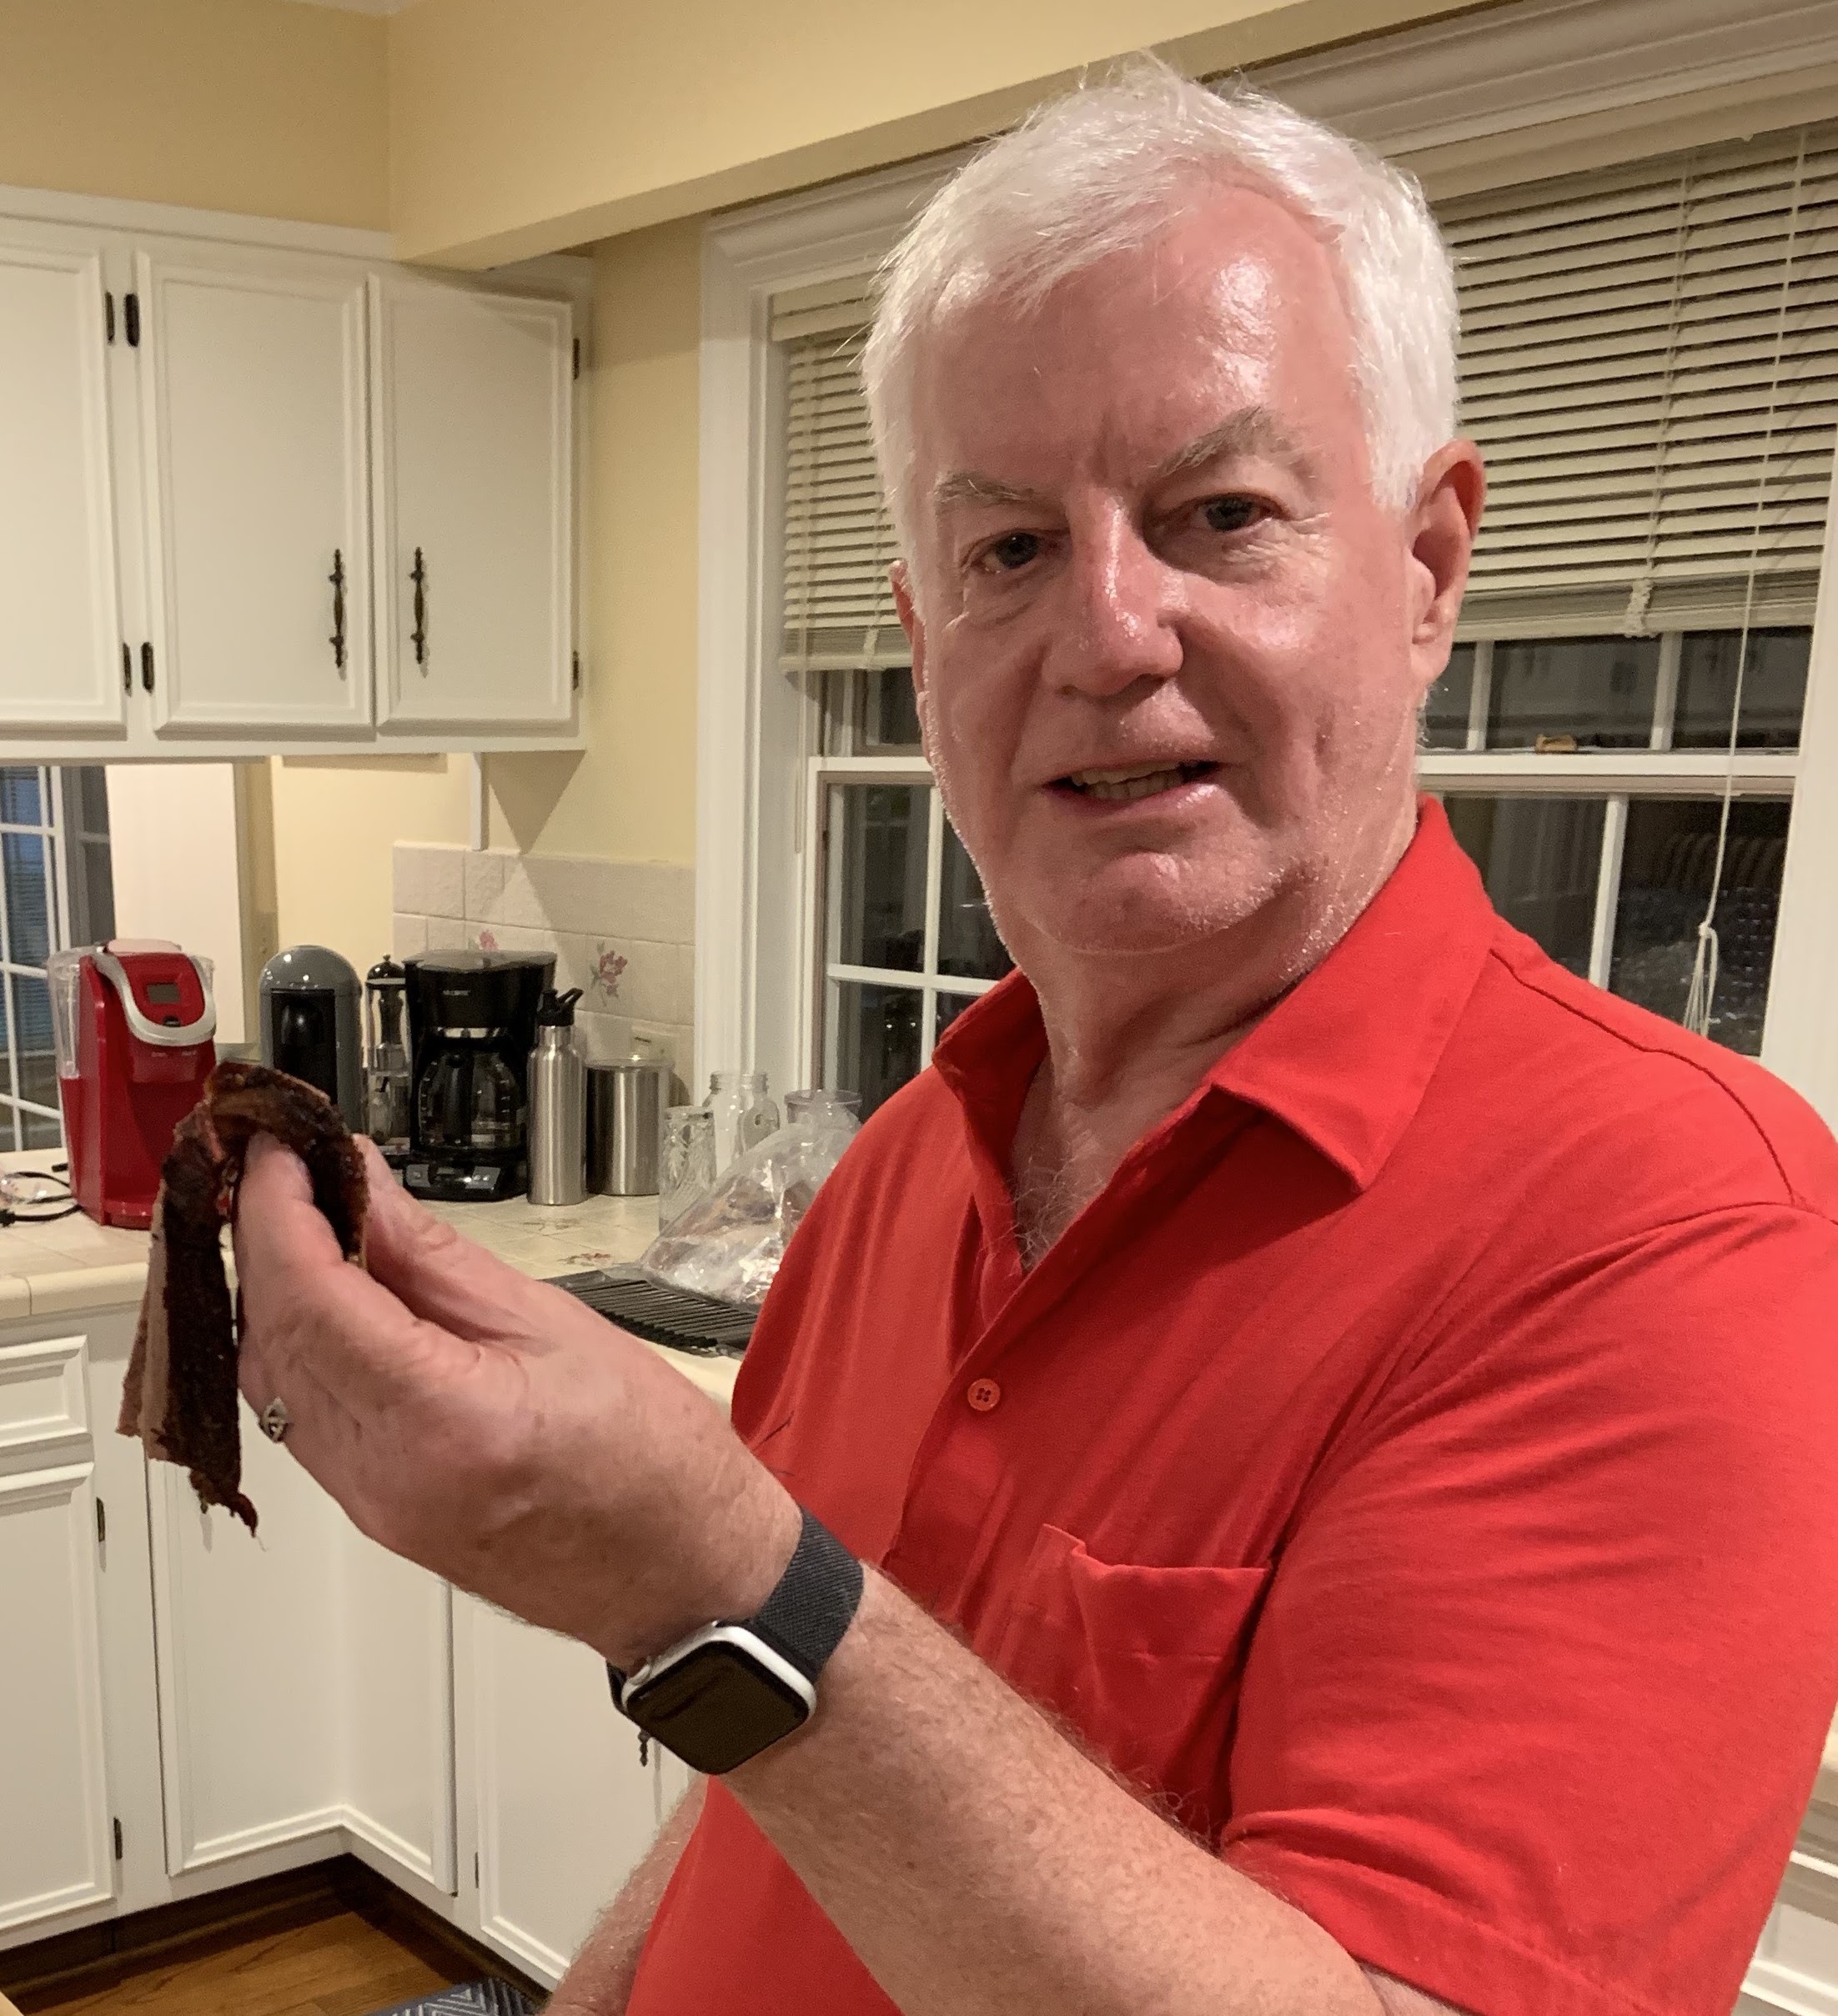

You must be logged in to post a comment.