If I count helping my dad cook steaks on the charcoal when I was growing up, I have been cooking steaks the wrong way for over 60 years! Maybe not the wrong way, but certainly not the best way. Over a very hot fire I would sear the steak for 2 minutes on each side. Then depending on how think the steak was, I would either keep turning it every minute or reduce the heat by moving it higher off the coals or a cooler spot on the grill for it to finish cooking. Since I like my steak Rare/Medium Rare (bright rosy red interior) when I did it right I would have a little crust on the steak but, if it was a bone in steak, either the meat next to the bone was VERY rare or the steak was only slightly pink at the edges. Thin steaks were very hard not to overcook and thick steaks were even more difficult not be charred on the outside and raw in the middle.
I got pretty good at determining when the steak was done the way I liked it by poking the steak with my finger and seeing what resistance I got. A raw steak provides very little resistance and as it cooks that gradually increases.
Articles by two celebrity chef’s that I think very highly of, Jose Andres and Michael Symon, got me interested in trying a totally different way to cook steaks and I am now a believer that tempering the steak under low heat and then finishing it with a reverse sear is a much better way to cook a good steak.
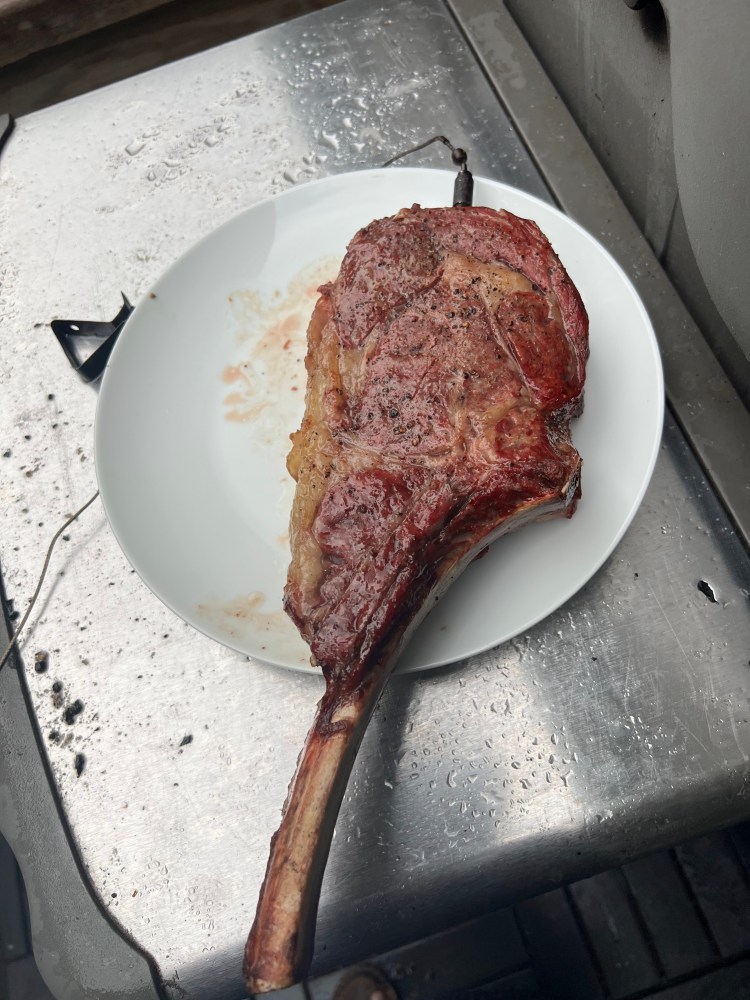
Tempering the steak under low heat lets it cook very slowly and that breaks down the connective tissue so that steak becomes very tender and very juicy. The first time I did this was with a dry aged ribeye steak that was 1 ½” thick. The ribeye is two steaks. On one side of the bone is the tenderloin, what is used for Filet Mignon. On the other side of the bone is the strip steak which has great flavor but not known for its tenderness. Filet Mignon has been given high status because it is the most tender cut of the beef. But it really has very little flavor and and is not really a premium cut of steak. Many restaurants serve it with a strong sauce like Bearnaise to cover the lack of flavor. When I tempered this Porterhouse steak at 250° until it reached 100° internal temp and then reverse seared it, the strip steak was almost as tender as the filet side, and it still had all of that great strip steak flavor.
And the tempering the steak slowly also retains the juices so the steak is very moist and more flavorful. In that old style of cooking steaks, I would have to let the steak rest for at least five minutes for the juices to retreat back not the meat before slicing it or the juices would run out on the carving board and the steak would be dry. If the steak has been tempered and then reverse seared, it can be sliced immediately as the low temperature cooking kept the juices always inside the meat which I find to be another benefit of this approach.
I have tried three good ways to temper a steak for the initial cook and three good ways to do the reverse sear at the end. I will cover each of them with pictures below and then I will finish up with some thoughts on how thick a steak should be, grass fed vs grain fed beef, and dry aging.
Tempering The Steak
The goal here is let the steak cook slowly to an internal temperature of 100°. If you like your steak medium or medium well, you might let the internal temp go higher before taking it out. Since I only cook my steaks to Med Rare, I don’t know what that internal temp should be for Med Well but I suspect you can Google search and find that. If you like your steaks well done then we probably have very little to talk about. You should cook them to the way that you like and I am not criticizing, but that taste profile is very different from mine so I don’t think my suggestions will have much relevance for you.
I salt and pepper the steak and then begin the tempering process. Lightly coating the steak with olive oil will let the salt and pepper adhere to the steak better but I like to brush it with a light coat of Dijon mustard instead of the oil. That also lets the salt and pepper adhere well to the steak and the mustard adds a little flavor to the steak.
This method of cooking the steak is all about the internal temperature and not cooking so many minutes per pound or minutes per side. An internal temperature probe is a requirement for this. At the end of this post I will talk about the two internal probes that I have if you need to get one.
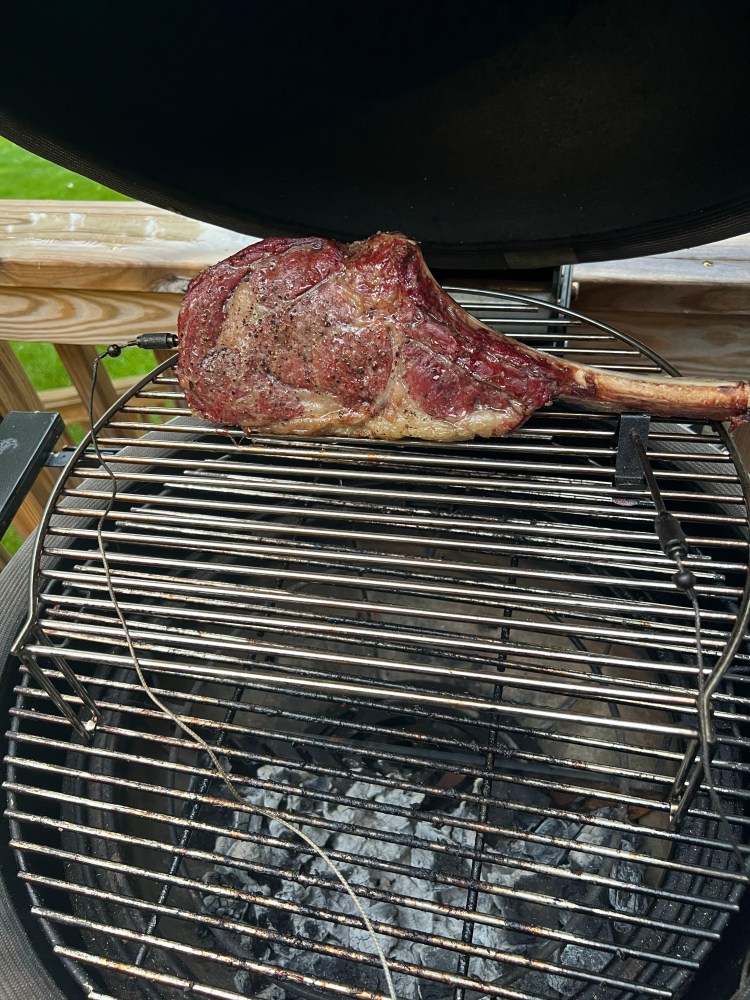
Grilling – If you like to grill your steak, either on a gas grill or a charcoal grill, you can do both the tempering of the steak and the reverse sear on the grill or use one of the other ways to temper it and just do the reverse sear on the grill. In the picture you can see that I have my charcoal all in the front half of the grill and my steak is on the back side on an elevated rack. My Kamado lets me cook at three different distances from the coals, as well as letting me put a divider in the fire box so the coals are only under one half the grill. This gives me lots of options on cooking temperatures and I have this steak at the highest level off the coals and it will take about 30 minutes for a 1” thick steak to get to the target internal temperature.
I could do the same thing with my gas grill by having the gas low or off one segment of the grill. But for me the gas grill is just the equivalent of taking the oven/broiler out of the kitchen. It is more fun to cook outside, and my wife is happy for me to be out of her way in the kitchen so I do use my gas grill when I don’t want to go through the time and effort of getting a charcoal fire ready to cook on. It will add grill marks, but it really does not impact the taste of the steak. Cooking over big lump oak hardwood charcoal will add some flavor to the steak and so a charcoal grill is the much better choice than a gas grill when you are cooking a nice cut of meat. I could also put some wood chunks like pecan or hickory on top of the charcoal and close the Kamado lid to add some smoke flavor during the tempering but we prefer to use smoke to only provide an accent to the flavor of some dishes, so I don’t sue any smoke when I am tempering my steaks. If you really like smoke flavor, that is another reason to try this approach on your charcoal grill.
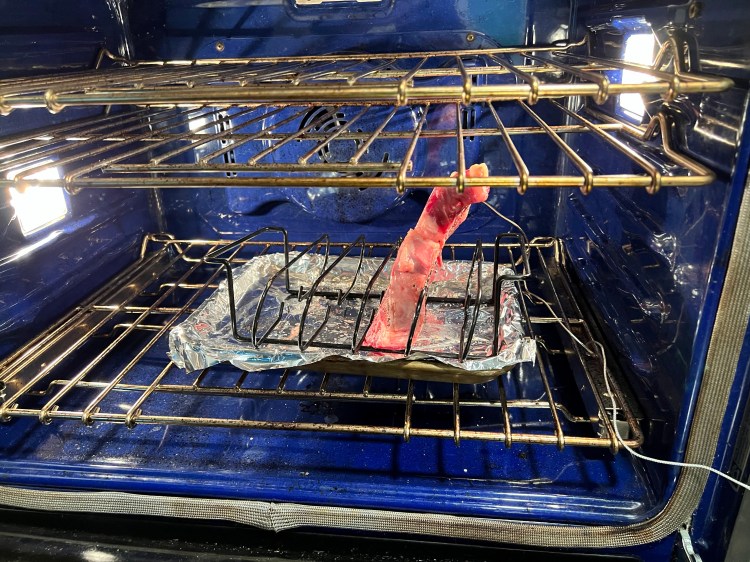
Oven – This next picture shows the steak tempering in the oven at 250°. This also is usually about 30 minutes for a 1” thick steak but that time will vary so I go totally by when the temperature probe tells me it has hit the target temp. The rack that the steak is on I got to grill ribs. It lets me put four racks of ribs on the grill at the same time. It also lets me stand the steak up with it resting on the bone. This lets the low oven heat flow around the steak and cook it evenly. It also warms the bone so the meat next to the bone is cooking, not cooled by bone and staying very rare. If you don’t have a rack that lets you stand the steak up, you can lay the steak down on a rack in the sheet pan but if you just put it directly on the sheet pan instead of on a rack the down side will cook faster due to the contact with the metal and that uneven temperature is not good.
You want about 30 minutes for that slow cooking to break down the connective tissues in the steak. If your oven is getting it up to 100° in less than 25 minutes you should lower the cooking temp to 225° or even 200°. Letting it cook for 45 minutes at 200° is much better than 20 minutes at 250°. More on that in the final way of tempering the steak below.
Sous Vide – This is the wildest way to temper the steak and probably the most controversial. It is also probably the best way to do it if you can get comfortable with putting your steak in a baggie and dropping it into hot water. The Sous Vide fans are very vocal on how great this method is for steaks and they have a very good case. I probably should do a whole post on Sous Vide, but I am still a beginner in this mode of cooking and don’t feel qualified yet to talk about the ins and outs and individual preferences. But I did Sous Vide a bone in strip steak and I think it is an excellent way to very effectively temper a steak. I welcome the Sous Vide fans, and opponents, to weigh in with comments on this mode of cooking.
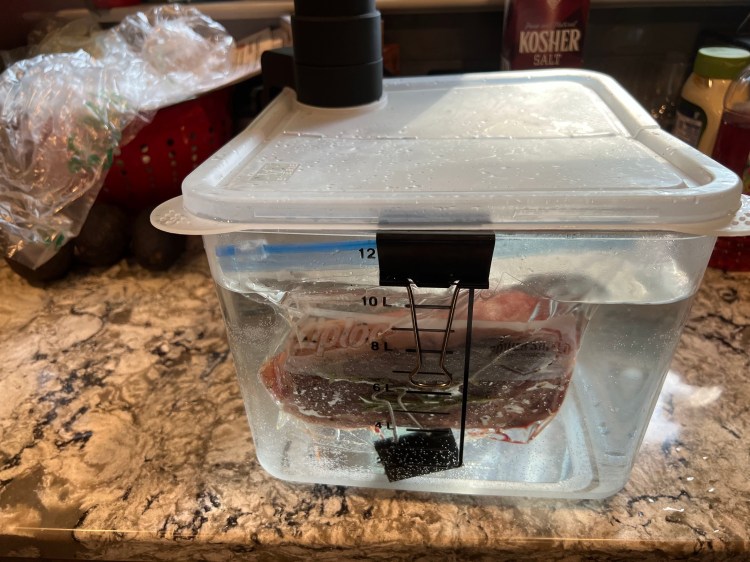
Sous Vide is French for “without air” or vacuum sealed. You put the food to be cooked in a sealed plastic bag and suspend that bag in a bath of circulating hot water at a temperature you set, generally between 100° and 200°. You can put spices in the bag and they will add flavor to the protein being Sous Vide. I had a sprig of Thyme in the bag with my steak and I had it in the Sous Vide for 60 minutes at 125°. If you are not at all familiar with Sous Vide, in the above picture the round black shape in the upper left corner is the Sous Vide unit and it is clamped onto the inside of the large plastic bin. I set the cooking temperature on it and it heats the water to that temp and keeps it circulating so the temperature stays constant. I put my steak in a zip lock bag sealed and suspended into the water with a large binder clip holding it in place. I worked hard to get all the air out of the bag when I sealed it but any air in there would be heated and cause the bag to float so the steak would not be under water. I clipped a second large binder clip to the bottom of the bag to weigh it down so it stayed fully submerged.
Because of the very low cooking temperatures, the cooking time is longer. You do need to plan for that but it is just a few minutes of prep time and then you walk away for about an hour and can work on other things so not a big deal unless you are doing something last minute. The longer cook time at this low temperature allows for even more of the connective tissue to break down so the steak will be very tender and being sealed in the bag means no juices evaporate during the tempering process.
You are not boiling the steak. The water would have to get up to 212° to boil and you are just at 125°. If you left the steak in for 3 hours the internal temp would not go above 125° because that is how hot the water bath is, but mentally I’m still not ready for that long a time. I want it at 100° so I can take 4-5 minutes to reverse sear it and get a very nice crust on the steak with it being between 125° – 130° when I carve it. An hour worked very well for tempering the steak Sous Vide.
Reverse Sear The Steak
What makes a steak very special is when it has a crisp, thin dark bark or crust with juicy meat just inside it. The reverse sear lets us get steak to that appealing color and can add that bark. The three different ways to reverse sear discussed below have different effectiveness on getting that crispy bark.
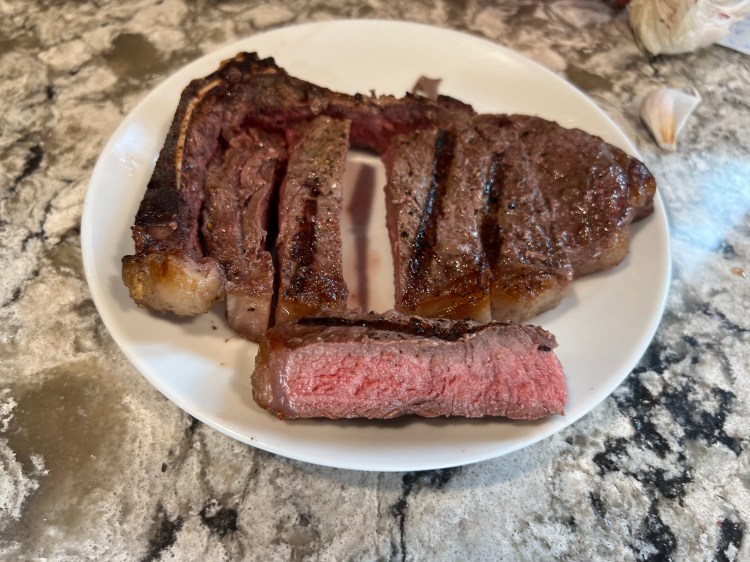
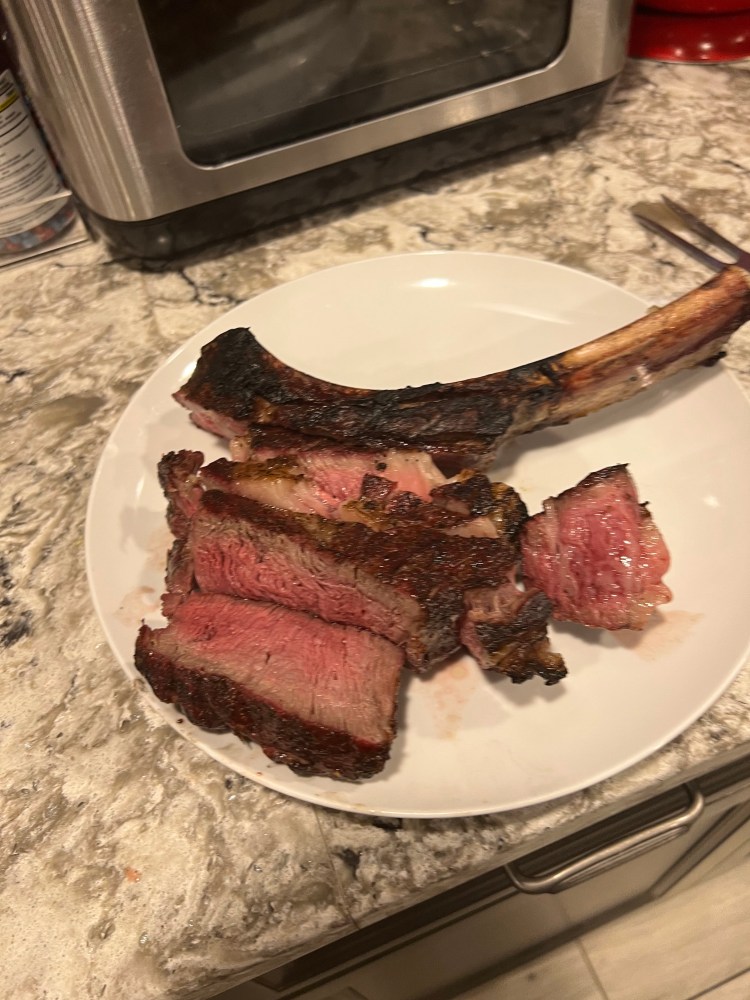
One of the concerns I had was the transition from the tempering when I needed to get the cooking temperature up very high for the reverse sear. Depending on which method you use, there can be a lag time. For me the biggest lag time is getting the charcoal grill up to very high temp for the sear. But the steak can sit for a while on the counter while you get to the cooking temp you need for the sear. The internal temp might increase a little while it sits, but not that much because it is pretty low to start with. Even if 20 minutes is needed to get a really hot fire, the steak might start to cool but the searing process will quickly get it to the desired end temperature. Because the internal temp probes are not recommended for temps above 500° and my Kamado can get over 700°, I take the temp probe out and do the reverse sear at 2 to 2 ½ minutes per side. That is getting the steak to the bright rosy red that I like as you can see in the several pictures where I turned one of the slices up to show the doneness.
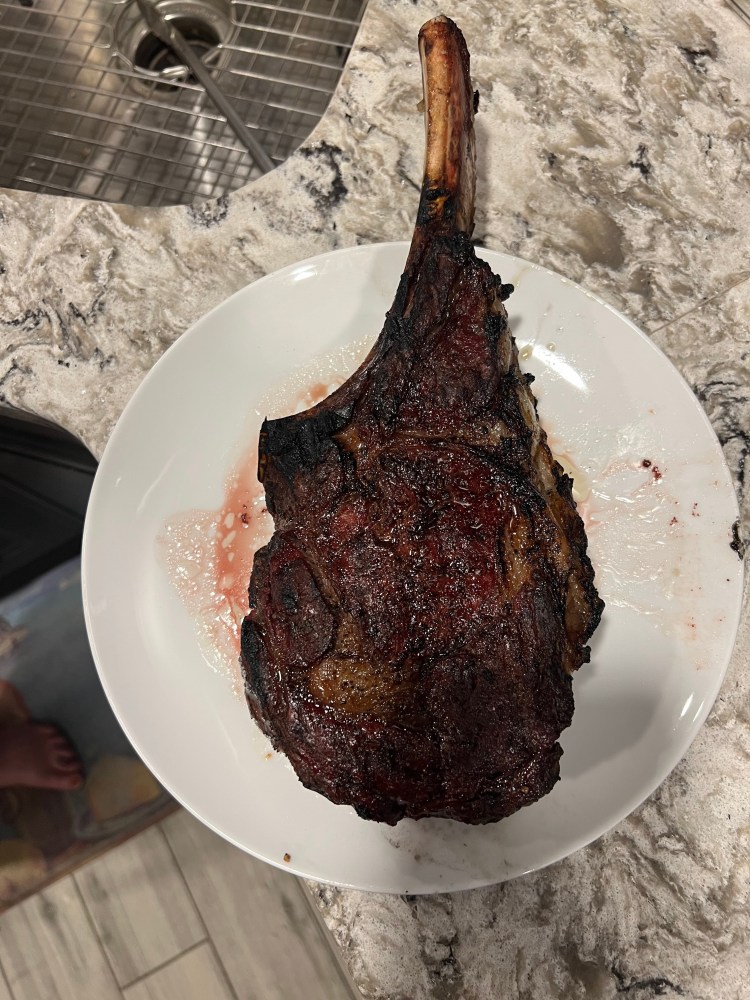
Grilling – I talked about the grill as the first method for tempering the steak so the first alternative I will cover is reverse searing it on the grill. As noted above, you want to make what ever adjustments your grill needs to the vents and the charcoal levels to get it to blazing hot. In the first picture you see a nice Tomahawk steak at the end of the tempering cycle. It has just a slight brown color, not very appealing to look at. The second picture is when it was on the very hot Kamado for about 2 minutes per side and it is dark brown with a nice bark. The third picture shows it sliced with meat a lovely shade of red and very moist and juicy.
In the tempering process I had the pan with the steak on the standard wire grill racks that come with the Kamado. For the reverse sear I use heavy cast iron grill grates that I bought for the Kamado which creates some very good grill marks. I can really do lots of different things with my Kamado. My gas grill just gets to 600° so it is not doing much for the reverse sear so I either use the charcoal grill or one of the two approaches with a cast iron fry pan discussed below for my reverse sear.
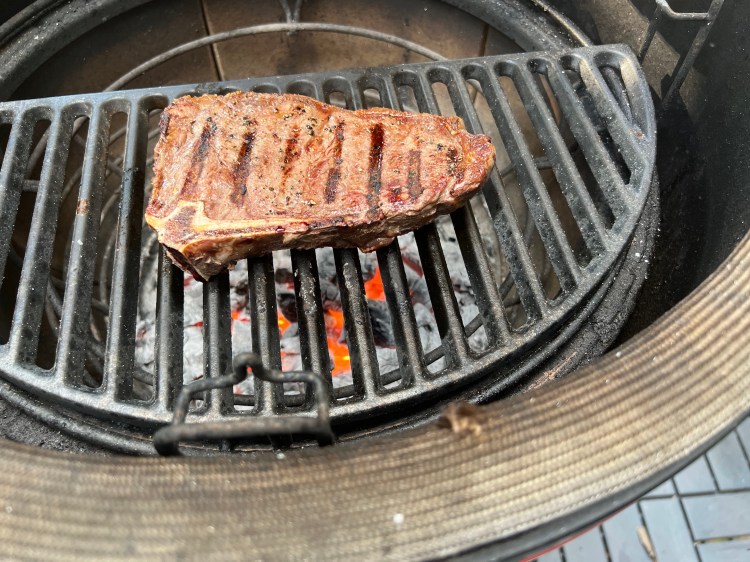
This next picture is a strip steak at the lowest cooking level over a bright red fire with some flame licking the steak. This was a thinner steak so I only did it one and a half minutes per side so it was not as dark as the Tomahawk steak but still with some bark and just the right level of doneness.
I can use the charcoal gill for the reverse sear if I did the tempering in the oven or Sous Vide. I schedule to get the fire to its highest level just when the steak is finishing the tempering process and then take it to the grill to be seared. I get the open flame and a little of the hardwood charcoal taste just using the grill for the reverse sear.
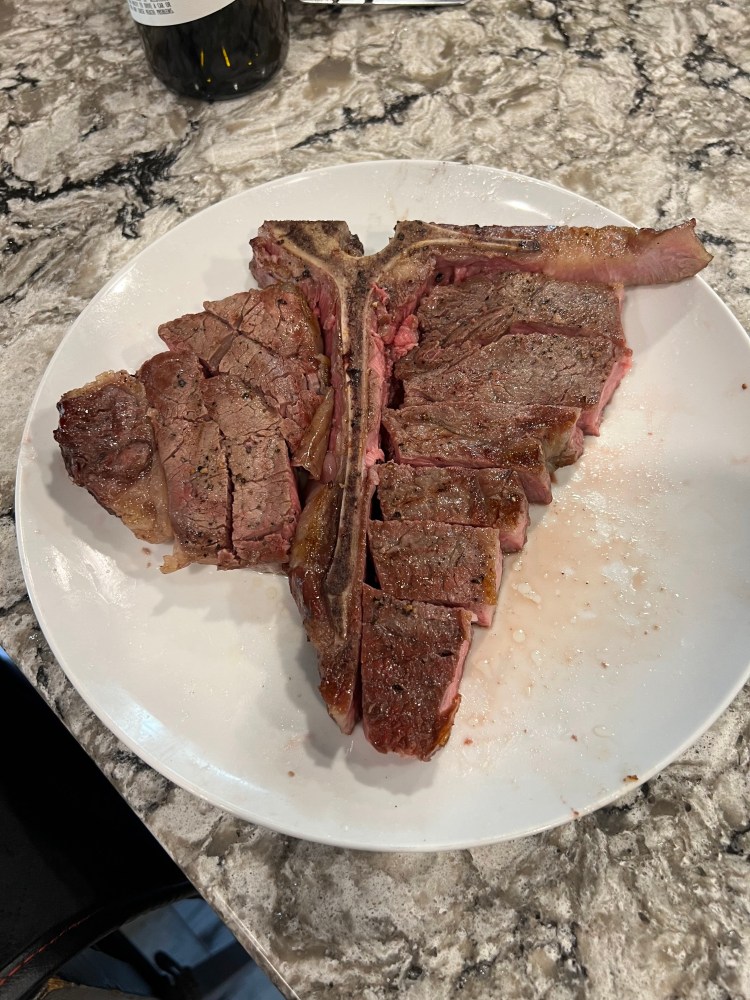
When I have a bone in steak I first cut it off the bone when I carve it and then cut slices perpendicular to the bone about ½” thick. I then reassemble the slices around the bone and serve it family style.
Broiler – If I can’t use the grill for some reason, typically weather, I can do the reverse sear under the broiler. I can lay the steak down on a rack in a sheet pan and flip it at about the 2 minute mark, depending on the thickness of the steak. But I will get much better results if I preheat my cast iron, or carbon steel, fry pan under the broiler and then drop the steak in the very hot pan and again flip it at about the 2 minute mark. The broiler will not give much of a bark on the steak but the fry pan will do a much better job of that.
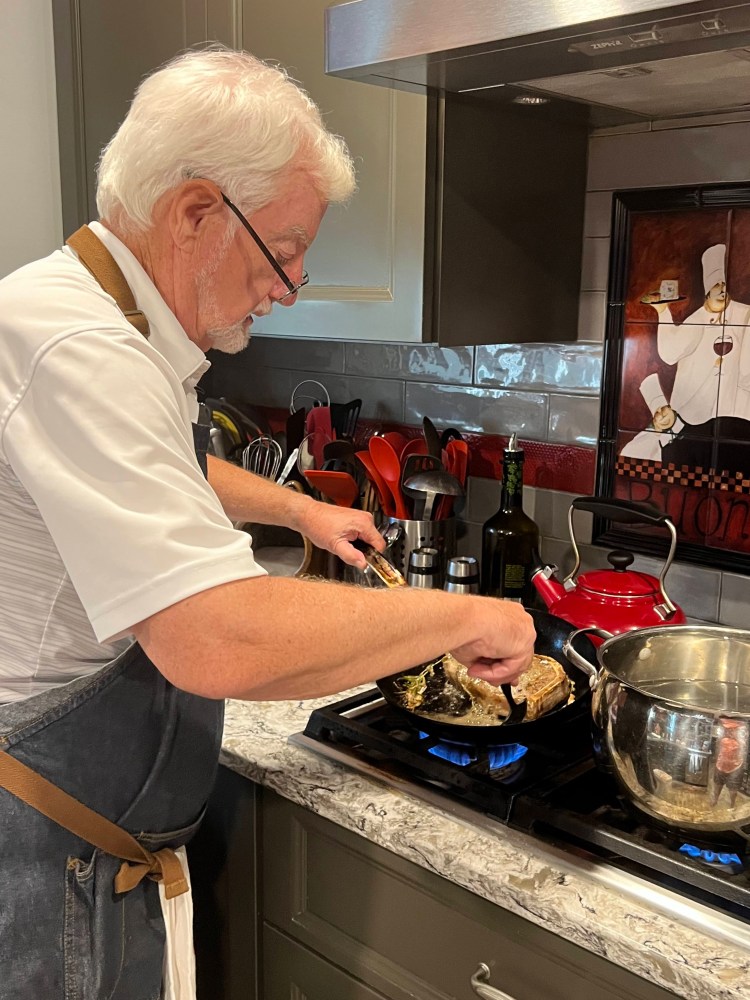
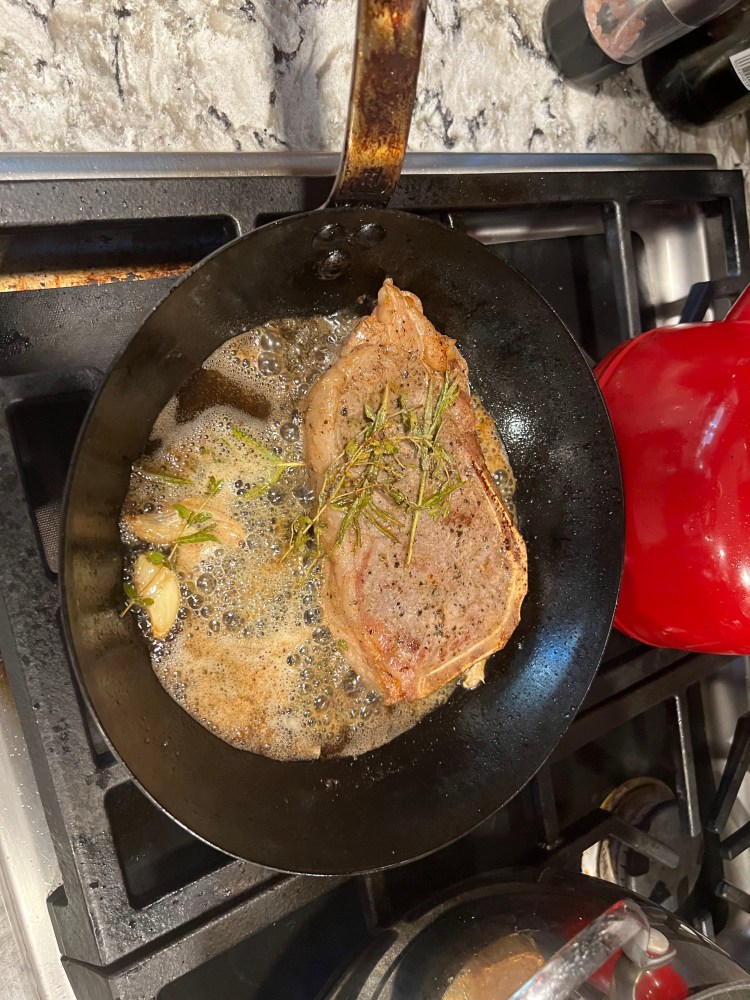
Butter Basted Cast Iron Fry Pan – Not the healthiest alternative, but probably the one that really gives the best final product is doing the reverse sear in a cast iron or carbon steel fry pan on the stove top where you can butter baste it. When I do this, I melt the butter in the pan and get it very hot. I then add a couple of sprigs of thyme, or rosemary, or tarragon and a very large clove of garlic that I have slightly crushed with the flat of my chef’s knife, leaving the skin on. The skin of the garlic and the stem of the herbs have a lot of flavor but you don’t want to chew them. In this case they are flavoring the butter and get thrown out at the end of the cooking proves so leaving them adds to the flavor. The first picture shows the steak just as it comes out of the tempering and is being added to hot pan with the butter and herbs. The next picture Beth took of me basting the steak with the herb butter. I tilt the pan to get a pool of the butter and use a large serving spoon to baste each side for 1½ to 2 minutes depending on the thickness of the steak. This produces a great bark on the steak.
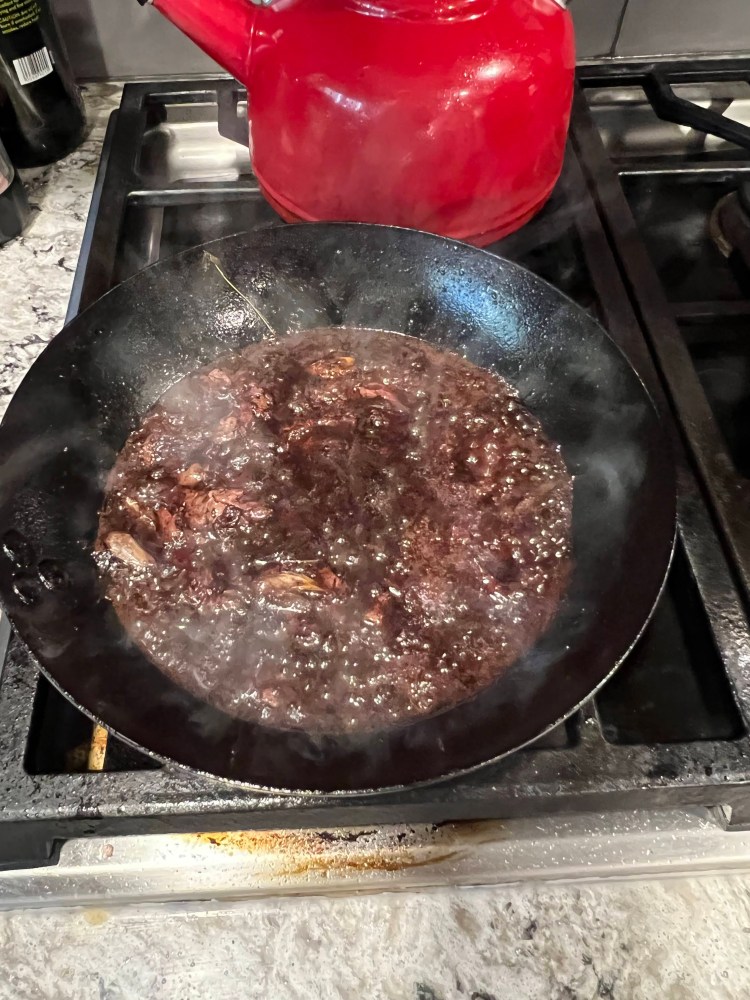
When I take up the steak I let it rest for a minute while I pour the hot butter into the drip jar. I then add ¼ cup of beef stock and ¼ cup of red wine to the pan, with the herbs and garlic still in it, and scrape the pan to get all the residue from the steak. The picture shows that wine sauce reducing down to about half the volume, and I then pour it through a strainer into a bowl to remove the garlic and herbs. I serve that alongside the carved steak so everyone can add what they want to their steak. I can do the same thing if I use the cast iron pan to sear the steak under the broiler but it doesn’t have the butter that is left clinging to the pan and the herbs to add to the flavor.
Two thoughts on the sauce:
- If I don’t have open beef stock available to me, I don’t open a new can or carton just for ¼ cup. I just double the red wine to make up for it.
- I don’t cook with expensive wine. In my earlier blog post on Red Table Wines for Under $15, I talked about having one of those inexepnsive wines to cook with and then drinking a nice bottle of wine made from the same grape, cabernet sauvignon or pinot noir usually, with the meal. As long as i am cooking with the same grape as I will be drinking, I can keep the nice bottle just for drinking.
- All the volumes and timing here are for a 12-14 oz steak cooked Med Rare for two people to share. Adjust accordingly if you are cooking larger steaks or a want a different level of doneness.
Other Thoughts On Steak
How thick should a steak be – I believe the best steak is when you have one steak large enough for everyone to eat their fill. If you have more then 6 people, or some huge eaters, you might need to go for a second steak. Assuming you have a source to have a steak cut to the size you want, a thick steak will be much more flavorful and juicy than a thin individual steaks. If you have to deal with what the supermarket has available, look for the thickest steaks they have. In the old way of cooking steaks by first searing them, it was very difficult to cook a very thick steak to the desired level of doneness. By tempering it first for as long as it needs to get the innermost part of the steak up to 100°, you don’t have that problem. For a steak over 2″ thick maybe you want to go to 110° internal to end up Med Rare after the Reverse Sear.
Grass fed vs grain fed beef – When I was growing up cows grazed on grass and then went to be slaughtered. The cattle farmers realized that they could add significant weight to the cow, and therefore make more money from the sale, by having the cows fatten up on corn so grain fed beef became the norm on the supermarket shelves. Beth and I were on a trip to the Caribbean a few years ago and had a steak dinner and both of us remarked how good the meat tasted. Beth said it reminded her of the steaks she had as a child. We asked and were told that it was grass fed beef that came in from South America. Grain fed beef will be fatter and that can make them more tender, but grass fed beef has much better flavor. If you have a chance to get grass fed beef, I strongly suggest you try it. You may have been raised on grain fed beef and don’t want a different taste and that is fine. I will take grass fed over grain fed every chance I get.
Dry aged beef – Dry aging is a process that ages the beef before cooking and that aging breaks down that connective tissue and makes the steak much more tender. Some of the great steak houses like Peter Lugers in New York dry age all their steaks for at least several weeks so they don’t need to do the tempering process to server tender steaks. Beth has dry aged some beef for a few days in our refrigerator and even that short time made a noticeable difference. In my earlier blog on how Bobby Fly cooks steak I mentioned that some of the large Harris Teeter stores have dry age units that keep the steaks for at least two weeks before they will sell them. They get a very premium price for the dry aged steaks but they will cut them to order for you and the taste is worth the price premium.
Internal Meat Thermometers
I have two internal meat thermometers that I can put in for the full cooking process and see the internal temp on my cell phone any time I want it. I have had both for several years and this is a rapidly changing technology so there are probably newer, better products on the market now. I think the important things are:
- To be able to get the temp on your phone. I am fine with Bluetooth, I am not going far enough away where I need it to be wi fi. I am also OK with the probe having a cable back to the monitor unit. Both Bluetooth and wi fi can have limits of not being subject to temps over 400° so the units where the probe is cable connected to the monitor which sends the data to my phone can work at higher temps.
- At least two probes are needed for many cooking sessions, three can be good sometimes. When I am cooking in my Kamado I want a probe in the protein being cooked to let me track the internal temp and I want one on the cooking surface right next to it telling me the cooking temperature that the meat is getting. The big dome of the Kamado can have different temperatures and the external one is at the top of the dome and generally different from what the temp is down on the grill rack. If I am doing two pieces of meat, I may want an internal probe in each of them, especially if they are different sizes so that would call for three probes.

For my outside coking I use a ThermoPro Wireless Meat Thermometer with 6 probes. The model I have is no longer for sale and I don’t remember the model number. The TP930 appears to be the current model closest to what I have and it comes with 4 probes. I don’t think I ever used 4 probes so this would be my choice if I needed to replace what I had now. I have had several generations of ThermoPro and been happy with their products. I recently put probes into ice water and boiling water and found that the readings were 4 degrees higher than they should have been. I now factor that in and add 5 degrees to the temp I am looking for and cook to that reading on the device.
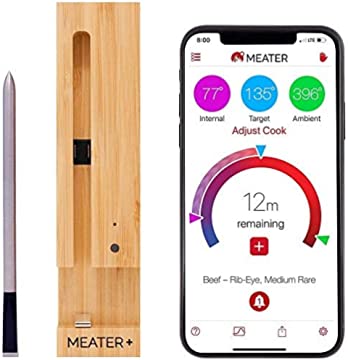
In the kitchen we have a MEATER Plus Smart Meat Thermometer. On the plus side it is totally wireless so no cables are coming out of the oven. The user interface is also very good. The device has two sensors. One at the end of the probe where it goes into the meat to give the internal temp and the other at the top where it gives the cooking temp. If I put the desired end internal temp into the ap on my phone, it will tell me approximately how long it will take to get to that internal temp based on the cooking temp that it is getting. It also has let me know that my oven is generally 8-10 degrees cooler than the temperature I select when turning on the oven so I now set the over for that higher temp so the actual cooking temp is what the recipe called for. The two negatives to this product are that the charging station needs to be just a few feet away from the probe when it is in the oven and that it should not be used at temps over 400°. Both of those are show stoppers for my outside cooking but OK for the kitchen oven. It is on the expensive side at $100.
I hope you found this blog of interest and let me know your thoughts after you have tried tempering a steak and then reverse searing it.

Bill, this is so interesting. I was imagining how much our dad would have enjoyed reading this post. I remember him cooking steaks in a cast iron pan in Vermont when John and I visited him, and he poked them with his finger to check how done they were. He was so proud of you. As am I. Love Ellen
LikeLike
Bill, my technique for grilling steak was exactly as you described your old technique to be.
Tried this new way as you described with a couple of nice Ribeyes on my old school weber charcoal grill and it worked great for a first attempt, Tender and juicy with nice bark. Since my weber only has a rack with only one level, I reached my desired internal temp too quickly and as a result my steak was a little more done than I normally like. All in all, I think you’ve turned me on to a new way to cook my steaks and I look forward to tweaking my technique to match my old school bar-b-q grill. That’s the really fun part in my opinion.
Thanks Bill, my life is already pretty good and you’ve helped to make it just a little bit better.
Frosty
LikeLike
Frosty,
Try putting the coals in your Weber mounded up on one side. Temper the steak at the far side where the coals aren’t and then do the reverse sear over the hot coals. They might give you a little more tenderness. One other thing to try – coconut charcoal instead of standard briquettes. It burns hotter and longer so you need less and can more easily have the coals in just half of the grill. You can find it on Amazon.
LikeLike