Beth and I got married Memorial Day weekend of 1971, a week after she graduated from Georgetown. I was halfway through my MBA up in New York at Columbia. Beth was an Ensign in the Navy Nurse Corps and our sole breadwinner. She had the 7 AM to 3 PM shift on Thanksgiving in 1971 so she suggested that we either get take out or go to a restaurant for our first Thanksgiving dinner together. I responded that we should have a home cooked turkey dinner for our first Thanksgiving together. Beth’s response was she was not going to work a full day and come home and start to cook a turkey at 4 PM. I agreed and suggested that she come home and eat a turkey at 4 PM. If she bought a turkey, I’d cook it.
You can download the recipe I am using now, after 51 years of roasting over 70 turkeys or read the blog and decide if you want the recipe and I have the download links again at the end of this blog. The other recipe is for Cranberry Chutney and that is discussed below
Our bible for the kitchen was The Joy of Cooking and Irma had her typical very comprehensive recipe for roasting a turkey for me to follow. When Beth arrived home from work there was a gorgeous golden brown roasted turkey sitting on the table ready to be carved and it was moist and delicious. Beth informed me that she would never roast a turkey and this Thanksgiving will be 52 years where her record remains intact. Our phone in 1971 hung on the wall in the kitchen and did not have any camera capability so we do not have a picture of that first turkey.
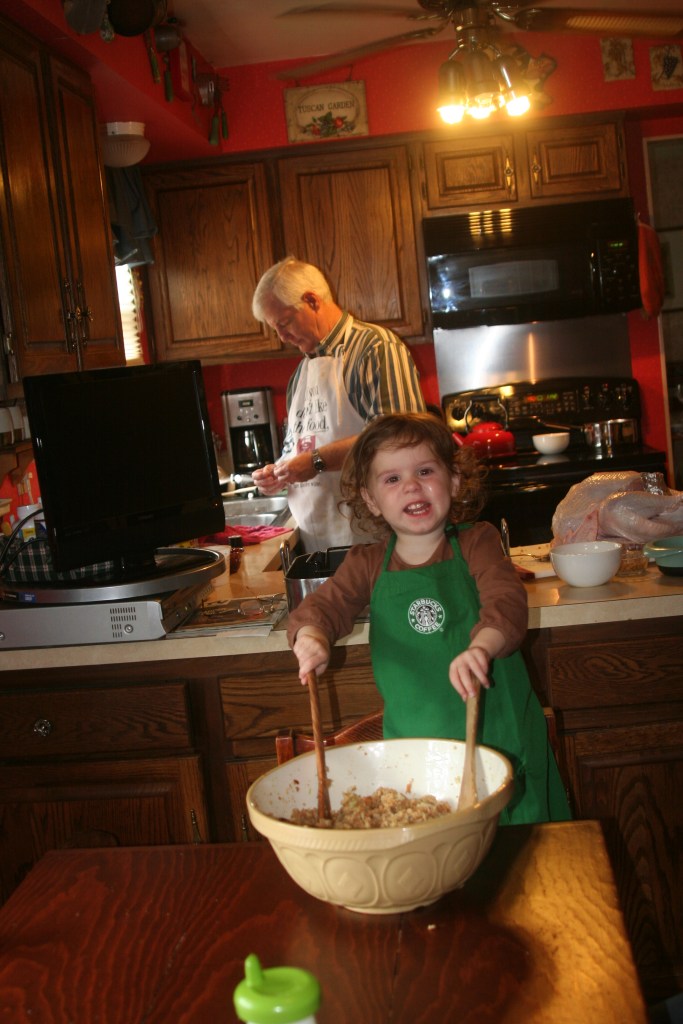
My roasting the Thanksgiving turkey has become a family tradition and each of my three children was my Sous Chef for a couple of years to learn my recipe and approach. Since she was 18 months old, my oldest granddaughter, Reese Davis, has been my Sous Chef and and this picture is Reese at 18 months old in 2007 helping to make the stuffing. She also tasted it frequently for quality control. Last year, when she was 15, she took on the lead role and I was her Sous Chef. This year Ray Davis, her youngest brother, age 8, has asked to join the team and learn how to roast a turkey. He really likes cooking at their house and I think he will quickly be a very productive member of the team. “I” and “we” are used somewhat interchangeably in these notes with we representing the team of Reese and I with assistance in some places from Beth.
Over the last 52 years I have continued to use the overall approach from the Joy of Cooking recipe but I have added tweaks and incorporated some lessons learned over those years. This post is to share that accumulated experience with you. There are many approaches to cooking a turkey including deep frying, smoking, wet or dry brining, and spatchcocking. All of them can produce the entrée for a great Thanksgiving dinner. This post will talk about one way of oven roasting a turkey with stuffing/dressing and making the accompanying gravy. My role on Thanksgiving is roasting the turkey and after Beth left the Navy I have left the gravy, side dishes, and desserts to the rest of the family. Each of those topics could be an even longer post, but you will not see a post on that from me. I am however including Beth’s Cranberry Chutney which is very closely related to turkey, and I will also offer some wine suggestions for Thanksgiving dinner.
I use the term stuffing for the seasoned breadcrumb mixture that bakes inside the turkey. Dressing is that same mixture cooked outside of the bird in a baking dish. Our family really loves stuffing/dressing so I do both. That way we have more than will fit inside the bird. Occasional blind tests have shown that no one can consistently tell which bowl is stuffing and which one is dressing but that is our tradition and I continue it. In the interest of typing less I will just say stuffing below but that covers both stuffing and dressing unless one is specifically addressed.
In this post I will talk about the topics below. At the end of the post you will be able to download the recipe if you want to give this approach a try and also the recipe for the Cranberry Chutney.
- Overall Approach
- Utensils
- Thanksgiving Dinner Process
- Wine aAccompaniment
Overall Approach to Roasting Turkey
There are three themes that drive my approach to roasting the turkey for Thanksgiving.
The first is that your meal planning should be for at least 5 meals, not just the big Thanksgiving dinner. In addition to the family Thanksgiving Dinner you should be planning an encore full dinner with the leftovers two or three days after Thanksgiving, perhaps for a smaller group, or supplying leftovers for grown children to take to their own home to have their encore turkey dinner. At least one lunch of hot turkey sandwiches should also be planned. The fourth meal recognizes that the stuffing and cranberry are gone by now and is targeting the tiny scraps of turkey meat that are on the cutting board every time you carve some of the turkey. Turkey tacos, or nachos, is a complete break from the other turkey meals and if you save those scraps instead of tolling them out, the meal component is free! The fifth meal is taking the turkey carcass once all the meat is off if it and using it to make a rich stock for turkey soup using the last pieces of turkey meat.
Planning five meals up front lets you purchase the right size bird and gets you the best return on what you pay for that bird. The last two meals are virtually free, and really delicious.
The second theme is related to the first one and it is to get the maximum utility out of every component that you use in making your turkey dinner. When I talk about the prep process below, or Mis en Place, we are going to use onions three different ways and use every part of the onion, including the skin. The same is true for celery where we are using the leaves at the top of the stalk and the white end at the bottom of the stalk that we always throw out. Carrots are used two ways. By knowing how I plan to use each of those ingredients, I can use fewer of them.
The third theme is that the toughest part of cooking a turkey is to have all of it fully cooked and none of it overcooked and dried out. All the poultry that I have cooked as whole birds Duck, Goose, Turkey, or Chicken – present the same challenge. When they sit on a rack in the oven with the breast side up, the breast gets much more heat and cooks faster than the dark meat that the bird is resting on. By the time the thigh meat is fully cooked, at an internal temperature of 165-170°, the breast meat is often overcooked. When the bird has been bred to have huge amounts of breast meat, like a turkey or supermarket chicken, that adds to the difficulty of having all the meat done at the same time.
I do three things to address that issue. How I do all three are discussed under the Thanksgiving Dinner Process below and are easier when using the tools that I discuss under Utensils.
- For the first 30 minutes of cooking I have the bird upside down. The legs and thigh are on the top and the breast meat is underneath. That gives the dark meat a head start in the cooking process so it will finish at close to the same time as the breast meat. It does mean that I need to take a very hot roasting pan out of the oven and take a heavy bird that is also very hot by this point and pick it up and flip it over so the breast meat is on top and put it back in the pan. This is not easy. With the right tools that I talk about below and the right approach I have done it about 70 times without dropping the bird on the floor or burning myself. Yes, I also roast turkey sometimes other than at Thanksgiving.
- For the first 50-60 minutes I have the oven at 450° and then I turn it down to either 350° or 325°, depending on the size of the bird. Which temperature to use is shown in the recipe that you can download at the end of this post. Starting at the higher temp gets the carcass of the bird hot so the meat closest to the bone starts to cook and the lower temperature for final cooking lets all of the meat get fully cooked.
- At 20 minutes after the bird has been rotated to breast side up, I cover the breast of the bird with cheesecloth soaked in unsalted butter or olive oil. The cheesecloth insulates the breast meat so it cooks slower and keeps it from being overcooked by the time the thigh meat is up to 165°. For a long time I basted the cheesecloth covered turkey frequently but I have recently become convinced by a number of postings by chefs I respect that basting does very little to enhance the flavor or add to the moistness because the juices roll off the skin of the bird and have little impact on the meat underneath. But opening the oven door frequently to baste the bird lets a lot of heat escape and lengthens the cooking time which can cause the bird to be overcooked. My bird never came out overcooked but I have stopped basting the turkey.
Useful Utensils
It is very hard to make very good food if you have are working with poor utensils. Beth and I have made the investment to have good quality tools for a home chef. First and foremost, for all cooking, and very much for the Thanksgiving turkey, good quality knives with a sharp edge are mandatory. Over the years Beth and I have found knives from different manufacturers where we liked the weight and balance, the overall feel of the knife, and they have been good tools for years. The knives we have bought most recently are from MadeIn and we really like the quality and price of those knives. I plan to do a blog post on kitchen knives when I finish the posts for our Spanish Winetasting Trip. I use a Make Sharp MK.2 electric knife sharpener to keep a good edge on about a dozen kitchen knives that we use regularly and I can have a very good edge on all of them in about 15 minutes. The first time I used the Make Sharp it was more like 45 minutes but once the knives have gone through several times at the 20° setting, the edge is restored very quickly.
Good pots and pans are also very important, and I have done a couple of blog posts on cast iron and carbon steel fry pans. Our stock pot is the 5 quart Chantal stainless steel pan in the picture. It has nice weight and lets me start with about 4 quarts of water along with all the ingredients and, at the end, reduce that down to about 2 quarts of rich stock. We can also put this pan in the oven which we do when we make the turkey stock. I also use one of the ceramic baking dishes that I also use for lasagna for the dressing. I also use a basic sheet pan in part of the turkey prep.
In addition to these good standard kitchen tools, I have accumulated a set of other tools that really help me with the roast turkey. I use all of them for other recipes as well, but I would not want to do my turkey recipe without these tools that make the job much easier.

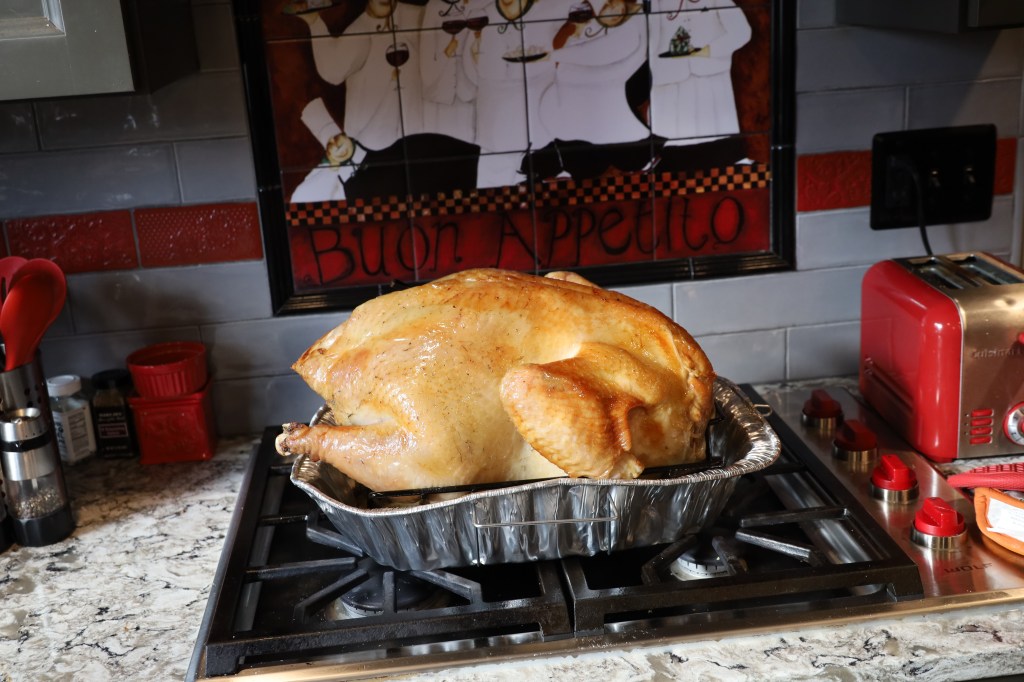
Roasting Pan – When I first started roasting the turkey we had a large roasting pan that I used. As our family grew and the size of the bird did as well, we had to get a bigger roasting pan. When the disposable aluminum pans became widely available, I tried them and was an immediate convert. There was no impact on how the bird cooked and cleanup became a much easier and faster job. I now use the one in the picture with the handles and supporting frame. That makes it easier to do the rotation of the bird to breast side up after 30 minutes. For one year we had a very large family group with requests for leftovers that they could take home so we got a very big bird. I used two aluminum pans nestled inside each other to handle that weight but the single pan in the picture with the supporting aluminum frame easily handles an 18 lb. bird .
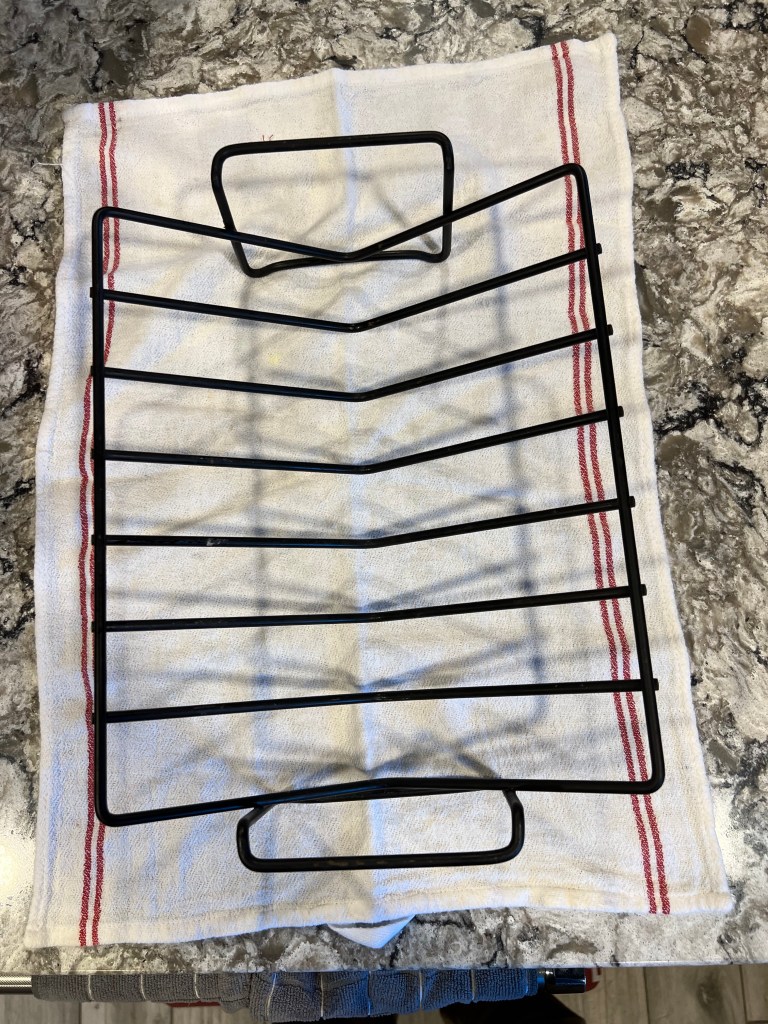
Roasting Rack – The roasting rack in the picture is used for any of the large birds that I cook, and I have also used it for some large beef roasts. I can turn it upside down and put it on my Kamado grill with slabs of pork ribs in each slot so I can cook about 3x what I could cook if I just lay them down on the grill. I take the roasting pan and this rack out on the deck and liberally spray them with Pam cooking spray. Doing it on the deck does not get the spray over other things in the kitchen. The rack is easy to clean without food caked to it.
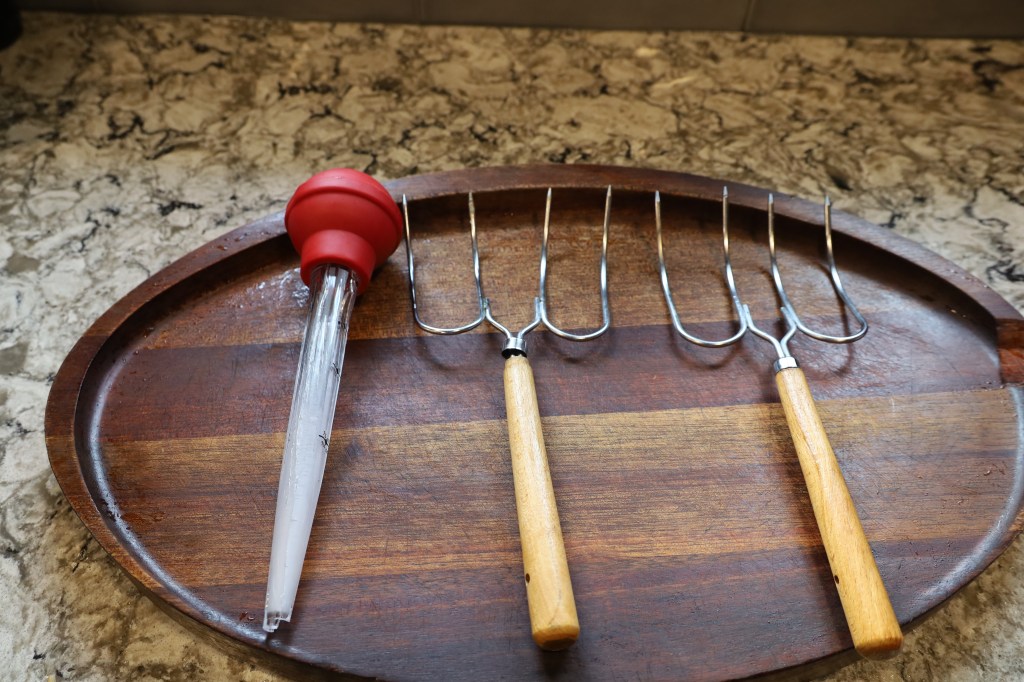
Poultry forks – The real key to me rotating the partially cooked bird is these poultry forks. With someone holding the roasting pan and the rack. I can slide one fork in each end of the bird, lift it our of the pan, and rotate it 180 degrees to get the breast side up. Before I got these forks, I was using combinations or tongs and carving forks and the difficult process of rotating the bird earned the nickname “flipping the bird”. Now it is pretty simple, but part of that is having done it multiple times. I find the forks very good for getting any large bird out of a roasting pan and for some large pieces of hot meat like pork shoulder or brisket to get them off the grill to wrap in foil or butcher’s paper. I strongly encourage you to have good quality poultry forks as a kitchen tool. This is an Amazon link to ones for $19 that are very highly rated – https://www.amazon.com/KAYCROWN-Stainless-Lifters-Poultry-Carving/dp/B07B1Z7X9N/ref=sr_1_7?crid=3B63VQDCNYYXW&keywords=poultry+forks&qid=1668354806&sprefix=poultry+forks%2Caps%2C82&sr=8-7
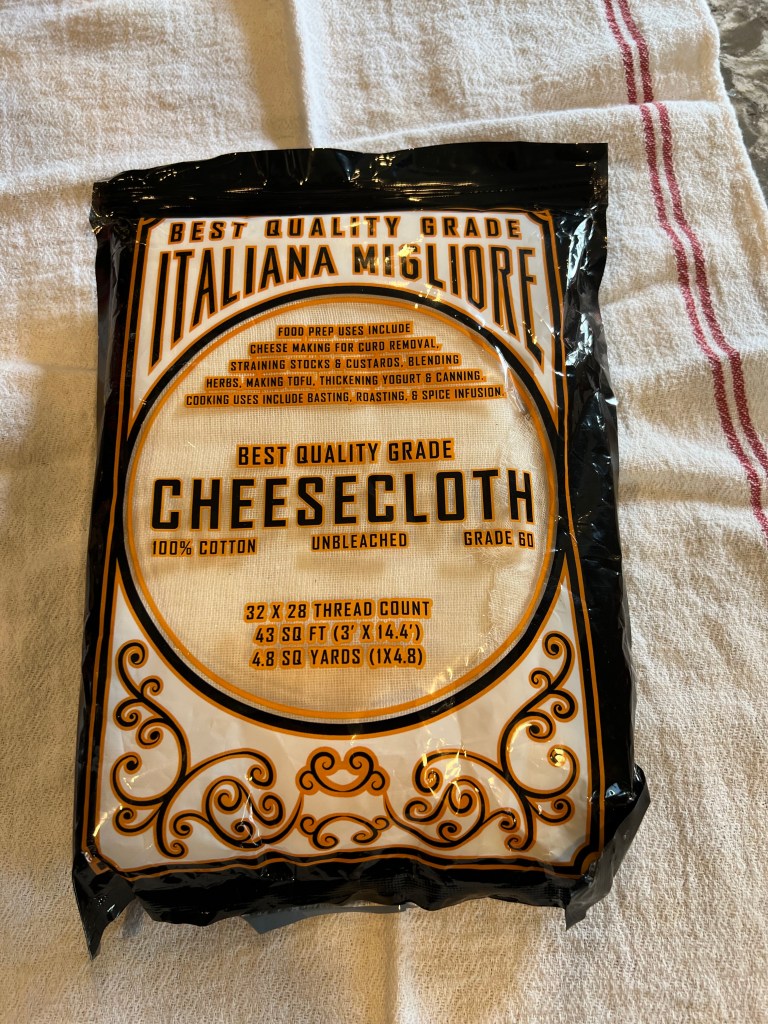
Cheesecloth – Covering the bird with cheesecloth that has been soaked in butter was the reason a total rookie like me hit a home run with my first turkey back in 1971. We have a family member with a dairy allergy so this year I am replacing all the ways in which butter is used in the attached recipe with olive oil. I made that comment several times in the recipe and I hope it is clear that you can make that substitution if needed. TV chef Michael Symon also likes using cheesecloth on his turkey but he soaks it in some different things, bourbon being one of them, and uses it a little differently than I do. I encourage you to check his cookbooks and streaming cooking shows about turkey for some other interesting things that you can do when you cover your roasting turkey with cheesecloth.
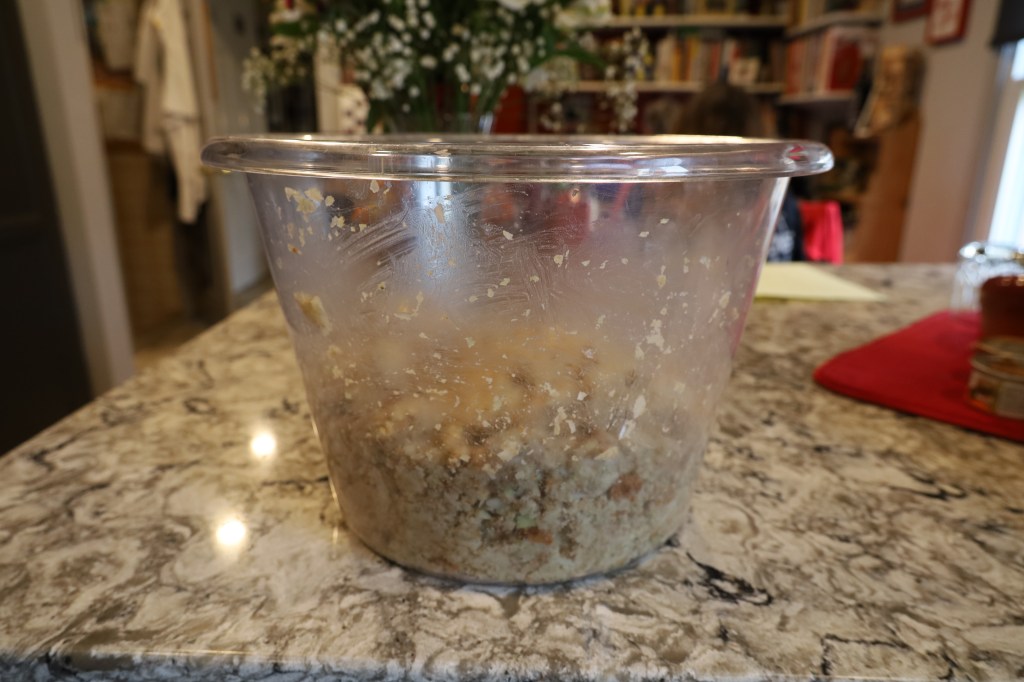
Very large bowl for stuffing – Two bags of Pepperidge Farm Stuffing along with the other ingredients takes up a lot of space. You want to move all those ingredients around to evenly mix them. I use this very large plastic tub for that I also put ice in this large tub to keep several bottles of white wine chilled for parties.

Fat separator cup – Liquid fat is lighter than water so it floats to the top. If you are cooking a day ahead, you can put a bowl of stock or pan juices in the refrigerator overnight and the next day the fat will have congealed on the top and is easy to remove. You can even use some kinds of fat like duck fat in other recipes. But when you don’t have the time to let a dish cool and the fat congeal, which is almost always the case when using pan drippings for gravy, then it can be much more difficult to remove the fat. Beth found this fat separator cup years ago and we love it. We pour the liquid into the cup and let it sit for a couple of minutes. The fat will rise to the top. But when I pour the liquid out of this cup, the liquid comes from the bottom, not the top, because the spout opening is at the very bottom of the cup so I can pour out all the juices until just the fat is left. This is a very handy tool. This is an Amazon link to a highly rated 4 cup fat separator for $17 – https://www.amazon.com/OXO-Good-Grips-Cup-Separator/dp/B07V1ZSYVF/ref=sr_1_6?crid=40NUZAT104ZC&keywords=fat+separator&qid=1668355180&sprefix=fat+seper%2Caps%2C102&sr=8-6
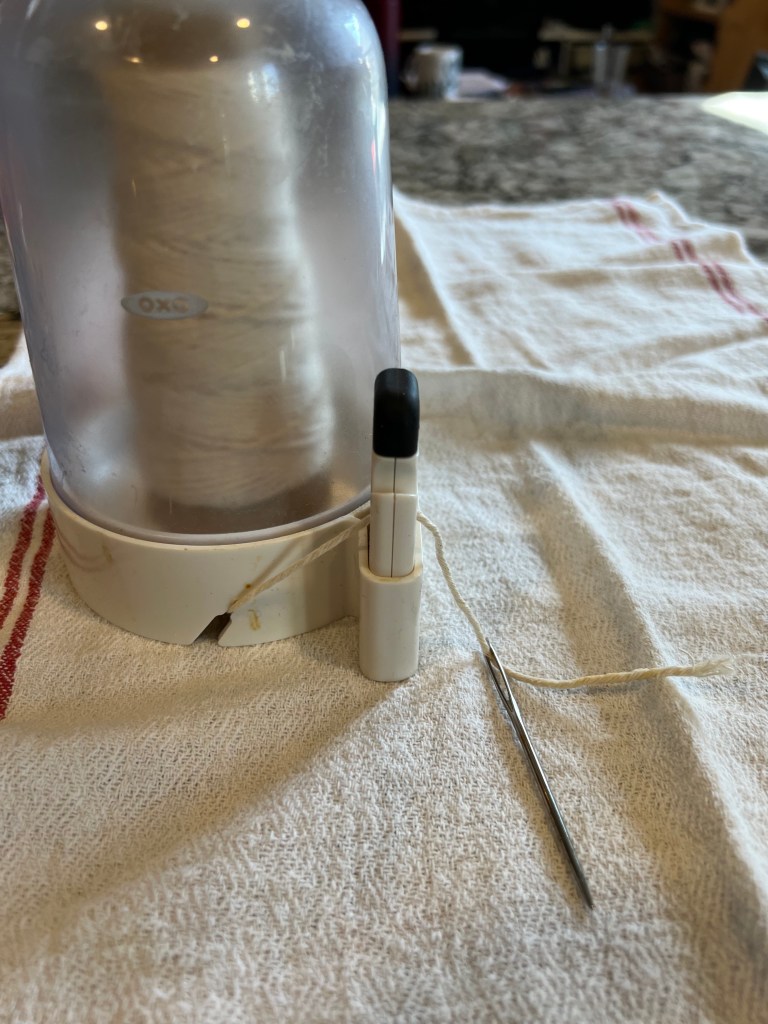
Large needle and thread that can go into the oven – the final utensil is a needle and thread to sew up the bird when I have stuffing in it. Not needed if you are just doing dressing. As you can see in the picture I have a very large needle with a large eye to make it easier to thread the needle. Because this thread will be in a 450° oven you don’t want to use a plastic thread or any thread that will bleed color. Watch the movie Bridget Jones Diary for proof. I use cooking twine which is simple white cotton and thin enough to go through the eye of this needle. Here is an Amazon link for this twine for $8 – https://www.amazon.com/dp/B06XDMQTD8/ref=redir_mobile_desktop?_encoding=UTF8&aaxitk=ce95e207c7d64381411b7bfb1f4c822b&content-id=amzn1.sym.552bcbb2-81a1-4e8b-b868-3fba7d5af42a%3Aamzn1.sym.552bcbb2-81a1-4e8b-b868-3fba7d5af42a&hsa_cr_id=4880790140001&pd_rd_plhdr=t&pd_rd_r=ed2040fb-9687-4ada-91f6-91d7c02f2117&pd_rd_w=EyE1a&pd_rd_wg=U2nZr&qid=1668355387&ref_=sbx_be_s_sparkle_mcd_asin_0_img&sr=1-1-9e67e56a-6f64-441f-a281-df67fc737124&th=1
My Process for Roasting Turkey
Below are 12 steps in my process where I talk about what I do, why I do it, and some lessons learned.
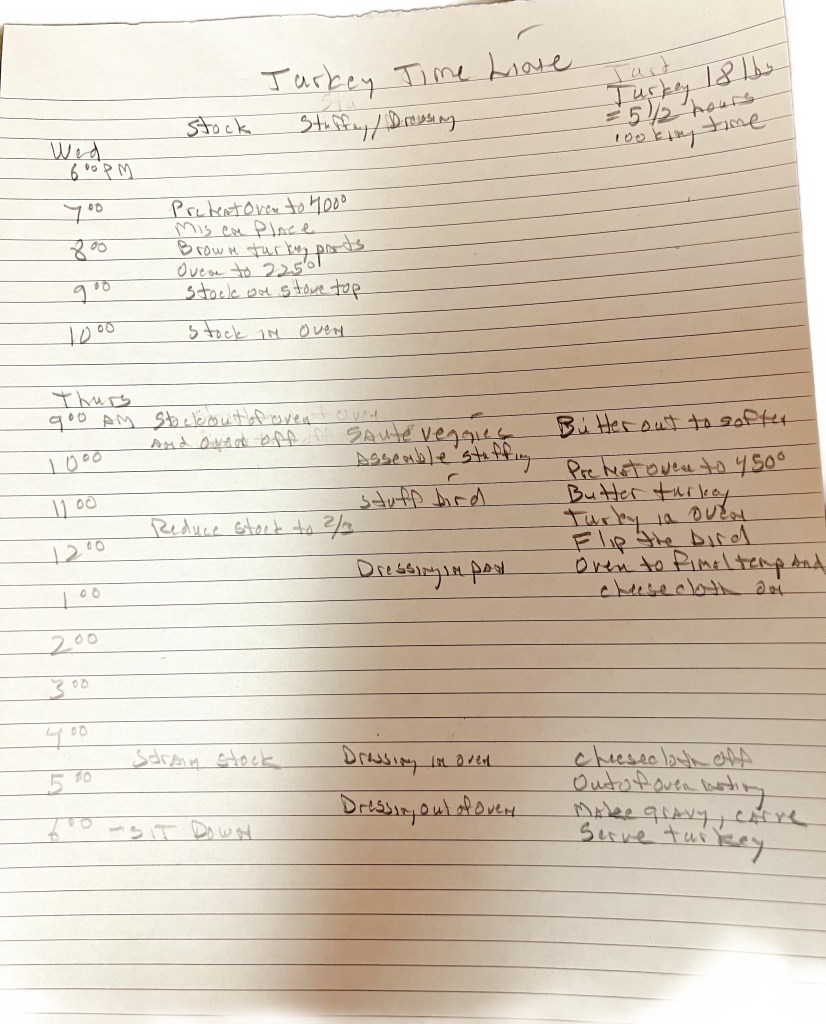
Creating a Timeline for the turkey – The first thing that Reese and I do when she comes over on the Wednesday before Thanksgiving is to create a timeline of everything we need to do and when that needs to happen. The picture shows a sample of that timeline where at the bottom of the page we put the time when Beth wants everyone to sit down at the table. We then put half hour increments up the page for the things that must happen on Thursday and above that half hour increments for what we need to do Wednesday evening (or afternoon if we want). One of the key things this timeline does is identify when key resources like the oven and different burners on the range are being used. Our three children are now married and in their own homes, two of them with children. They now bring the side dishes and dessert each year and they can add any kitchen resources that they need to the timeline so everyone has what they need. One of the key things is knowing what time any oven needs to be preheated so it is at the right temperature when needed. How much time is needed on Thursday to make the stuffing, stuff the bird, sew it up, and cover it with butter or olive oil is a driving factor. Once that process is finished the bird should go right into the oven. It should not sit on the counter for more than 30 minutes after it has been stuffed. If we finish the stuffing process very early, the bird will be out of the oven, rested and ready for carving well before Beth wanted everyone to sit down and the side dishes may not be ready yet. Even worse, if that process takes longer, the bird will not be ready at the scheduled start time. When the turkey goes in the oven, Reese and I quickly review the timeline to see if we need to make any adjustments for next year in that process so we have history to help us budget that time correctly. Some of the things that should be in your timeline include:
- Take two sticks of butter out of the refrigerator to soften if you are not using olive oil. It is very important that one half of one stick be very soft to butter the bird before it goes into the oven.
- Start assembling the stuffing 2 hours before the turkey should go into the oven.
- Preheat the oven to 450⁰ at least 45 minutes before the bird should go into the oven.
- Butter the bird 10 minutes before it goes into the oven back side up.
- Flip the bird to breast side up 30-40 minutes after the bird goes in based on the size of the bird. Turn the heat down to the final cooking temperature 20 minutes after you have flipped the bird.
- Right after you set the oven for the final cooking temperature, cover the turkey with the cheesecloth soaked in butter or olive oil
- Halfway through the cooking time, turn the pan 180⁰ in the oven so that if there are hot spots in the oven, they hit different parts of the bird.
- 30 minutes before the end of the scheduled cook time carefully remove the cheesecloth and baste one time.
- If you are making dressing, use the bulb baster to add a full bulb of pan drippings to the pan, cover it with foil, and put in the oven. Let cook for 45 minutes and then remove and put the dressing into a bowl to bring to the table.
- Move the bird from the roasting pan to the carving board when you take it out of the oven so the gravy can be made while the bird rests. Let the bird rest for 30 minutes before carving. Clip the stiches and remove the stuffing from both sides and add to a bowl. Then carve the bird when the resting period is over.
Defrosting the turkey – The biggest cause of Thanksgiving disasters has been not properly or fully defrosting frozen turkeys. Unless and until the bird is fully defrosted it cannot go into the oven to start being cooked and that has caused many families to get on the phone and try to find a restaurant reservation on very short notice. Improperly thawing the bird has been the biggest contributor to people getting sick after eating it. Fortunately, we have had neither disaster. The people at Butterball, one of the largest turkey providers, have a very easy and foolproof way of properly defrosting your frozen turkey – Thaw Thursday. The Thursday before Thanksgiving take your bird out of the freezer and put it in your refrigerator. Put Thaw Thursday on your calendar. It will be on November 17, when I first publish this post on my blog in 2022. If the turkey is fully defrosted in a few days, it is fine to stay refrigerated the remaining days until Thanksgiving. If you follow my process you will take it out of the wrapper six days after Thaw Thursday, the day before Thanksgiving, to get the ingredients needed to make the stock and that will be a clear proof that the bird is fully defrosted. After you get what you need for the stock on Wednesday, wrap the bird in plastic wrap and put it back in the refrigerator as soon as you have the stock ingredients to keep it refrigerated until you want to start the roasting process the next day, Thanksgiving. Just feeling the outside of the bird through the plastic and seeing that it does not feel frozen does not tell you if the bird is fully defrosted. Your turkey has likely been hard frozen for some time and the last thing to defrost will be the carcass of the turkey. Thaw Thursday will give the bird time to fully defrost. The bird does NOT need to come to room temperature. It should go into the oven cold.
- If you forgot to do Thaw Thursday and your bird is not fully defrosted the folks at Butterball suggest that you submerge it in a large pot of cold water, not hot, for 30 minutes per pound and that will defrost it. If you have an 18 lb. bird and discover it is fully frozen at 10:00 AM on Thanksgiving Day, that would mean that you could not put the bird into the oven to start cooking until 7:00 PM so dinner would be VERY late. But making the stock on Wednesday will let you know if you need to cold water defrost process in plenty of time to still have dinner at a reasonable time on Thanksgiving.
- If you have questions about roasting your turkey or need help with a problem, I will be keeping an eye on my blog up until lunch time on Wednesday, the day before Thanksgiving. At that time I move into Sous Chef mode with Reese and Ray and will not be paying much attention to the blog. But Butterball has an 800 number staffed with very qualified people available 24 x 7 to help you – 1-800-BUTTERBALL.
- Handling raw turkey – wash your hands EVERY time you finish a step in the prep cycle where you touch the bird. Take the bird out of the wrapper in the sink so any juices go right down the drain. Remove the neck and bag of internal organs and reserve for the stock pot. The neck may still have ice crystals even if the bird itself is fully defrosted. RTake the bird out of the wrapper in the sink so any juices go right down the drain. You should NOT rinse any poultry products before cooking. That process splatters raw juices all over and can create a serious risk of infection. The poultry will be cooked to a temperature well above what is necessary to kill all bacteria so rinsing it first does no good and can spread salmonella instead of preventing it. This has been well documented by respected chefs on a number of cooking shows.
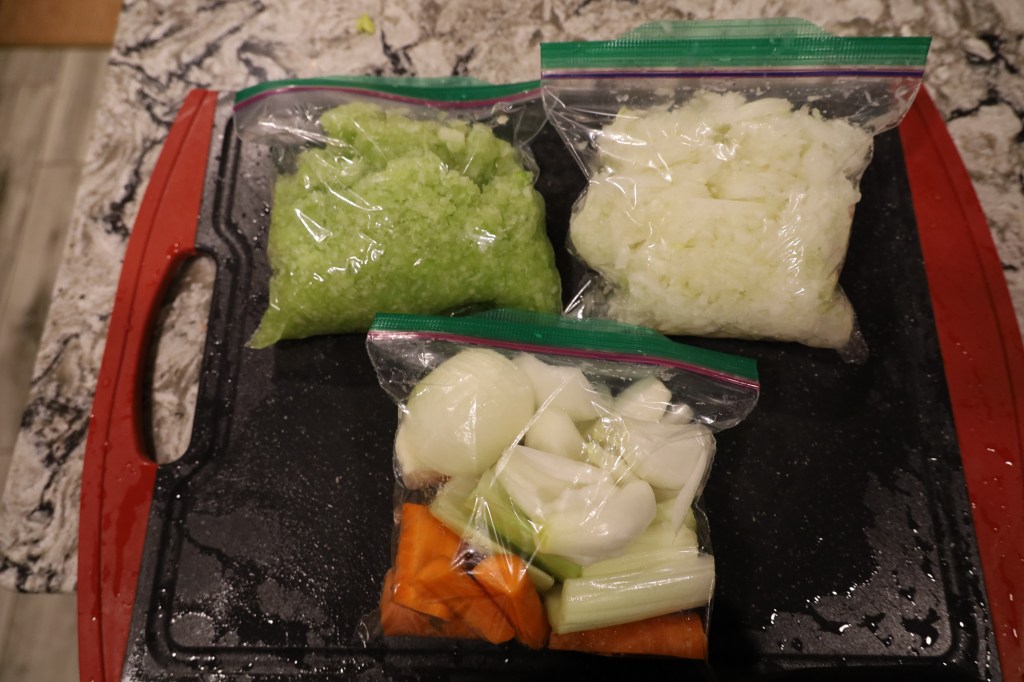
Mis en Place – a French term for getting all the prep work done on time, in an organized manner so you have everything you need when you need it for your cooking. Really a good idea. We do our Mis en Place on Wednesday afternoon, or sometimes after dinner on Wednesday. We need all the ingredients prepped for the stock pot, the stuffing/dressing, and the roasting pan. Two of those ingredients are used in all three – onion and celery – so we start with them and then do the carrots which are used in the stock pot and the roasting pan but not in the stuffing. The last thing we do is take the turkey out of the package to get the things we need for the stock pot. The above picture shows the bags for stuffing and roasting pan about to go in the refrigerator overnight.
- Onions – We need finely chopped onions for the stuffing/dressing and we need big chunks of onion for the roasting pan. Any part of the onion not used for either of those can go in the stock pot and that includes the skin and outer layers of the onion. They can add color and a lot of flavors to the stock, and it is strained at the end so none of those things are eaten, they just add their flavor to the stock. We prep 2 bags of stuffing, so we use three large (very) yellow onions. If you use Vidalia or sweet onions you well be less likely to be crying from all of the chopped onions 😊. We cut off the head and the tail or each onion and put that on a sheet pan to go into the stock pot. We peel the onion including the two outer layers under the skin and add that to the sheet pan for the stock. We then quarter two of the onions and put them through the food processor 2 or 3 pieces at a time to finely chop them using the primary metal blade. Pulse the food processor to get the pieces finally chopped. Put them into a measuring cup to check the amount. 1 cup of large chunks will not make 1 cup of finally chopped vegetables since the large chunks have lots of empty space between them. If you do not have a food processor you will need to do this by hand, and it should be a fine chop. I plan to do a blog post with a video on chopping an onion but that will likely not happen until early in 2023. You will need 1 cup of finely chopped onion for each 16 oz bag of stuffing you are using. If you take a 2-cup measure and add the chopped onion to that cup you can stop when you have the amount of onion that you need, one cup or two. Put the chopped onion in a plastic bag marked Stuffing. We then cut the third onion into eight wedges and take out the innermost small layers and add them to the sheet pan for the stock. We put the eight large segments in a plastic bag marked Roasting Pan. Those two bags should go in a larger plastic bag to control the onion smell and then into the refrigerator. Any quarter pieces of the first two onions that were not needed to be chopped to get the amount you need you put on the sheet pan for the stock pot. If two onions don’t give you the number of cups of finely chopped onion you need, use a 4th onion with the skins and head and tail added to the stock pot pile on the sheet pan.
- Celery – After rinsing off the celery we cut off the white section at the bottom where it was linked to the base and any celery flowers at the top for each stalk that will be used. Those go on the sheet pan for the stock pot. For each bag of stuffing we are using we cut three stalks of celery in half lengthwise and then each strip into 2” pieces. We put about 6 pieces at a time in the food processor to be finely chopped and again put the chopped pieces into a 2-cup measure until we have the number of cups needed for the stuffing. Finely chop by hand if you don’t have a food processor. Use enough stalks until you have the number of cups that you need based on the number of bags of stuffing you are making. We then take one more stalk and cut that in 3” long pieces and add those to the bag marked Roasting Pan. If we don’t have at least a cup of celery pieces for the stock pot, I cut up one more stalk in 2” pieces and add that to the sheet pan.
- Carrots – Don’t peel the carrots. Cut off the top and bottom of two large carrots and add to the sheet pan for the stock pot. Cut both carrots into pieces 2” long. Add the pieces for one of the carrots to the bag for Roasting Pan and close that bag up. All the bags can now go into the refrigerator. Add the pieces from the other carrot to the sheet pan for the stock pot.
- Turkey – Put the neck on a cutting board and with a cleaver cut it into sections 1 – 1 ½” long. Cut the heart into two pieces and the other organs into large pieces as needed. If there are any large clumps of fat around either opening that you can remove easily with a paring knife and not cut the skin, add that fat to the stock pot. Cut off the flat end piece of each wing and add that to the sheet pan. These pieces will add the turkey flavor to the stock. If your turkey did not come with the neck and gizzards and/or you have people who really like to eat that flat end of the wing, even thought is has almost no meat, you will need to purchase some turkey parts for the stock pot. You can ask the people at the meat counter of your supermarket if they have any turkey necks you can purchase. If not purchase a Drumstick, uncooked, and cut the meat off it in large pieces and put the bone with the chunks of meat into the stock pot.
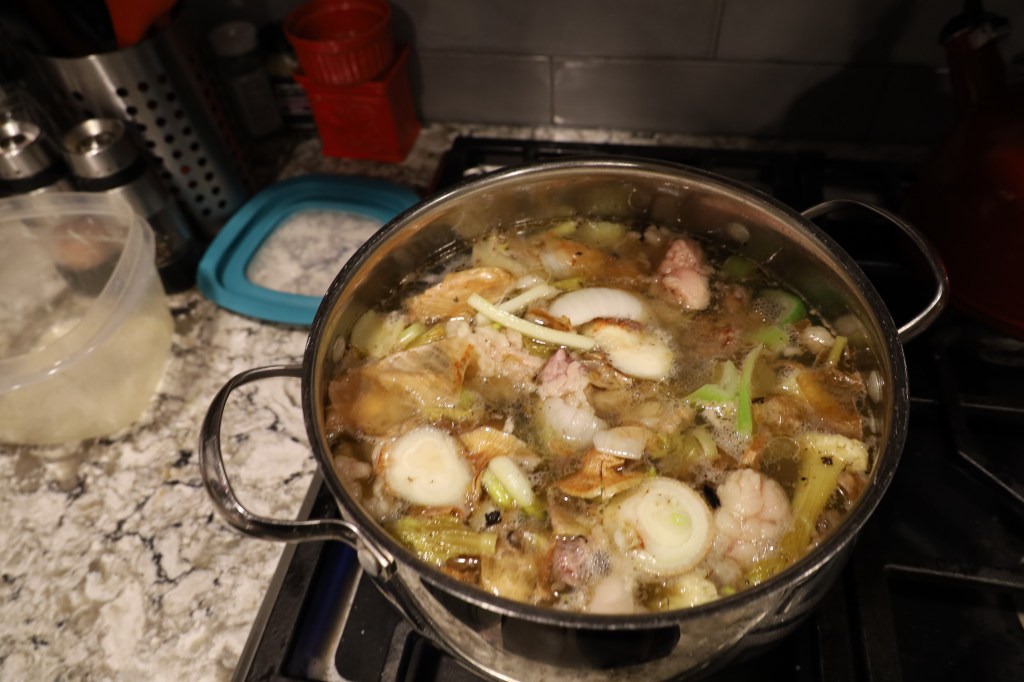
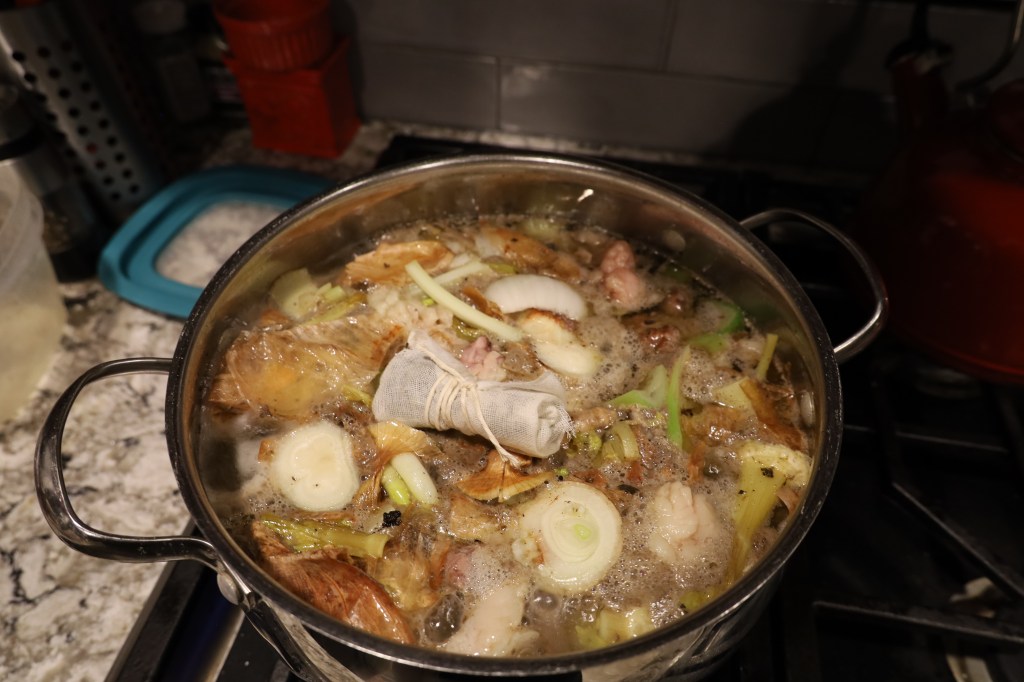
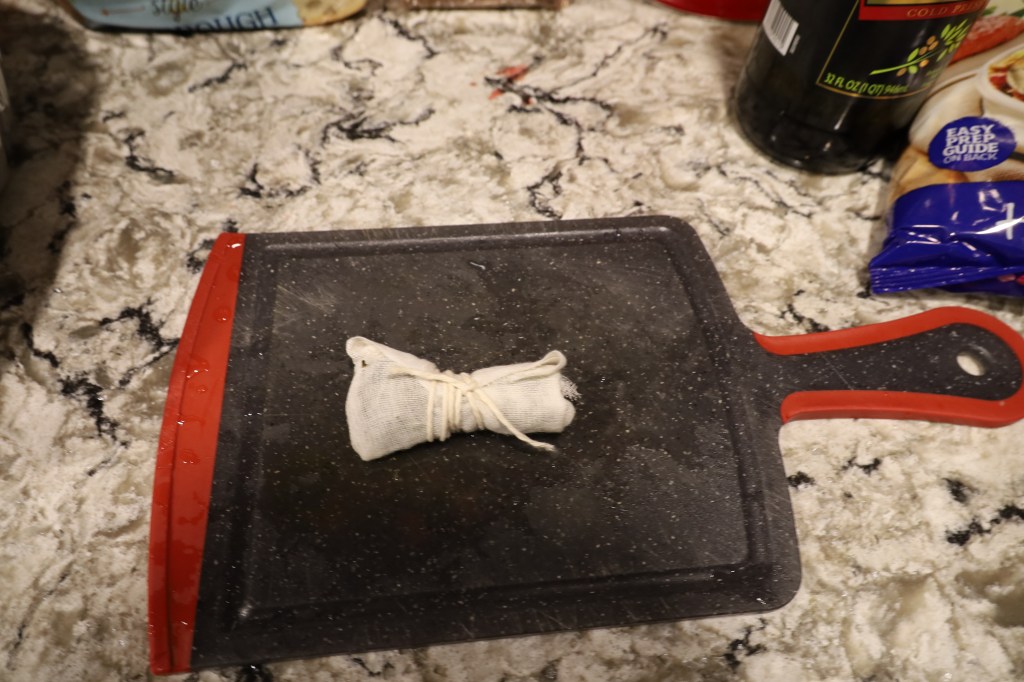
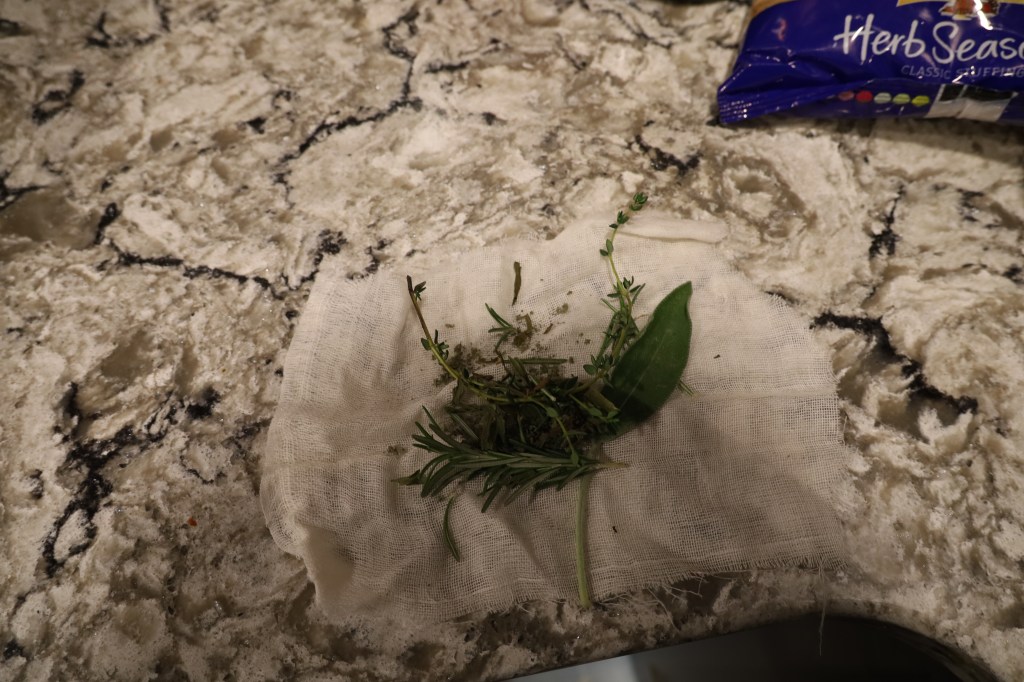
Making Turkey Stock – I make about two quarts of rich turkey stock each time. The attached recipe that you can download at the end of this post has the ingredients and the recipe for making the stock. Most of the stock goes into the gravy with the pan drippings to make a plentiful amount of delicious gravy so there is gravy for leftovers and hot turkey sandwiches. Any stock not used for the gravy is added to the stock made with the turkey carcass for turkey soup. We make the stock on Wednesday and leave it in the electric oven at 225° overnight and then have it back simmering on the stove top Thanksgiving morning. That long cooking at low heat with the pot covered gets all the flavors our of the ingredients and is the basis for a rich stock. As the recipe indicates, the stock is reduced while the turkey is cooking to about 2 quarts of liquid which makes it a rich stock and then strained so it is just a clear liquid. Making stock is easy and it adds great flavor to many dishes. Most of the ingredients in the stock pot are things that you have thrown away in the past. Why not use them to make your gravy really good and have some delicious turkey soup you can freeze and enjoy on some cold winter days? Below are pictures of making the bouquet garni of hers wrapped in cheesecloth that goes into the stock pot.
Stuffing/Dressing – There are lots of opinions about stuffing vs dressing. We have put both in bowls and done a blind taste test several times and the results showed that people could not reliably taste the difference. Because I have made stuffing for 51 years, it is part of our tradition, and we still make it each year. There is sufficient demand that we also make a large pan of dressing. If I had a time machine and could back to 1971 with my lessons learned, I would start the tradition with dressing instead if stuffing as that is a much simpler process. As the recipe indicates, we use a bulb baster to spread some of the turkey stock over the dressing before putting it in the oven to add turkey flavor and possibly also one bulb of pan juices for some additional turkey flavor. We also sauté the onions and celery before putting them in the stuffing mixture. If you are only doing stuffing inside the bird, you don’t need to do that but if you are doing some or all dressing cooked in a pan, those ingredients will often only partially cook when you put the pan in the oven so precooking them for 10-15 minutes is a good idea. If you are doing stuffing, you will need to sew closed the front and back openings where you put the stuffing. The recipe suggests using cooking twine to do that and the Useful Utensils section above has a link to get that cooking twine in time to have it when you are stuffing your bird. If you are doing dressing you want it to have at least 45 minutes to cook in the oven.

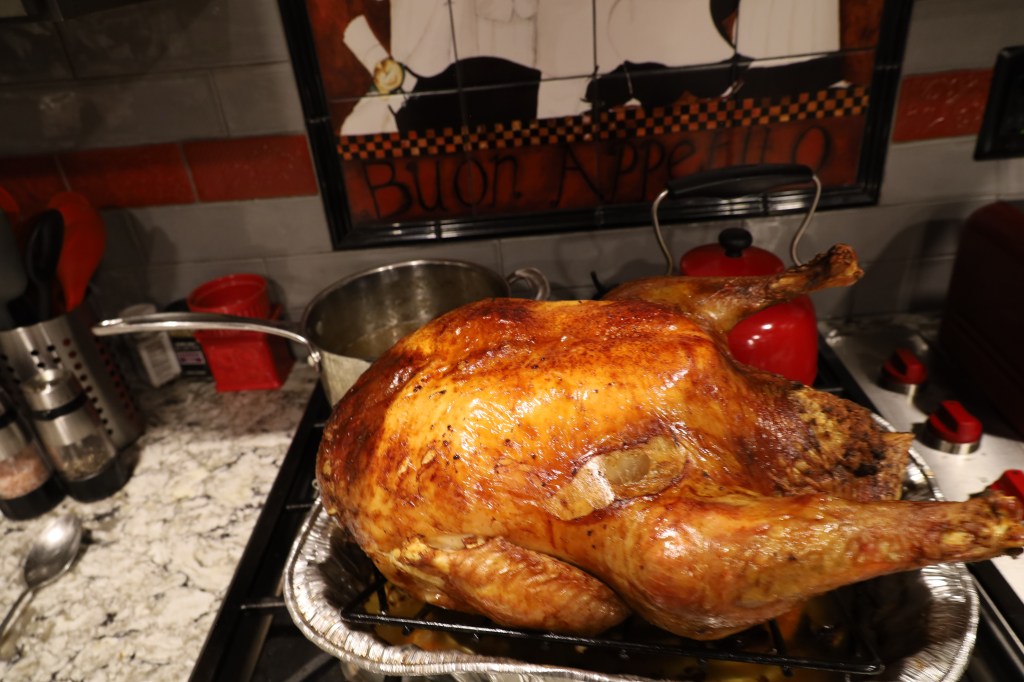
Roasting pan – As discussed above, for years now I have used a disposable aluminum roasting pan for my turkeys. It reduces the clean up effort significantly. I prefer the ones that have the aluminum frame and handles. I spray the pan with cooking spray, I use Pam, so less of the pan juices stick to the bottom and I use the large rack mentioned above. I distribute the bag of large chunks of onion, celery, and carrots that was done in Mis en Place in the bottom of the roasting pan as shown in the picture. Those vegetables cook down and add flavor to the pan juices. When the turkey is removed to the carving board to rest I pour the pan juices into the fat separator cup and use some white wine to deglaze the pan and add that to the fat separator cup. At that point the pan can be put aside to cool and then thrown out.
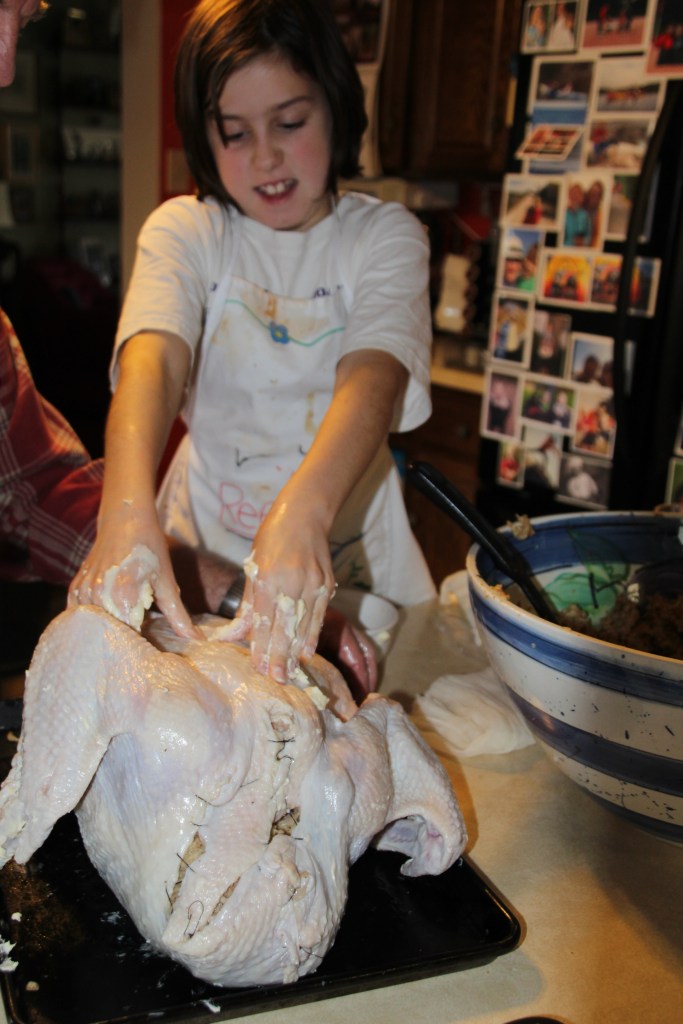
Buttering the bird – just before the bird goes in the oven we cover it with either butter or olive oil. We use olive oil because we have some family members with dietary restrictions for dairy products, but either one is fine. The picture shows Reese seven years ago buttering the turkey after she has sutured both cavities holding stuffing closed. If using butter, it needs to have softened so it spreads easily over the bird so taking a stick of butter out of the refrigerator several hours ahead of cooking will let that happen. Cut that sick in half and use half to butter the turkey and melt half in a small fry pan and soak the cheesecloth in that after you have used it to clean your hands. If using olive oil, about 4 oz each for the bird and for the cheesecloth is good. Butter or oil the bird breast side up in the sheet pan first. Then, with your hands covered with either butter or olive oil, pick up the bird and put it on the rack in the roasting pan breast side down. Breast side down means the wings are on top as shown in the picture. We cook the bird for 30 minutes breast side down to get the dark meat fully cooked at the same time the breast meat is fully cooked. You can then butter or oil the back side being sure you get whichever one you are using all over the bird. Your hands will be covered with residue. Have your sous chef, or a family member standing by with the cheesecloth so you can wipe all of that residue off and then fold up the cheesecloth and put it in the pan to fully absorb the butter or oil in that pan. Again, we are wasting nothing.
Flipping the bird – As mentioned above under Overall Approach, after cooking the bird back side, or wings side, up for 30 minutes (up to 40 minutes for a bird over 20 lbs.), we take it out of the oven and flip it to breast side up. This is not easy and you need to be careful of a hot pan, a hot bird, and very hot pan juices that can spill or splatter. If you have one person holding the pan and rack and good poultry forks, that greatly simplifies this process. Beth and I nicknamed it flipping the bird in the early years when we were figuring out how to do it but with the right tools and having done it a few times, now it no big deal. It does have a very material impact on getting the bird uniformly cooked so all parts a moist and juicy so the learning effort is worthwhile. The first picture shows the bird wings side up out of the oven before being flipped. The second picture shows the bird back in the oven breast side up. You can see in that picture that the skin on the breast side is white while the lower skim you can see through the rack has started to brown. Having the bird back side up at 450° for 30 minutes gets the dark meat cooking and then flipping the bird lets the white meat eventually catch up so both are done at the same time. I keep the oven at 450° for 20 minutes after flipping the bird and then turn it down to the final cooking temperature and put on the cheesecloth as described below.


Cheesecloth – If you go on the Internet and search on Covering Turkey with Cheesecloth you will get a lot of hits with people who love it and are using it in different ways. I cut the cheesecloth large enough so I can unfold it and refold it so that is at least three layers deep and can fully cover the breast side of the bird, including the legs. I use tongs to tuck it inside the wings. Much of the butter or olive oil in the cheese cloth will become part of the pan drippings and add flavor. The cheesecloth provides some insulation from the direct heat of the oven so the breast meat cooks slower, giving the dark meat more time to cook. We remove the cheesecloth 30 minutes before the oven is scheduled to come out of the oven to let the skin on the breast get nice and crispy. Sometimes the cheesecloth will stick to the skin in some spots and start to tear it as you take it off. I use tongs and work from each corner gently pulling up the cheesecloth. If I hit a spot where it is sticking, I go to one of the other corners and work from there. When I have as much loose as possible I go back with a sharp paring knife and scrape along the cheesecloth down to where the sticking point is to free it up. Some people like to wrap the turkey in foil to get that insulation effect. Doing that can cause the turkey to steam in its own juices which is not good in my opinion, and the skin does not get crisp. For those people who like the turkey they get wrapping it in foil, you do you and enjoy your meal. I prefer the above approach, but it is certainly not the only way to make a delicious roast turkey.
Use a thermometer – Any recipe that gives you a cooking time based on the weight of the bird should be viewed only as guideline on when the bird might be properly cooked. You need to cook the turkey to an internal temperature of 165-170° and make sure both the breast meat and the thigh meat are at that temperature. Most often the thigh is the last to get to the needed temperature. If your turkey came with a pop-up thermometer, that is a pretty good indication of when the breast is done but using an instant read digital thermometer to check both the breast and thigh temperatures is highly recommended, especially the thigh temperature. I start checking that when I remove the cheesecloth and do not take the bird out of the oven until the thigh is at that temperature. Any lower temperature than that carries a risk of infection. If I get both breast and thigh at 170° and the little probe in the bird has not popped, I still take it out to rest. Butterball says not using a thermometer is the second biggest cause of problems they get calls on, after not fully defrosting the bird.
Rest the bird before carving – As with any roast, your turkey needs to rest before you carve it. 30 minutes is good to let the juices retreat into the meat instead of pooling on your carving board. You can remove the stuffing from inside the bird during that resting time.
Download the Roast Turkey Recipe
Carving the Turkey
Set aside a small bowl for scraps that come off in the carving process. They are very good for turkey soup or for turkey tacos at a later date.
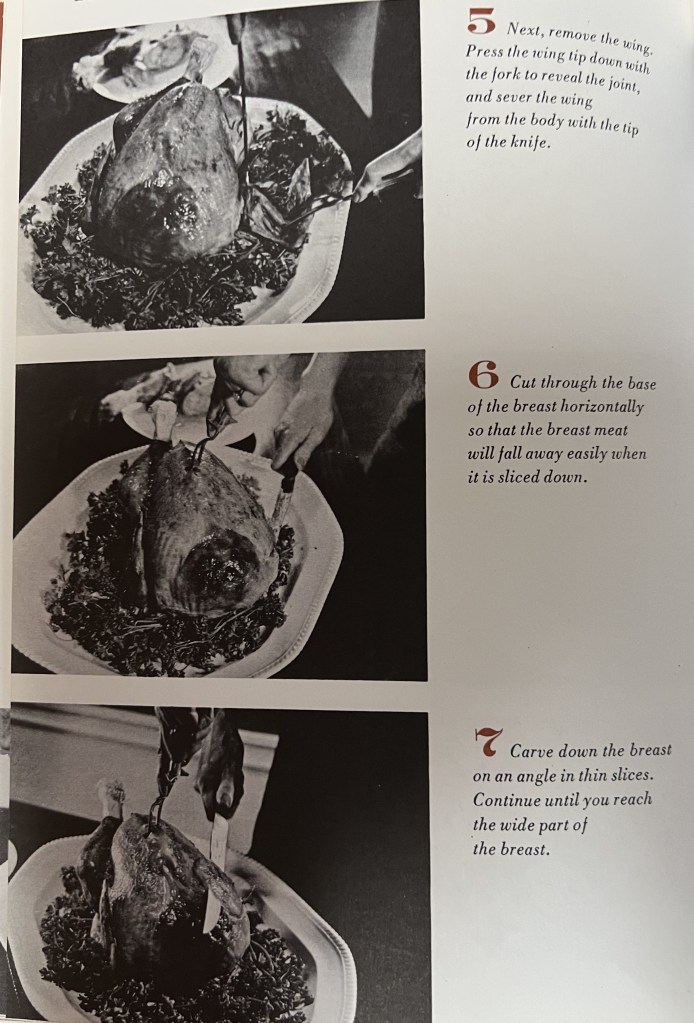
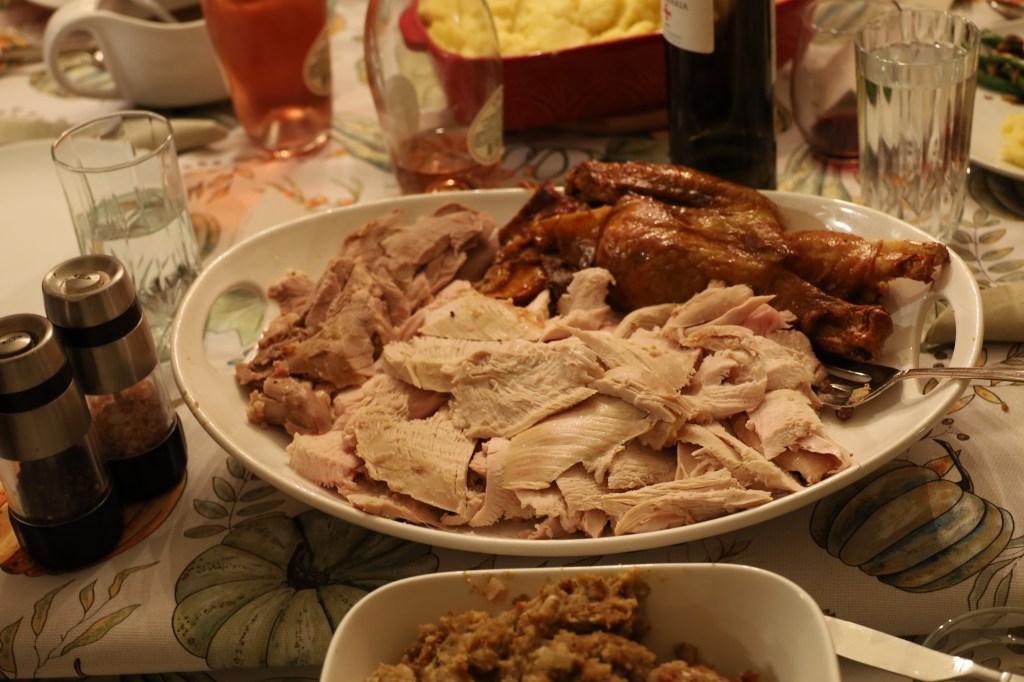
Roll the bird onto one side and cut down between the thigh and the body and push the leg away from the body so you can sever the leg from the body at the joint to remove the drumstick and thigh. Cut off the drumstick at the second joint and put on the serving platter. Slice off the dark meat from the thigh and add to the serving platter and cut as many slices of dark meat as you can from that side of the back of the turkey and add them to the platter. Roll the bird back upright and remove the wing by pressing the wing tip down and cutting the wing off from the body. The picture is a page from The Art of Carving, a very good book published by House and Garden that now sadly appears to be out of print. It shows you how to carve the breast effectively. The last picture about carving down at an angle is key to carve across the grain so the slices stay together. As you get the wide part of the breast, carve alternately from the back of the breast and the front of the breast, still at an angle to have medium size slices. When you have gotten as much meat as you can from that first side, determine If that gives you sufficient meat for the Thanksgiving meal. If so, you can stop there and take the other meat off the carcass after dinner or the next day. If you think you need more meat for the Thanksgiving meal, repeat the process for either the breast or the dark meat, or both. Slicing the 2nd breast later will keep it moister and take-home packages can be in larger pieces of breast that can be sliced the next day. Pieces of crispy skin that come off during the carving can go on one end of the serving platter.
Gravy
Gravy is a very important part of a great Thanksgiving meal. It needs to have color and good turkey flavor. The recipe you can download uses a combination of the pan juices and the stock you made to do that. You should have enough stock to make enough gravy for the encore meal and for the hot turkey sandwiches so consider that when you determine how much stock to add to the gravy pot. Beth has been the gravy master for the 51 years and the recipe there is from her. It is more of a process than a recipe, taking incremental steps to get the right amount of gravy and the thickness your family likes. Our family prefers gravy that is pretty thin and easily pours instead of needing to be spooned out, but you can add more roux to get whatever thickness you want. If you want to chop the giblets and add them to the gravy, you should remove them when you strain the stock. They are fully cooked and can be chopped and then added to the gravy when you have the quantity and thickness that you want. Not everyone likes chunks of giblets in their gravy so you may want to survey the people you are feeding to get their preference before you make the gravy.
Cranberry Chutney
Cranberry is the other traditional accompaniment to turkey. Beth’s mother had a recipe for a cranberry chutney that was a very delicious alternative to the cans of cranberry from the store. That very simple recipe can be downloaded here, and it can be made several days ahead to reduce the amount of work that needs to be done on Thanksgiving. We also have cans of cranberry jelly for the grandkids who are not ready to try the cranberry chutney yet.
Download Cranberry Chutney Recipe
Wine to Accompany Turkey
Since this blog is about wine as well as food, I will make some wine suggestions here. We are not addressing the Travel aspect of the blog in this post. We normally think of white wine with poultry and that is good, but there are also alternatives that match well with turkey.
Before getting into recommendations, I will share three lessons we learned in our recent three week wine tasting trip to Spain.
- We drink our white wines WAY too cold. Most refrigerators chill wines to around 45° and that shuts down much of the flavor of the wine. People who think white wine just tastes bland are generally surprised when they drink white wines that are about 60°. I strongly encourage you to take the white wine out of the refrigerator 30-45 minutes before you plan to serve it, open it, and let it sit on the counter. You will be very pleasantly surprised at the flavors you did not know were there.
- We drink our red wines too warm. Red wines are crafted with the intent that they will be drunk at 65-68°. When they are warmer than that, they lose some of their lovely flavors. I now put my reds in the refrigerator 30-45 minutes before serving. At 68° they have just a little chill to the taste but they are not cold. I am finding even simple inexpensive red table wines have more flavor when I drink them at 68°.
- At one of the first vineyards that we visited and were tasting wine at 3 PM, I asked them when did they open the wines? I was very surprised when the response was ”When we got here this morning”. I asked the same question at several other vineyards and the answer was always around 8:00 to 9:00 AM. So much for letting wines breathe for an hour! I have done this at home now and a $15 wine that I opened at 8:30 AM, put into chill at 5:30 PM, and started drinking at 6:00 was a huge hit.
If your family is open to trying a white wine that is not your standard house white, there are some good alternatives to consider:
- Pinot Gris – there is an earlier post on this blog on Pinot Gris so I will quickly summarize this grape and encourage you to check out that post for more information. Pinot Gris is the French name for the grape that is called Pinot Grigio in Italy. The Italians use it for simple, inexpensive table wine. The French showed that it can make a dry, delicious, full bodied white wine that pairs very well with food. A number of other countries have followed the French approach and are making very good Pinot Gris. I am a big fan of Pinot Gris from the Willamette Valley in Oregon and more on that below.
- Chenin Blanc – South African Chenin Blanc can be very good with turkey.
- Godello – If you want to try a white wine just getting some traction in the US, this wine from Spain, pronounced Go DAY ho, is a very good food wine and would pair very well with turkey. Most sell for around $15 a bottle in retail stores. Casar De Burbia is one I would recommend.
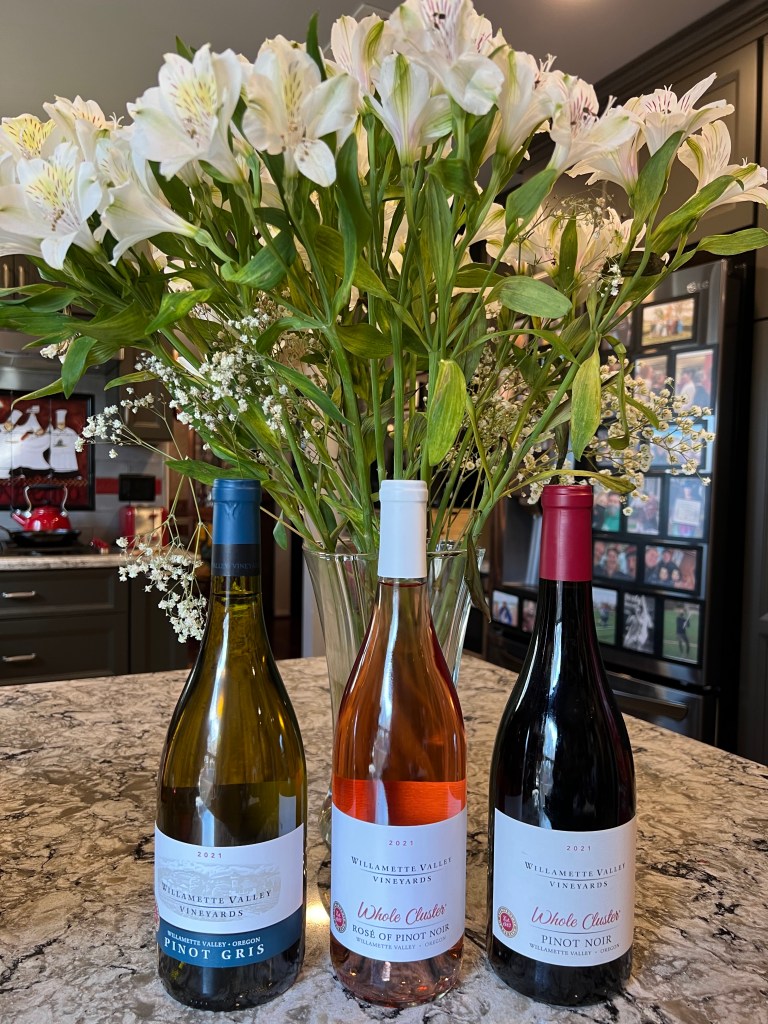
My family has some very strong red wine lovers. I think Pinot Noir with its medium body pairs very well with any poultry, and turkey in particular. We will be enjoying the Willamette Valley Vineyards (WVV) Whole Cluster Pinot Noir at this year’s Thanksgiving dinner. It is highly rated by Robert Parker and only $26 from the vineyard website, https://www.wvv.com, if you don’t find it in a local store. Order right away and you can have it for this year’s dinner.
A dry Rose is also a very good wine with turkey. We are big fans of the Rose from Provence, but we recently tried the Whole Cluster Pinot Noir Rose from Willamette Valley Vineyards and really loved it. At the first taste the Pinot Noir flavor came through giving it some very good character but much lighter than the red Pinot Noir mentioned above. During the unique Whole Cluster fermentation process they use, they take some of the juices off early and use them for this Rose and it is delicious and only $25.
Just to make things easy on you, WVV also makes a great Pinot Gris for $18. Consider having three very good wines from the same vineyard for your family and guests to enjoy with their Thanksgiving dinner.
Turkey Soup
There are many very good turkey soup recipes out there, so I am not going to offer one. But when you finish taking all the meat off the turkey bones you have two things sitting on the counter that in past years you probably put in the trash – the turkey carcass and lots of small scraps of meat that were left after carving the roast. If you take that carcass and use the stock pot recipe that is part of the Roast Turkey recipe you can download below, that carcass takes the place of the turkey pieces you used on Wednesday to make the stock for your gravy and will give you several quarts of delicious stock as the base for your soup. Any stock that you did not put in the gravy can also be added for more soup. When you add the onion, celery, and carrots to the stock pot, check the recipe you want to use for your soup and there is a good chance that most if not all three of those ingredients will be used in the soup. You can follow the same process to take the skins, ends, and other pieces that you don’t want in your soup and put them in the stock pot and bag the rest for when you are making the soup, probably the next day. All of those scraps of turkey can go into a bowl or bag and be added to the soup. You have most of what you need for some great soup sitting on the counter, why throw it in the trash?
Beth makes the soup and she bags portions sized for the two of us and freezes them so we can have some nice soup on cold winter days. Some, or all, of the stock can also be frozen to use in future recipes and it will add more flavor then the cans or boxes of chicken stock you buy in the stores and it has no chemical ingredients to give it long shelf life in the supermarket.
I hope these thoughts on roasting a turkey for Thanksgiving, and the recipes that you can download, will help put a meal on the table that your family will want repeated every year. That is what we have enjoyed for many years.

One thought on “Thanksgiving Roast Turkey”