Beth got a Tomahawk steak at a great price in the “Dents and Bents” bin at the supermarket. She dry aged if for two days and I did a reverse sear with my Kamado Grill and it was delicious!
The Tomahawk steak has a thick piece of Ribeye at the end of a very long bone, usually 6-8 inches. It has eye catching appeal but you are paying Ribeye prices for a very long bone, so I think it is generally not worth the cost. When it is significantly on sale, as this one was, the challenge remains that it is also difficult to cook. With the very long bone it does not fit well in a fry pan, even in our large cast iron fry pan. The steak is about 2” thick and how do you get the inside next to the bone fully cooked while not making the outside dry and well done? How do you make a very thick cut of ribeye moist and tender? Well between the two of us we did just that!
Step one is to dry age the steak. Some people call it dry brining but if you want to really set TV food expert Alton Brown off, use the term dry brining. Brine is salt water so Alton makes a lot of fun about anyone who says they are using dry salt water. Dry aging is a process of putting a coat of salt on the outside of a cut of meat, poultry, or fish and letting it sit uncovered in a refrigerated space for some period of time. 24 hours is minimum, three days is recommended. Restaurants or butchers who have the right kind of storage unit can have it age for several weeks which really has an very positive impact on what you are dry aging. What Beth did with this ribeye steak could be done with a turkey, or a thick cut fish steak. For beef the steak needs to be at least 1 ½” thick for this process, and the 2” steak we had was perfect.
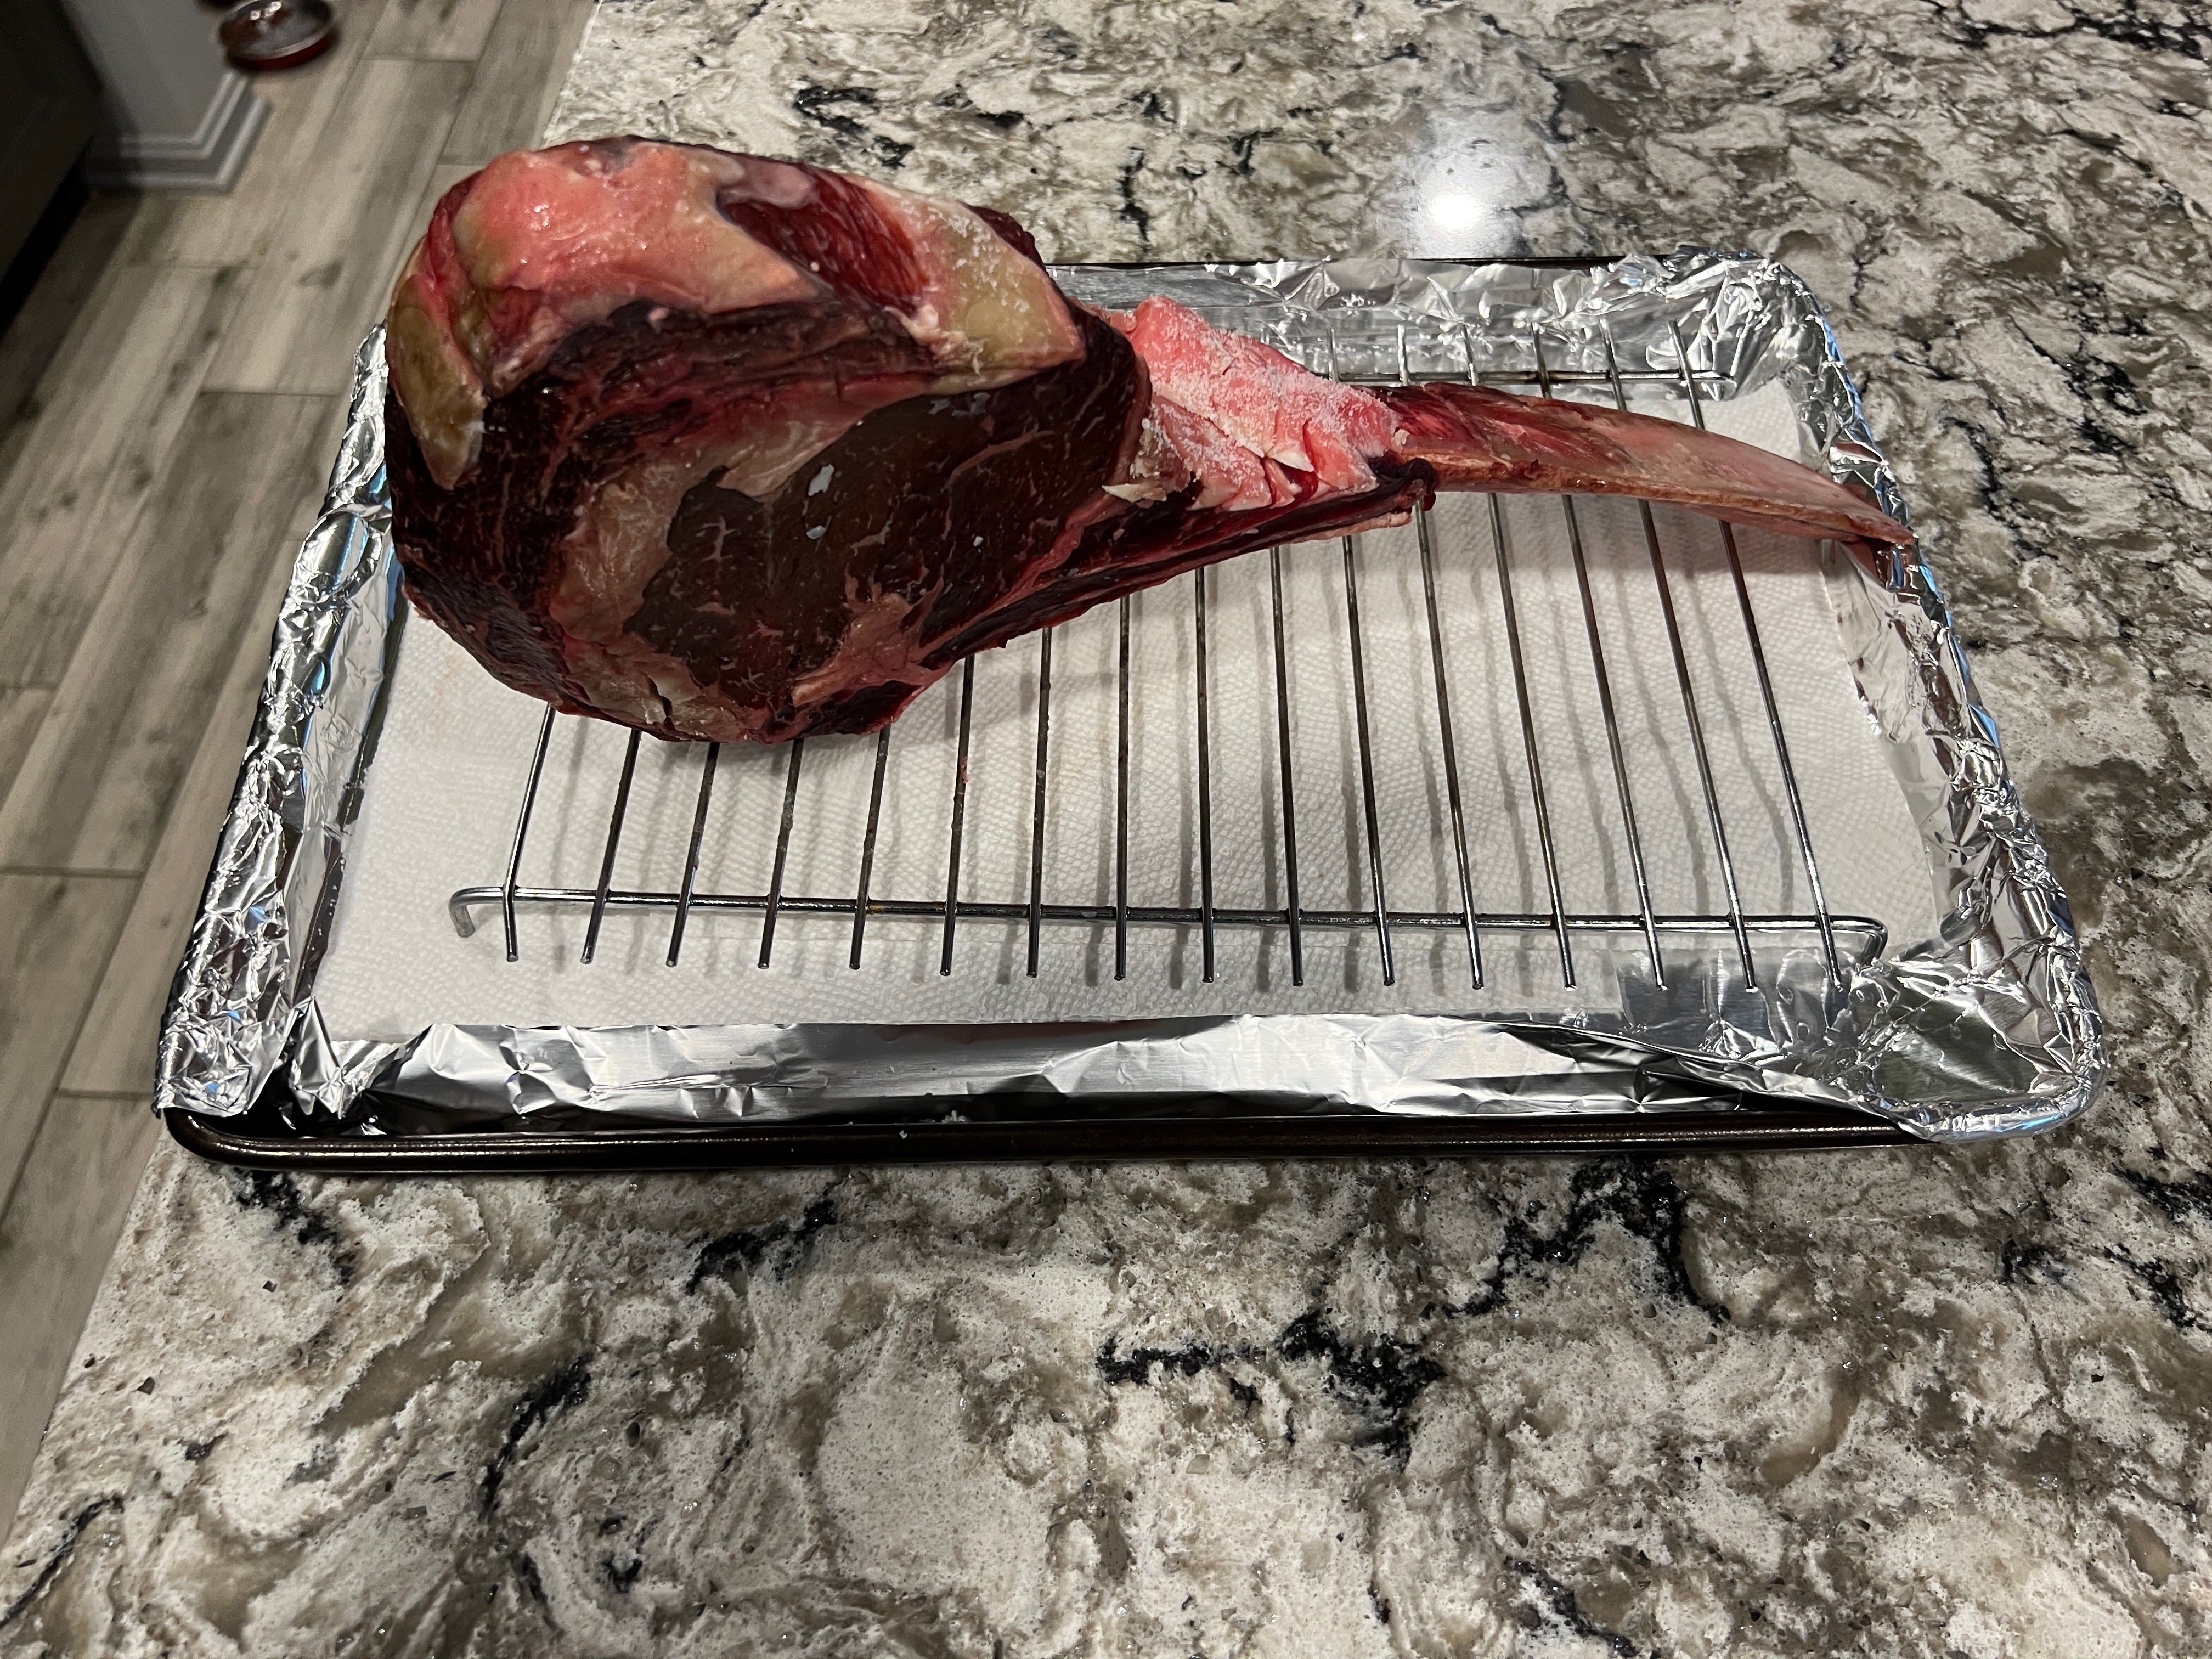
The salt crystals draw out moisture from the meat, initially creating slick watery surface on the steak that dissolves the salt. Over time that salty liquid is absorbed back into the meat where it breaks down the connective tissues in the meat making it more tender. Beth kept the steak uncovered on a rack ln our refrigerator so it had airflow all around it for 48 hours. Three days is even better and something that you can do in a regular home refrigerator. Longer than that needs some more supervision and really benefits from a cooler dedicated to Dry Aging that is very seldom opened. Top Steak Houses will dry age their steaks for weeks. The steak should come out of the refrigerator an hour before cooking to come to room temperature and that is the picture where I stood the steak on the bone for that time.
Dry aging also means that the surface of the steak is dry. To get the nice crust that we like on steaks, what is called the Maillard reaction, requires that the steak surface be completely dry when you start to cook it. Any steak should be dried using some paper towels before cooking but a dry aged steak already has a very dry surface when you take it out of the refrigerator.
This first step to tenderizing the steak is pretty easy – just put a nice coat of salt on all the sides and edges of the steak and let it sit uncovered in your fridge for 2-3 days. The next step, reverse searing the steak, is more work, but the results make it very worthwhile.
The way almost all of us learned to grill steaks was to sear them for a couple of minutes on each side to seal in the juices and then finish cooking them at lower heat until they are done. Searing them does not lock in any juices and getting the steak right next to the bone cooked to the desired temperature almost always means that the outer portions of the steak are overcooked. Reverse searing tempers the steak at a low temperature to get it uniformly cooked to a certain desired level, and then finished at very high heat to get that lovely crust and bring the internal temp to the desired level. I did an earlier Blog on different ways to reverse sear and you can find out more about this process at the link below which will open as a new window.
https://billwinetravelfood.com/2022/08/18/temper-your-steak-and-then-reverse-sear-it/
For this blog I will talk about how I used the flexibility of my Kamado Joe Grill to reverse sear this steak with pictures of each step. I have several options for the Kamado Joe that I used for this steak. The first is being able to divide it into two cooking zones with all the coals on one side of the pit and no coals on the other side. The second is the ability to have grills at three different levels. At the lowest level the meat is closest to the coals and at the highest level it is furthest away. Finally, I have a computer-controlled venting that lets me set a temperature for cooking and the airflow through is controlled to keep the coals at that temperature.
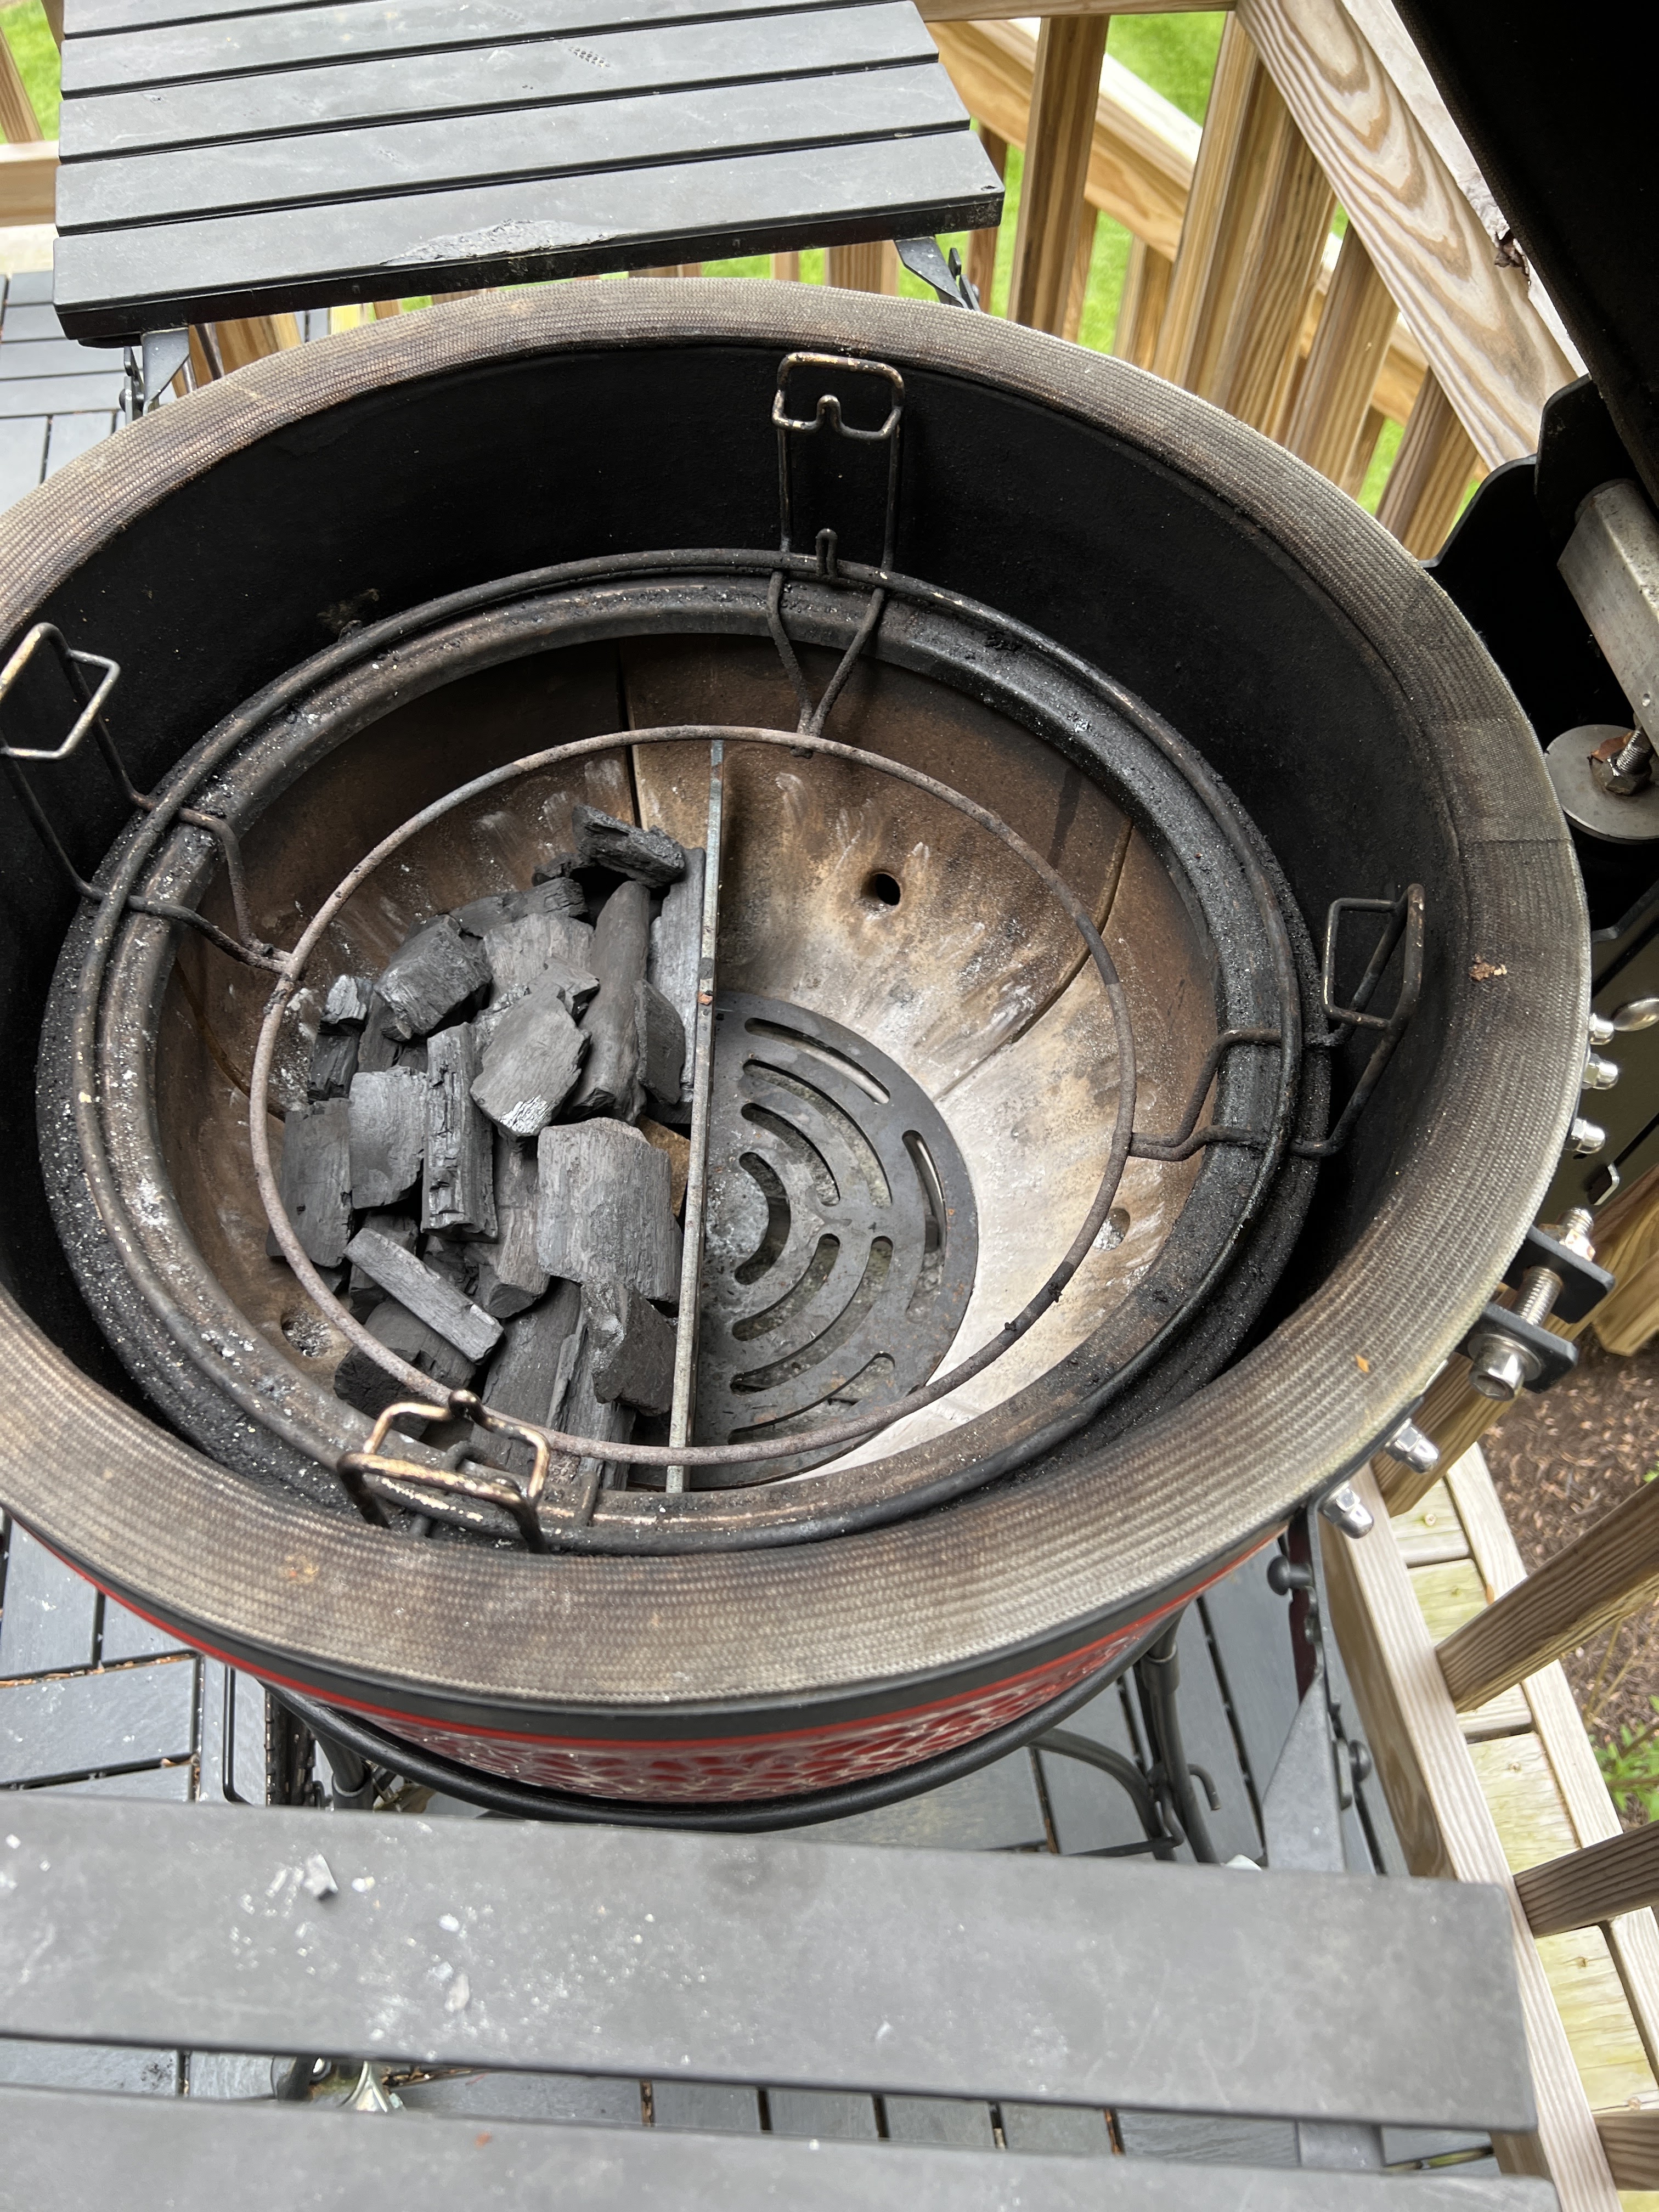
Here you can see I have the charcoal laid in the front half of the grill. I use the Fogo Super Premium Oak Restaurant All-Natural Smoked Hardwood Large Lump Charcoal that gives nice large pieces of charcoal. I lit the two fire starters that I had in with the charcoal and got the fire up to 300°. I then closed up the Kamado and used the controlled venting to get the cooking temperature to 225° and the ceramic egg of the grill up to temperature to keep that temperature constant.

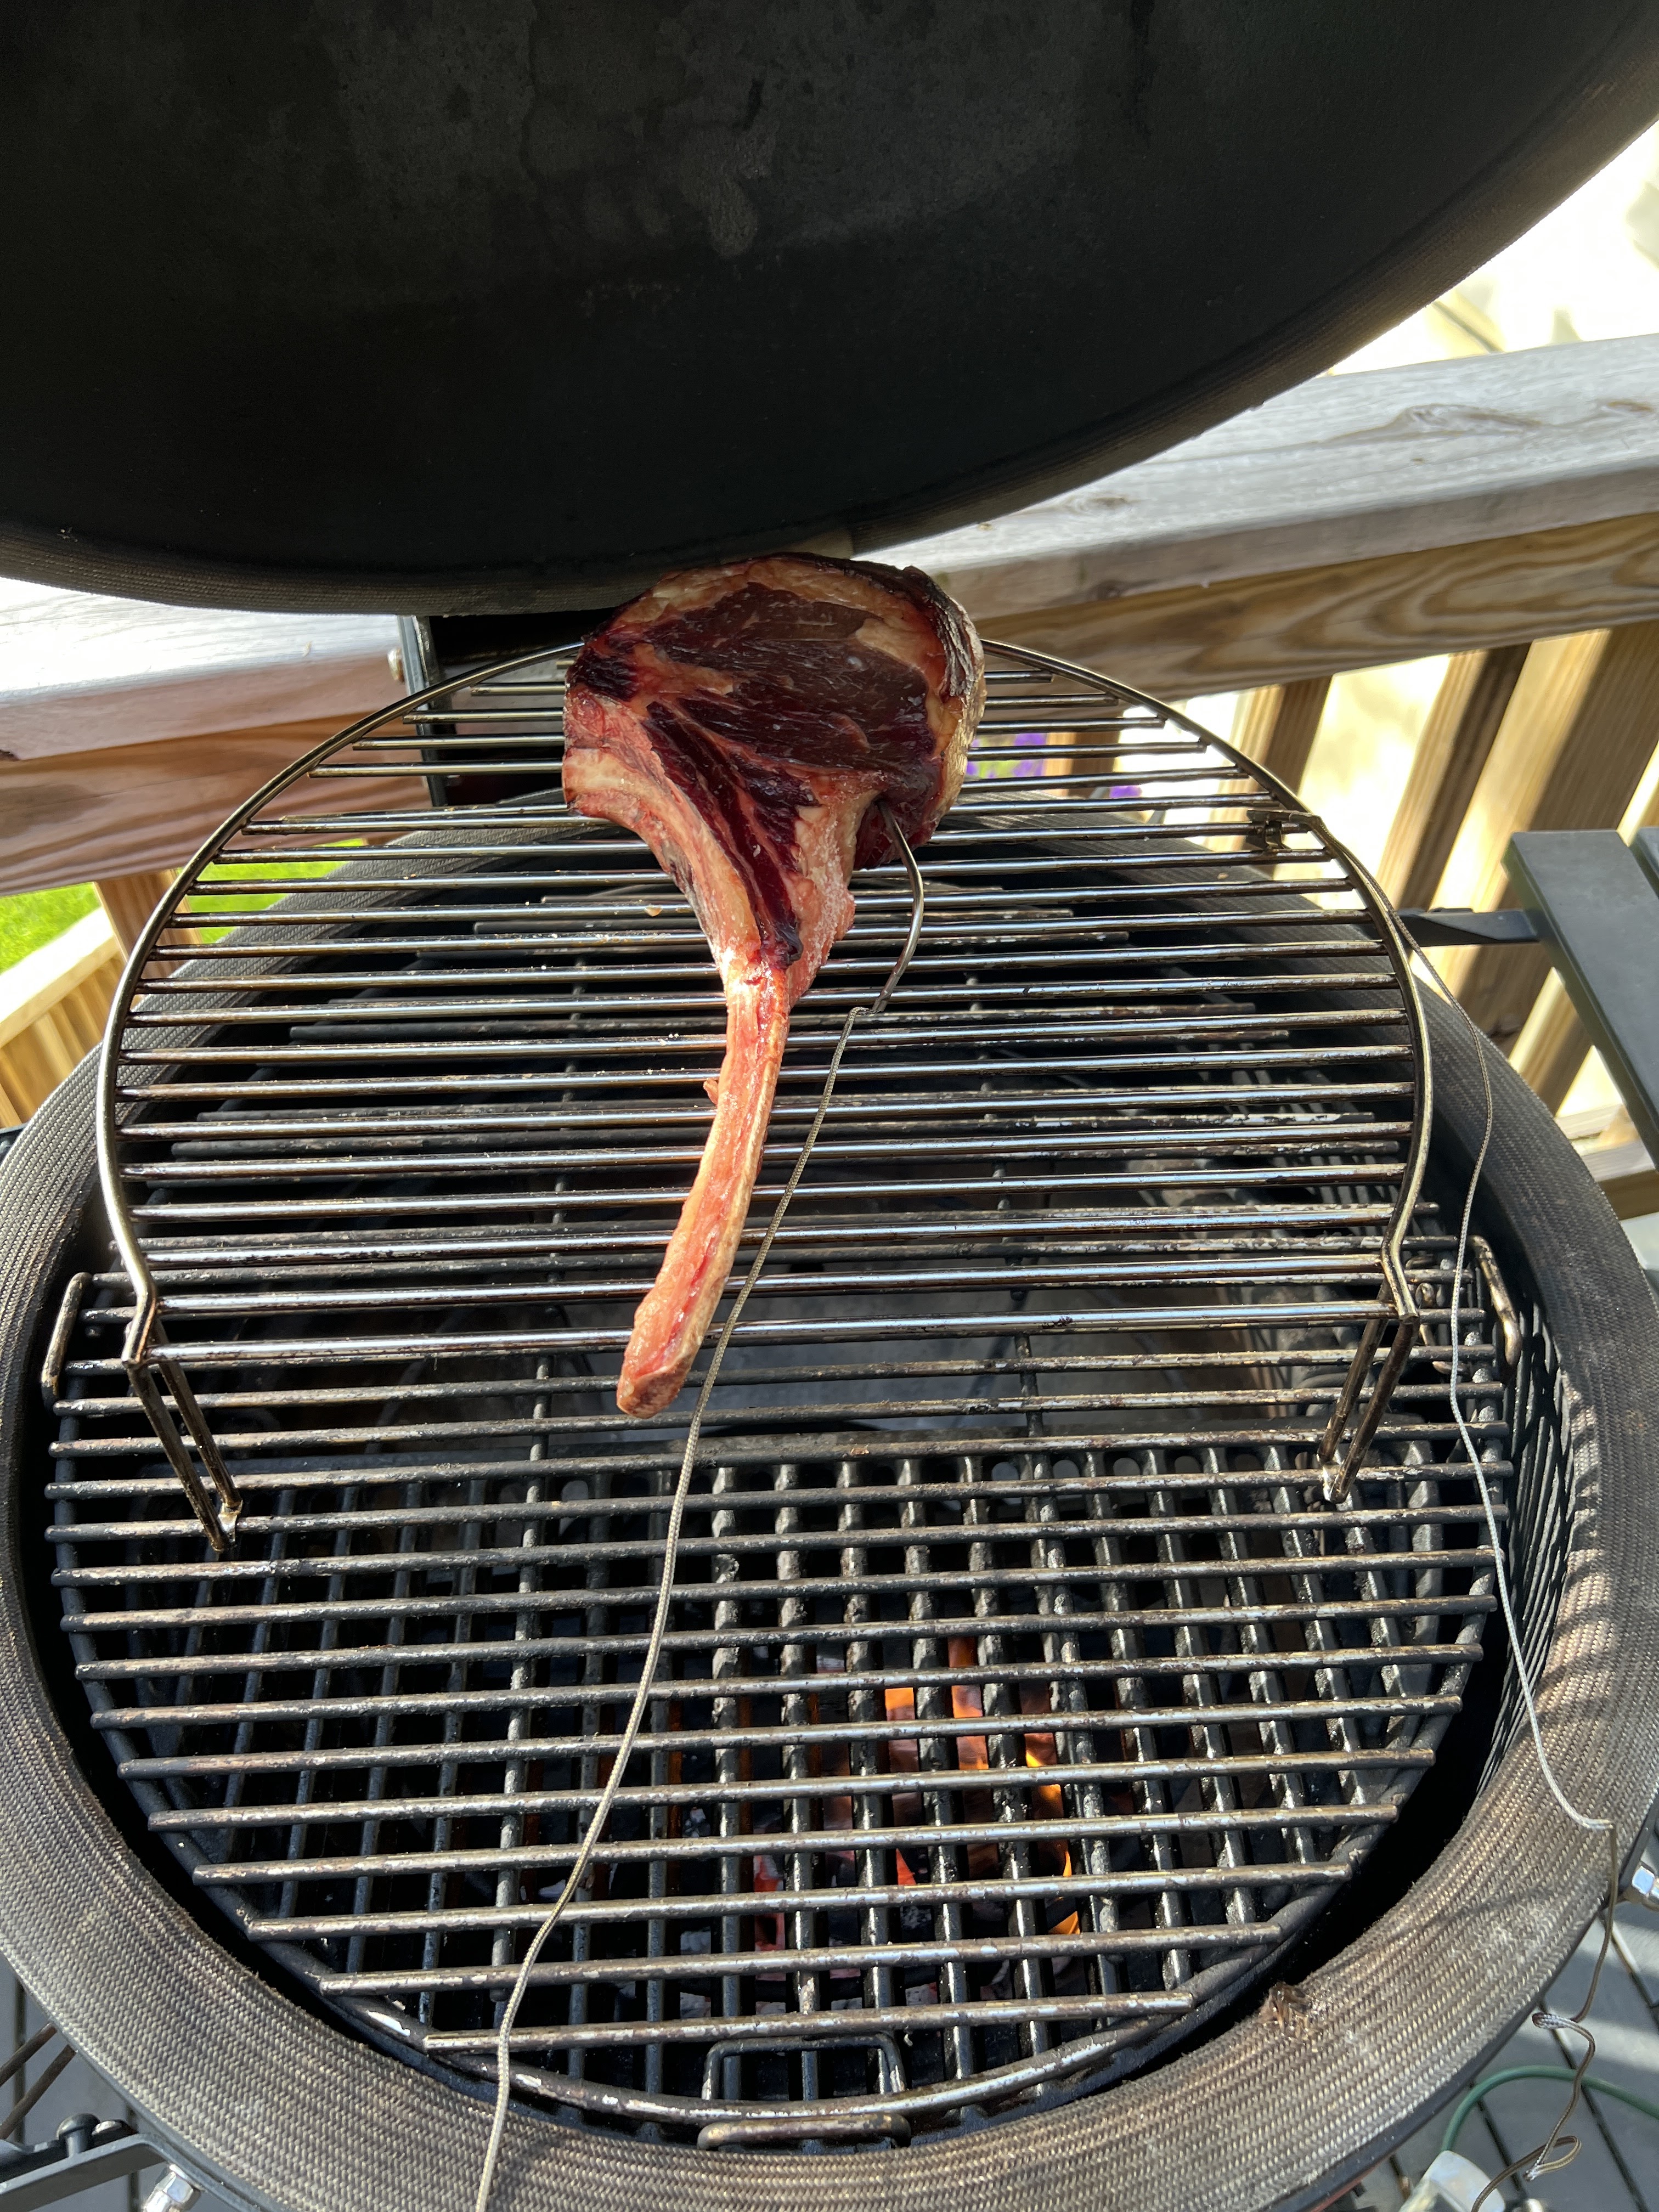
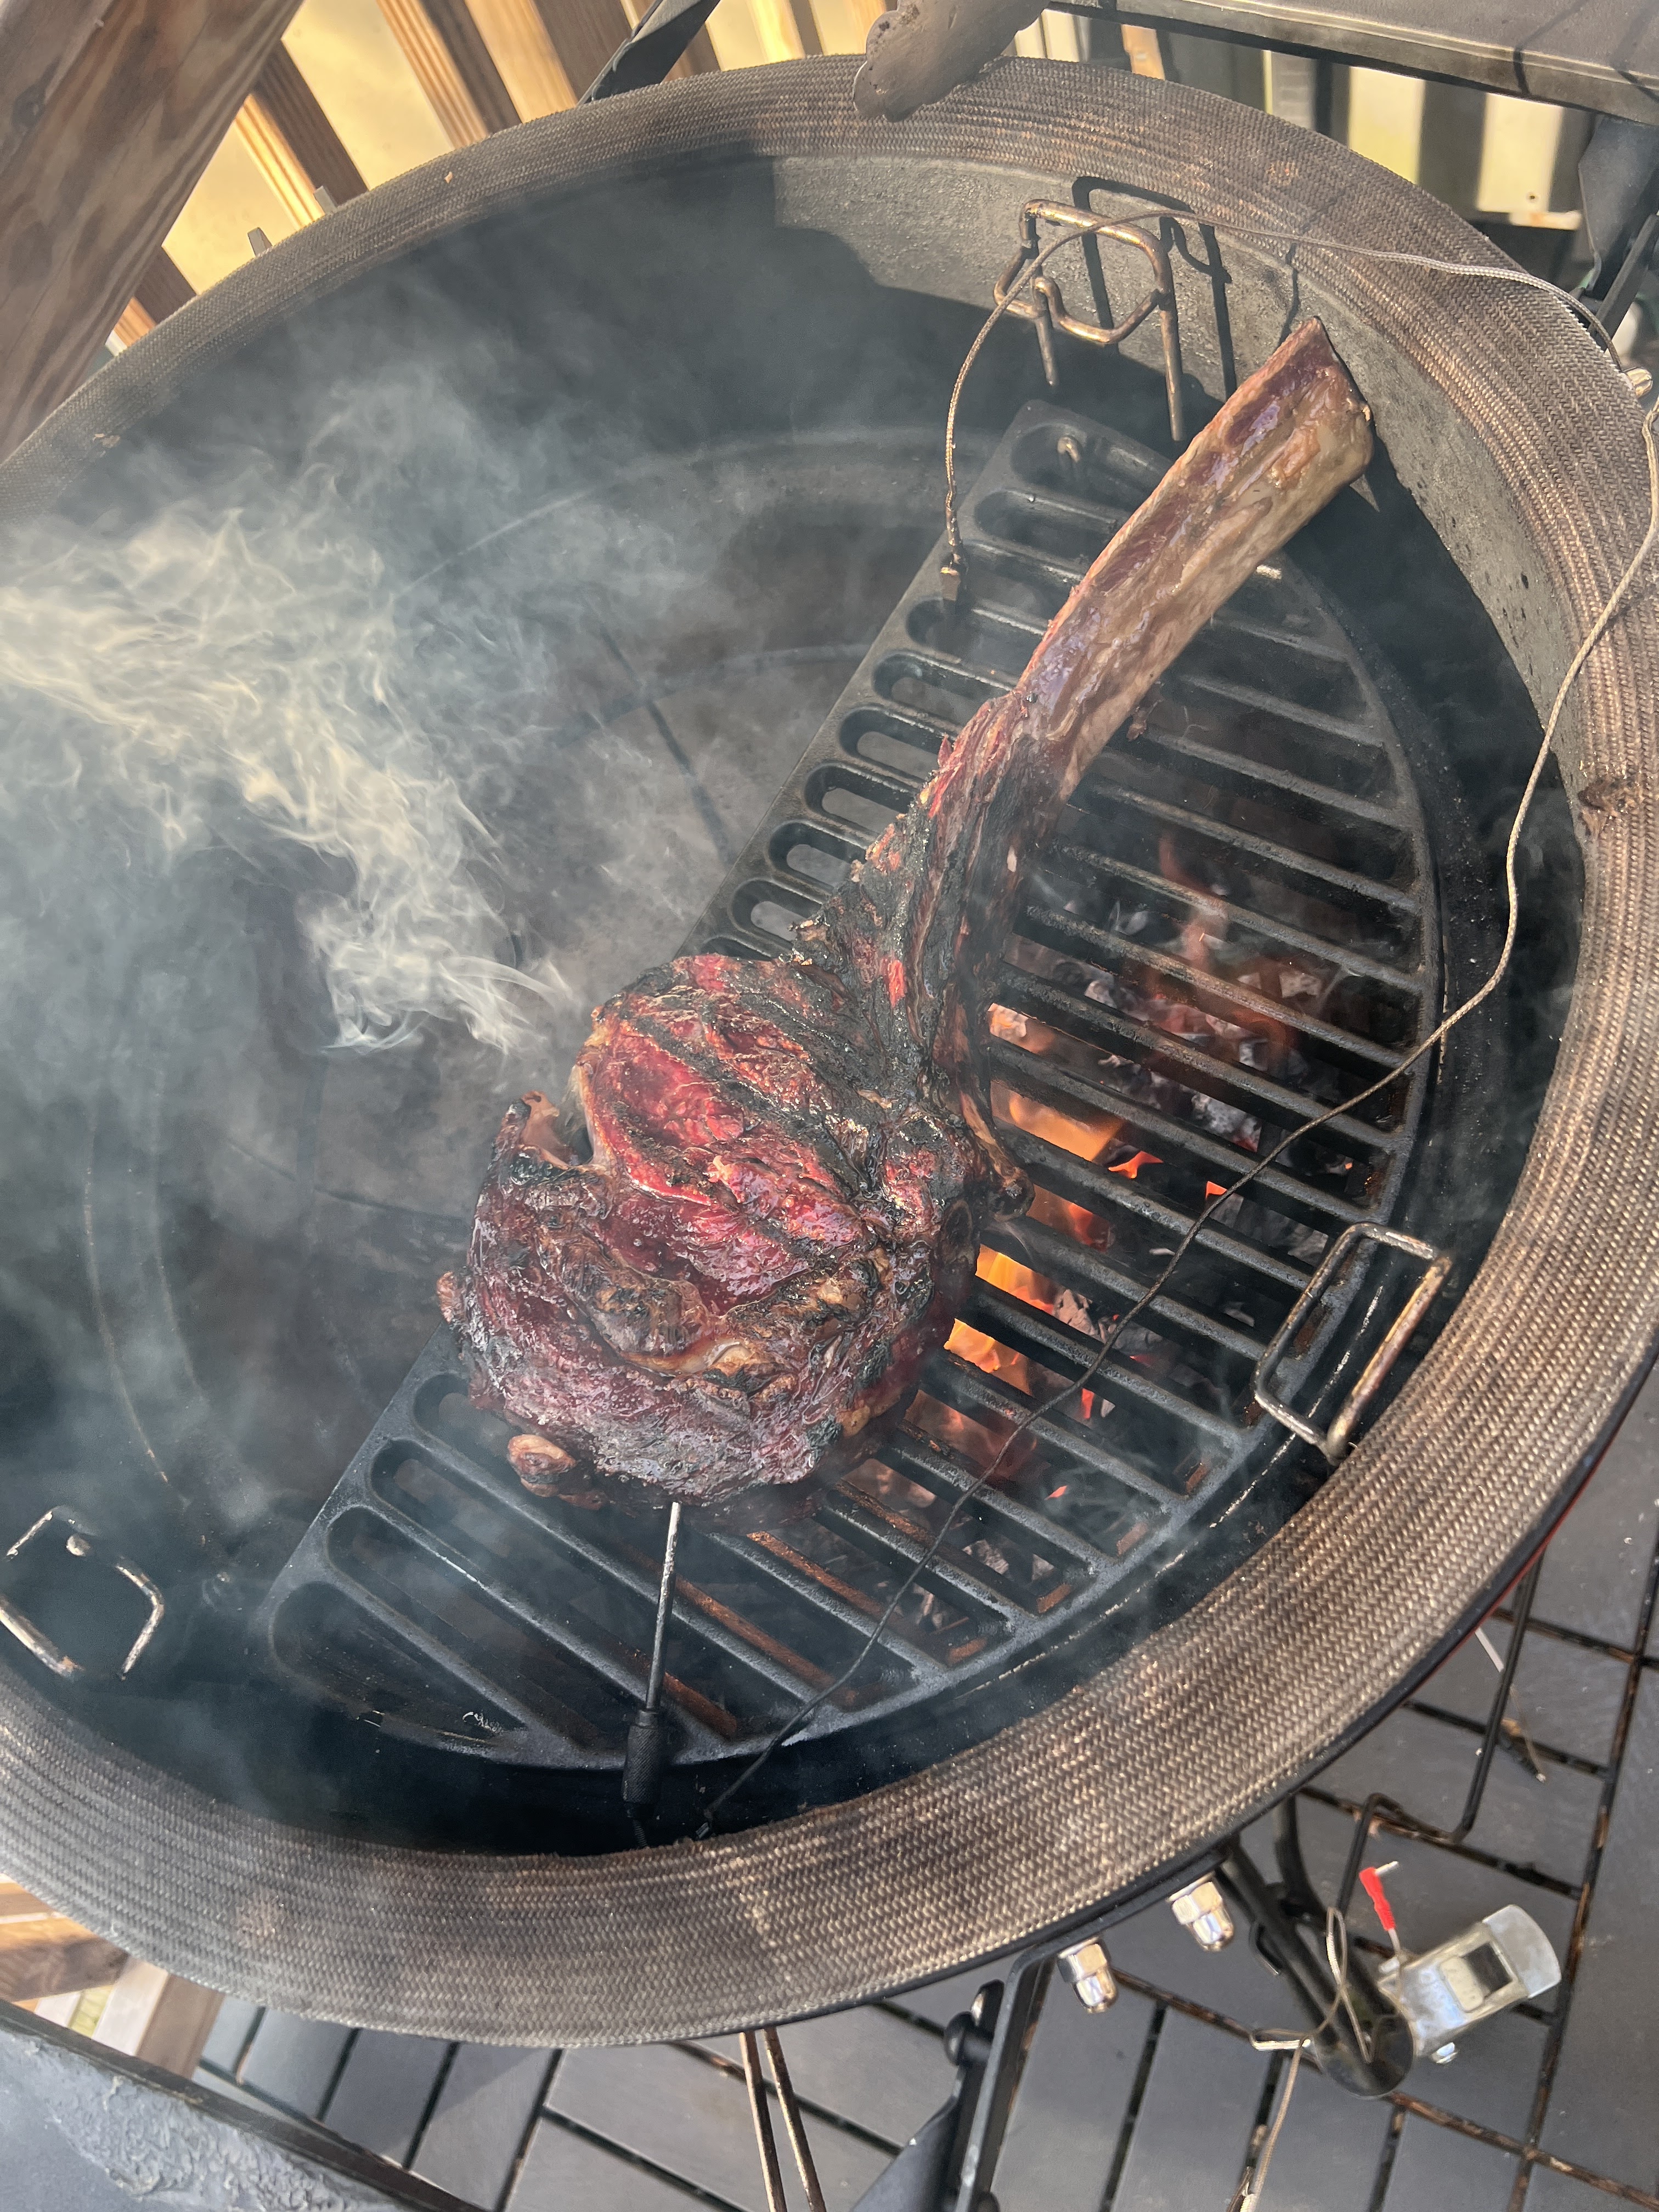
In this picture on the left you can see that I have a heavy duty cast iron grill in the low spot right over the coals. That grill has the heavy lines running horizontal in this picture. It will be getting hot all during the tempering process for the steak. I had the regular grills in the upper position so I can put my third level grill on top of them over the back of grill, totally off the heat. I have my cooking temp probe for the computer control clipped to the back of that upper grill so the cooking temperature there is 225°. It would likely be significantly hotter down on the lowest grill right over the coals but in the picture on the right you will see that I have the steak on the back of that highest grill, well away from the coals so it can temper very slowly.
I would have liked to have the steak standing on the bone, as I had it on the counter coming up to room temperature, but on that highest rack it did not have sufficient clearance with the dome of the grill to stand up, so I had it on its side and flipped it halfway through the tempering process. I have a second probe deeply inserted into the steak, so I am getting the internal temp on the meat very close to the bone. The probe can’t touch the bone or it will not give the internal temp of the meat but I want it measuring where the meat cooks the slowest.
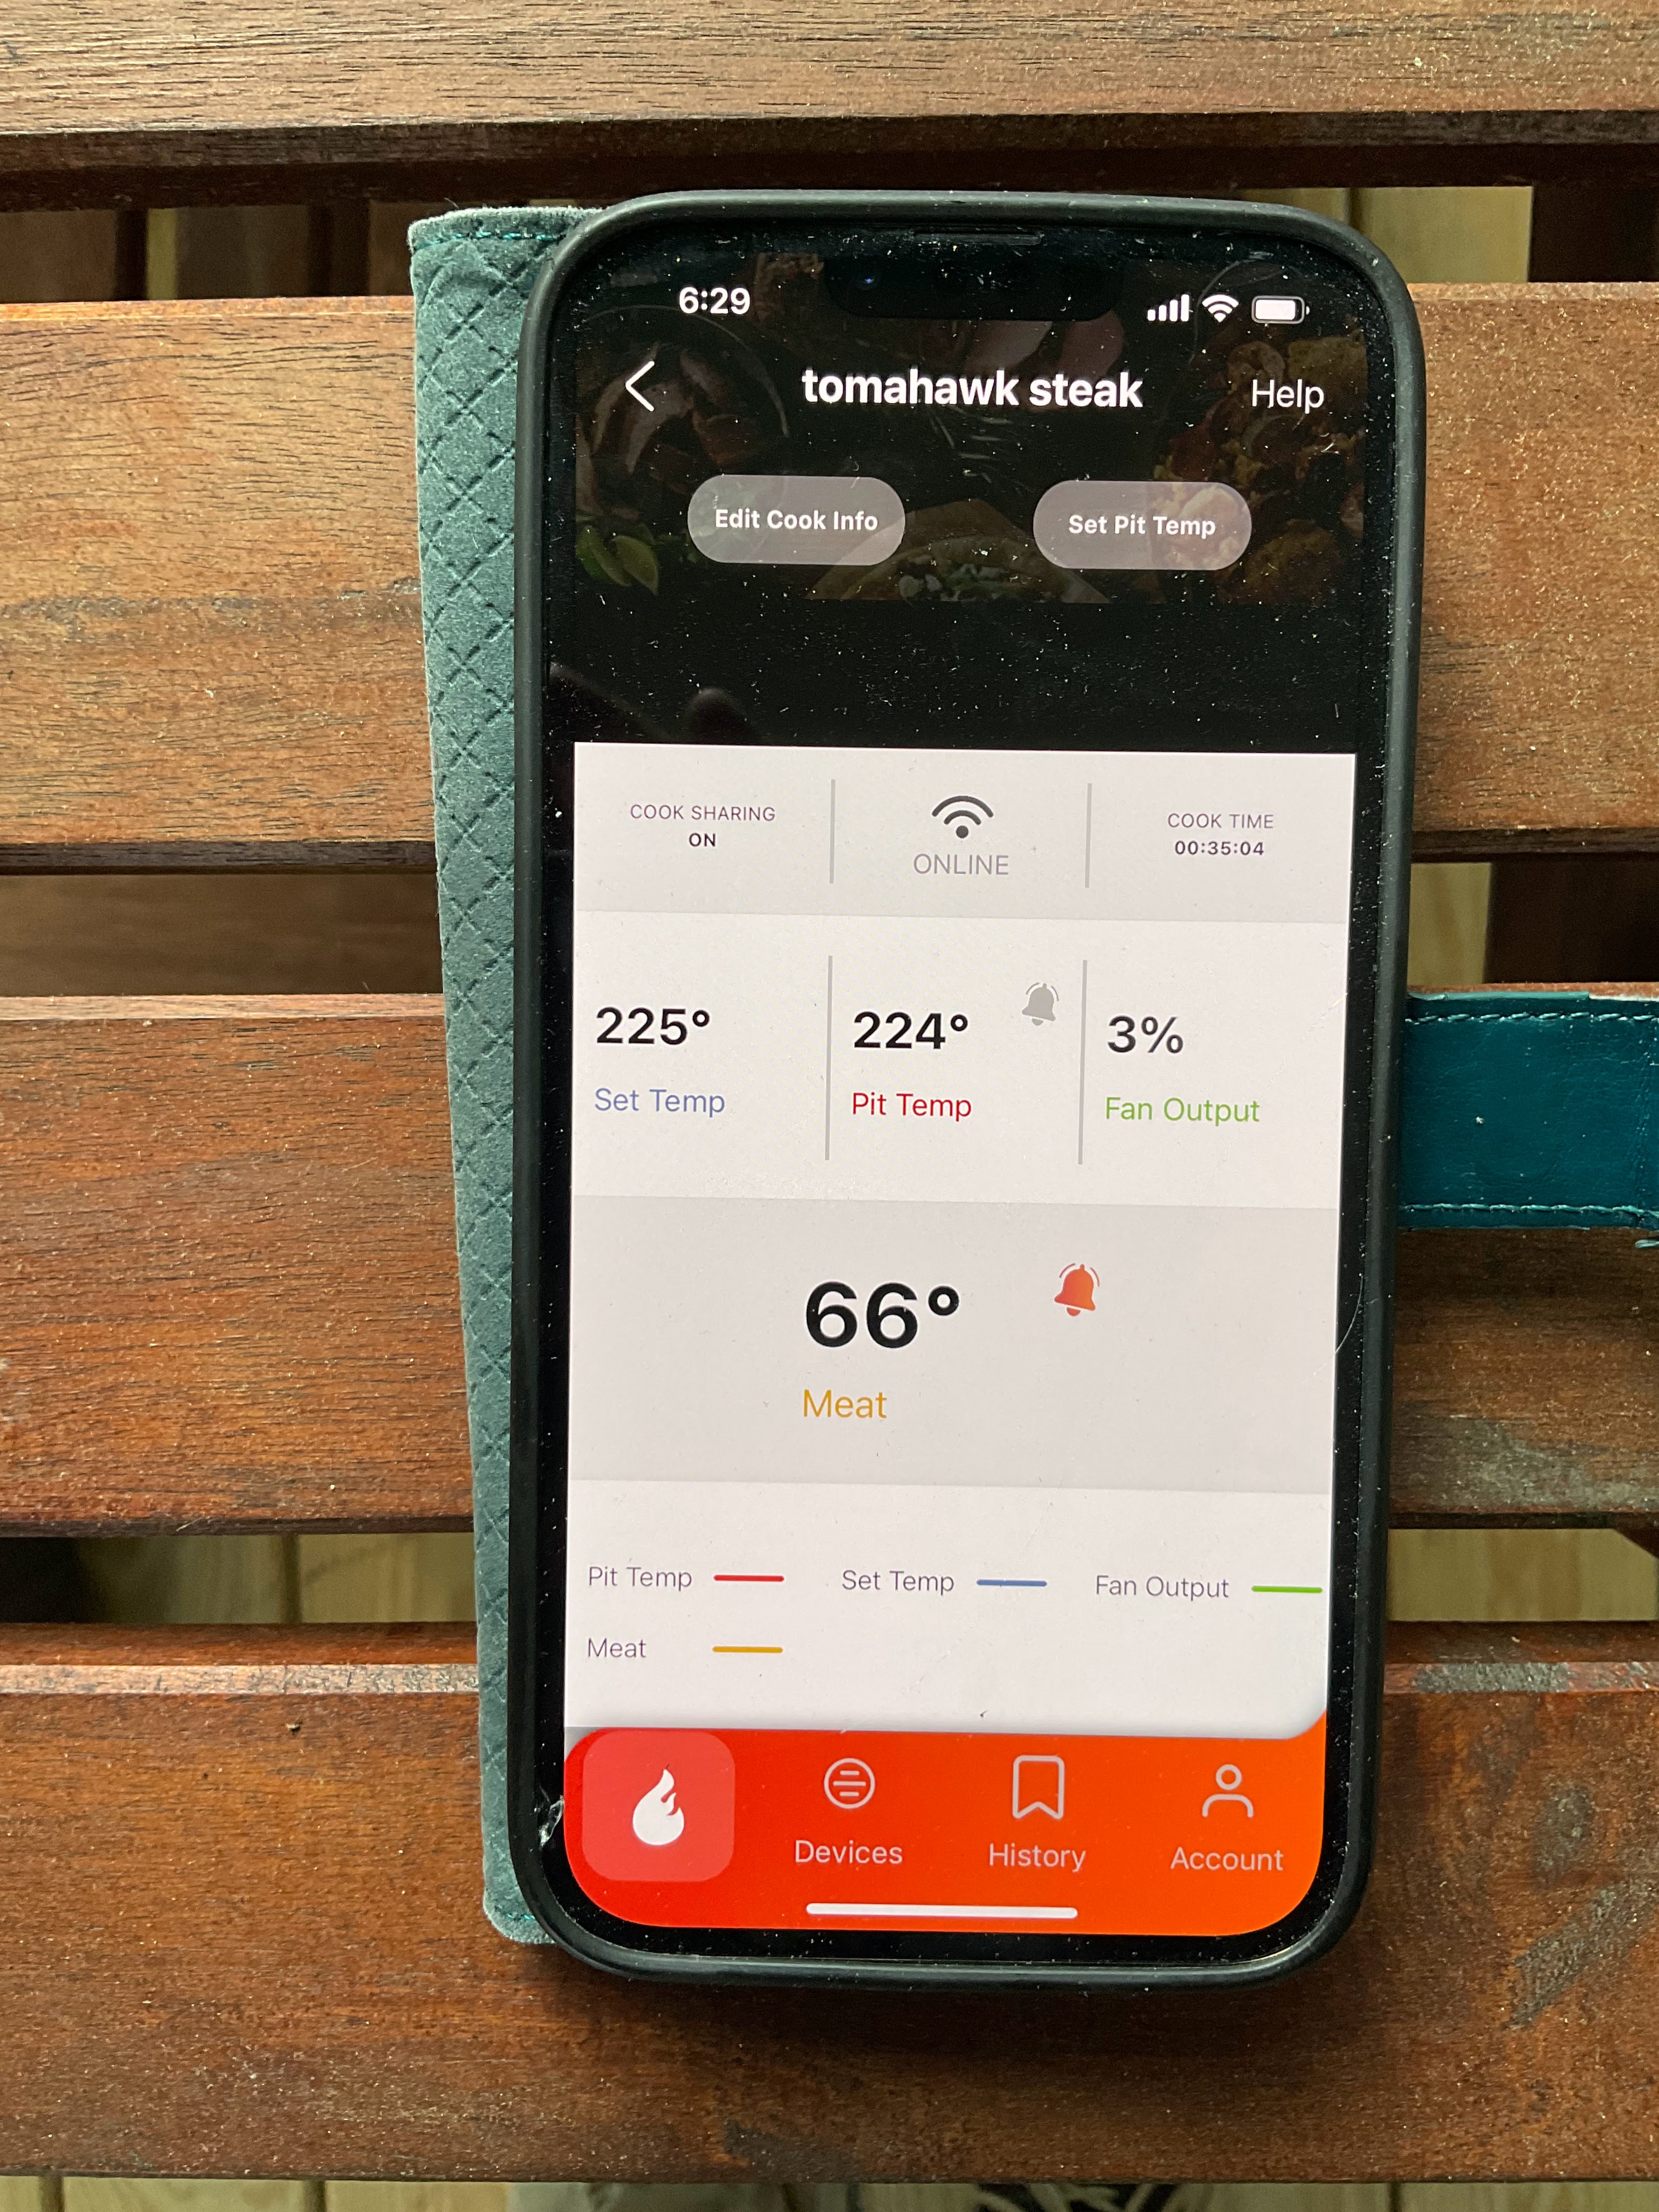
Beth and I like our steaks Rare, 125° internal is our preference. To get there I tempered the steaks at the low heat to get the internal temp to 100°. This took about 35 minutes. That slow cooking process really caused the internal connective tissue to further break down, so this thick steak was delightfully tender when we ate it. This next picture shows the control panel for the computer-controlled venting that I have for my Kamado, which has been broadcast to my phone. I got the Flame Boss FB400-Kamado for Christmas from my children and I love it. It does come with an attachment for a Beg Green Egg as well. The display on my phone is showing the goal cooking temp of 225° and the actual cooking temp of 224°. The computer has the fan going at 3% to get it back up to the right temperature. The steak has an internal temp of 66°, up from the 56° it was at when I put it on the grill. Looking at this control panel, I know when it is half way to 100° so I should flip it. That is the only time in this tempering process that I will open the grill.

The steak has tempered to 100° internal temp so I have taken it off the grill and have it resting on the rack. It has a little color but would still be considered raw. I take off the upper and middle grills, leaving only the cast iron grill right over the coals. I set the computer control to run the fan at 100% and fully open the top vent to get lots of air flow to quickly get the fire very hot. In 10 minutes it is glowing red and I put the steak over those coals and quickly get some flames to give a strong sear and a nice crust. After 4 minutes I flip the steak to the other side and about 4 minutes after that the internal temp is at the 125° that I want, and I pull the steak off.
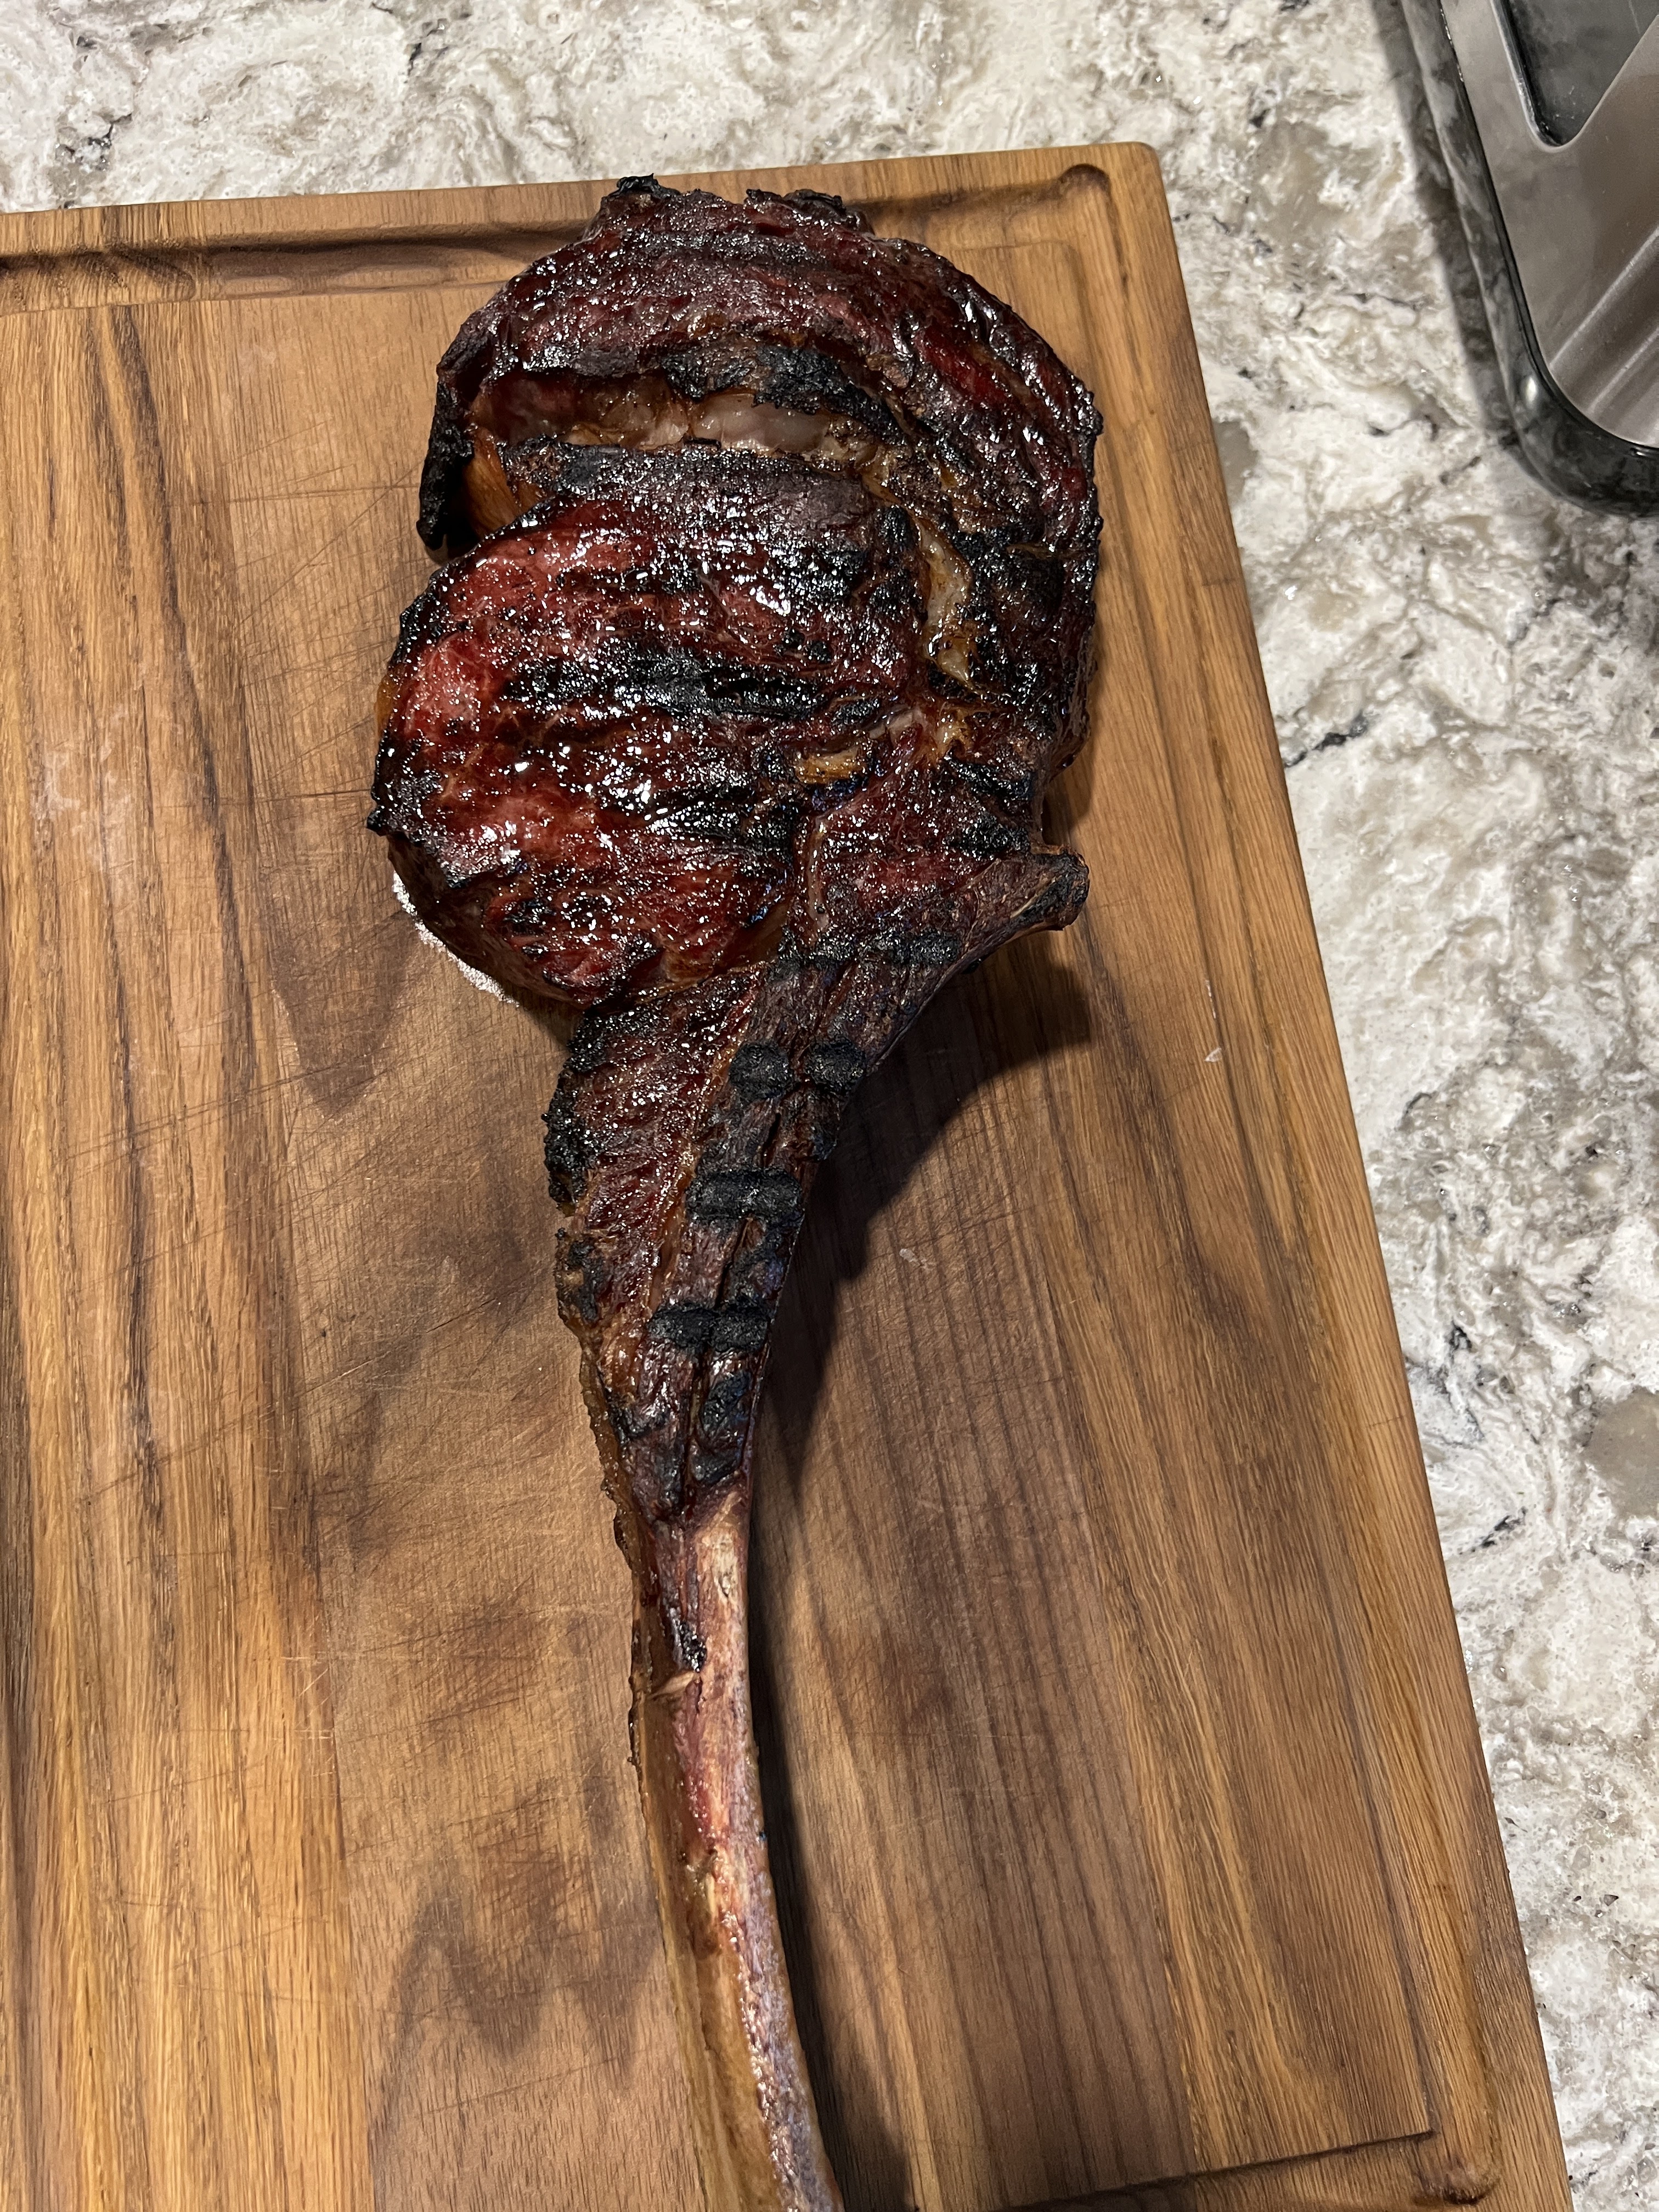
Here is a picture of the fully cooked steak on the cutting board with a lovely brown curst from the 8 minutes over high heat at the end of the cooking process. Because the steak was slowly tempered first, it does not need any resting period before being carved. The juices have all retreated back into the meat during that slow cooking period and the steak can be carved and served immediately.
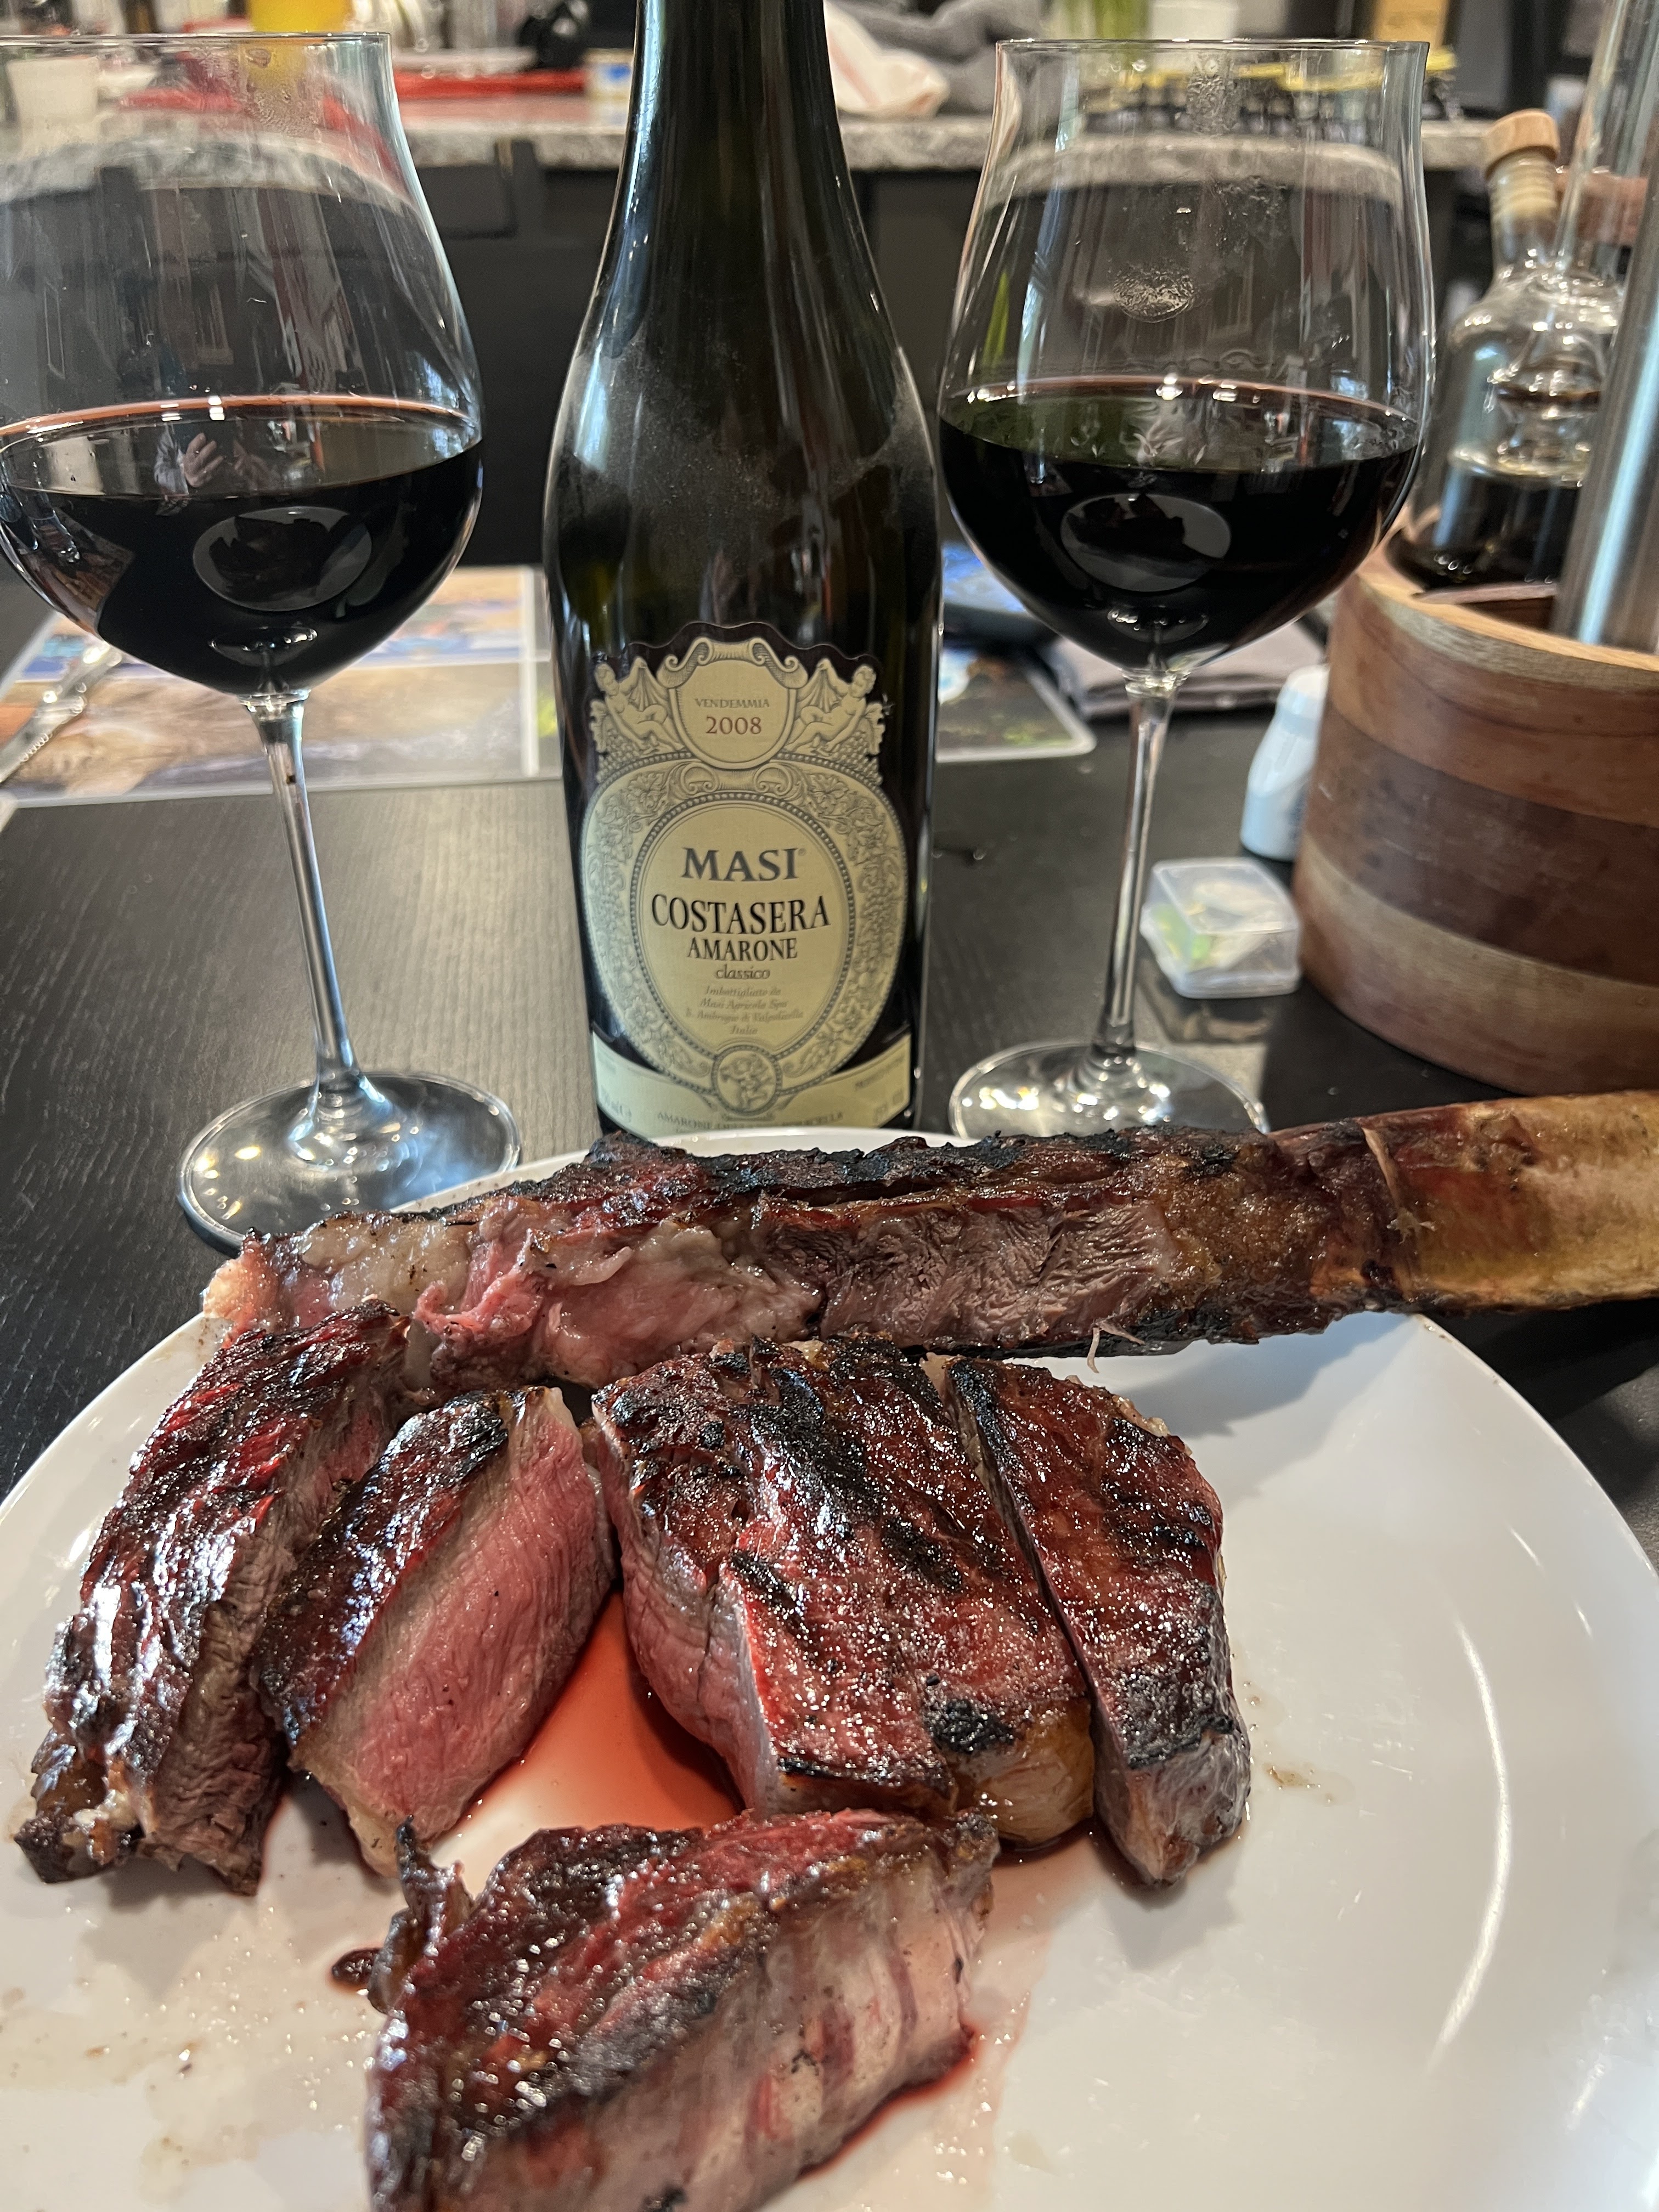
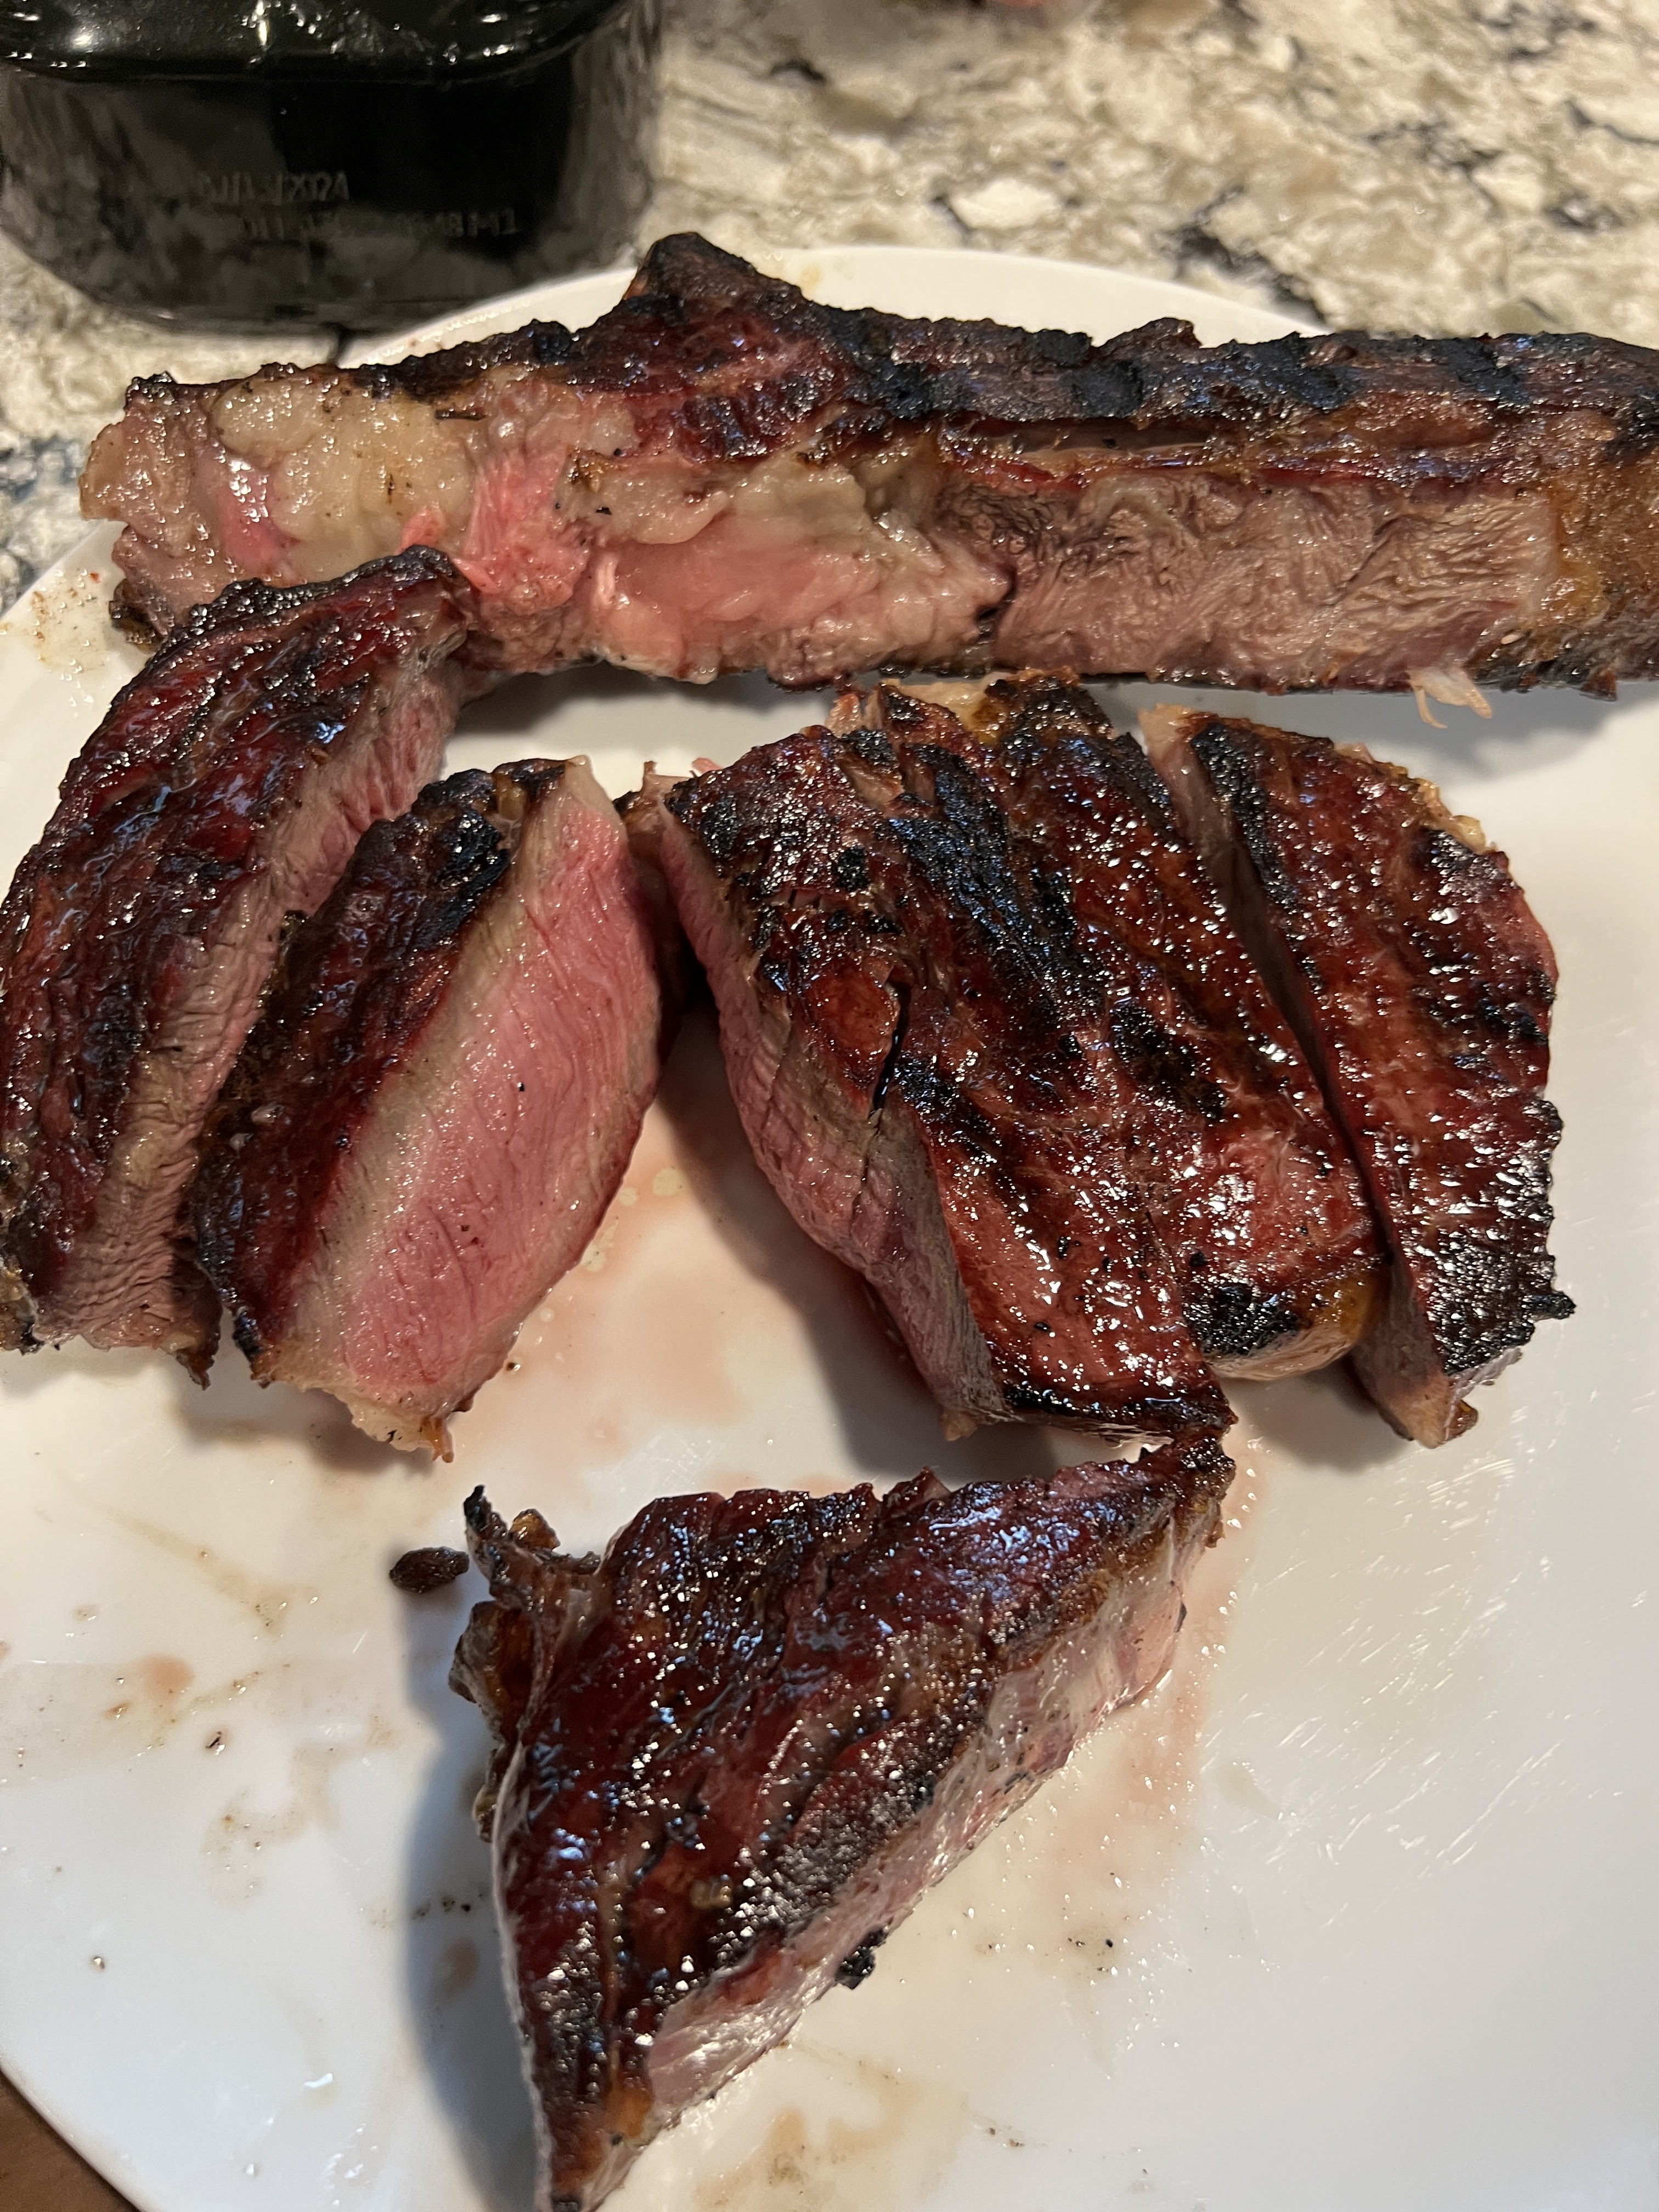
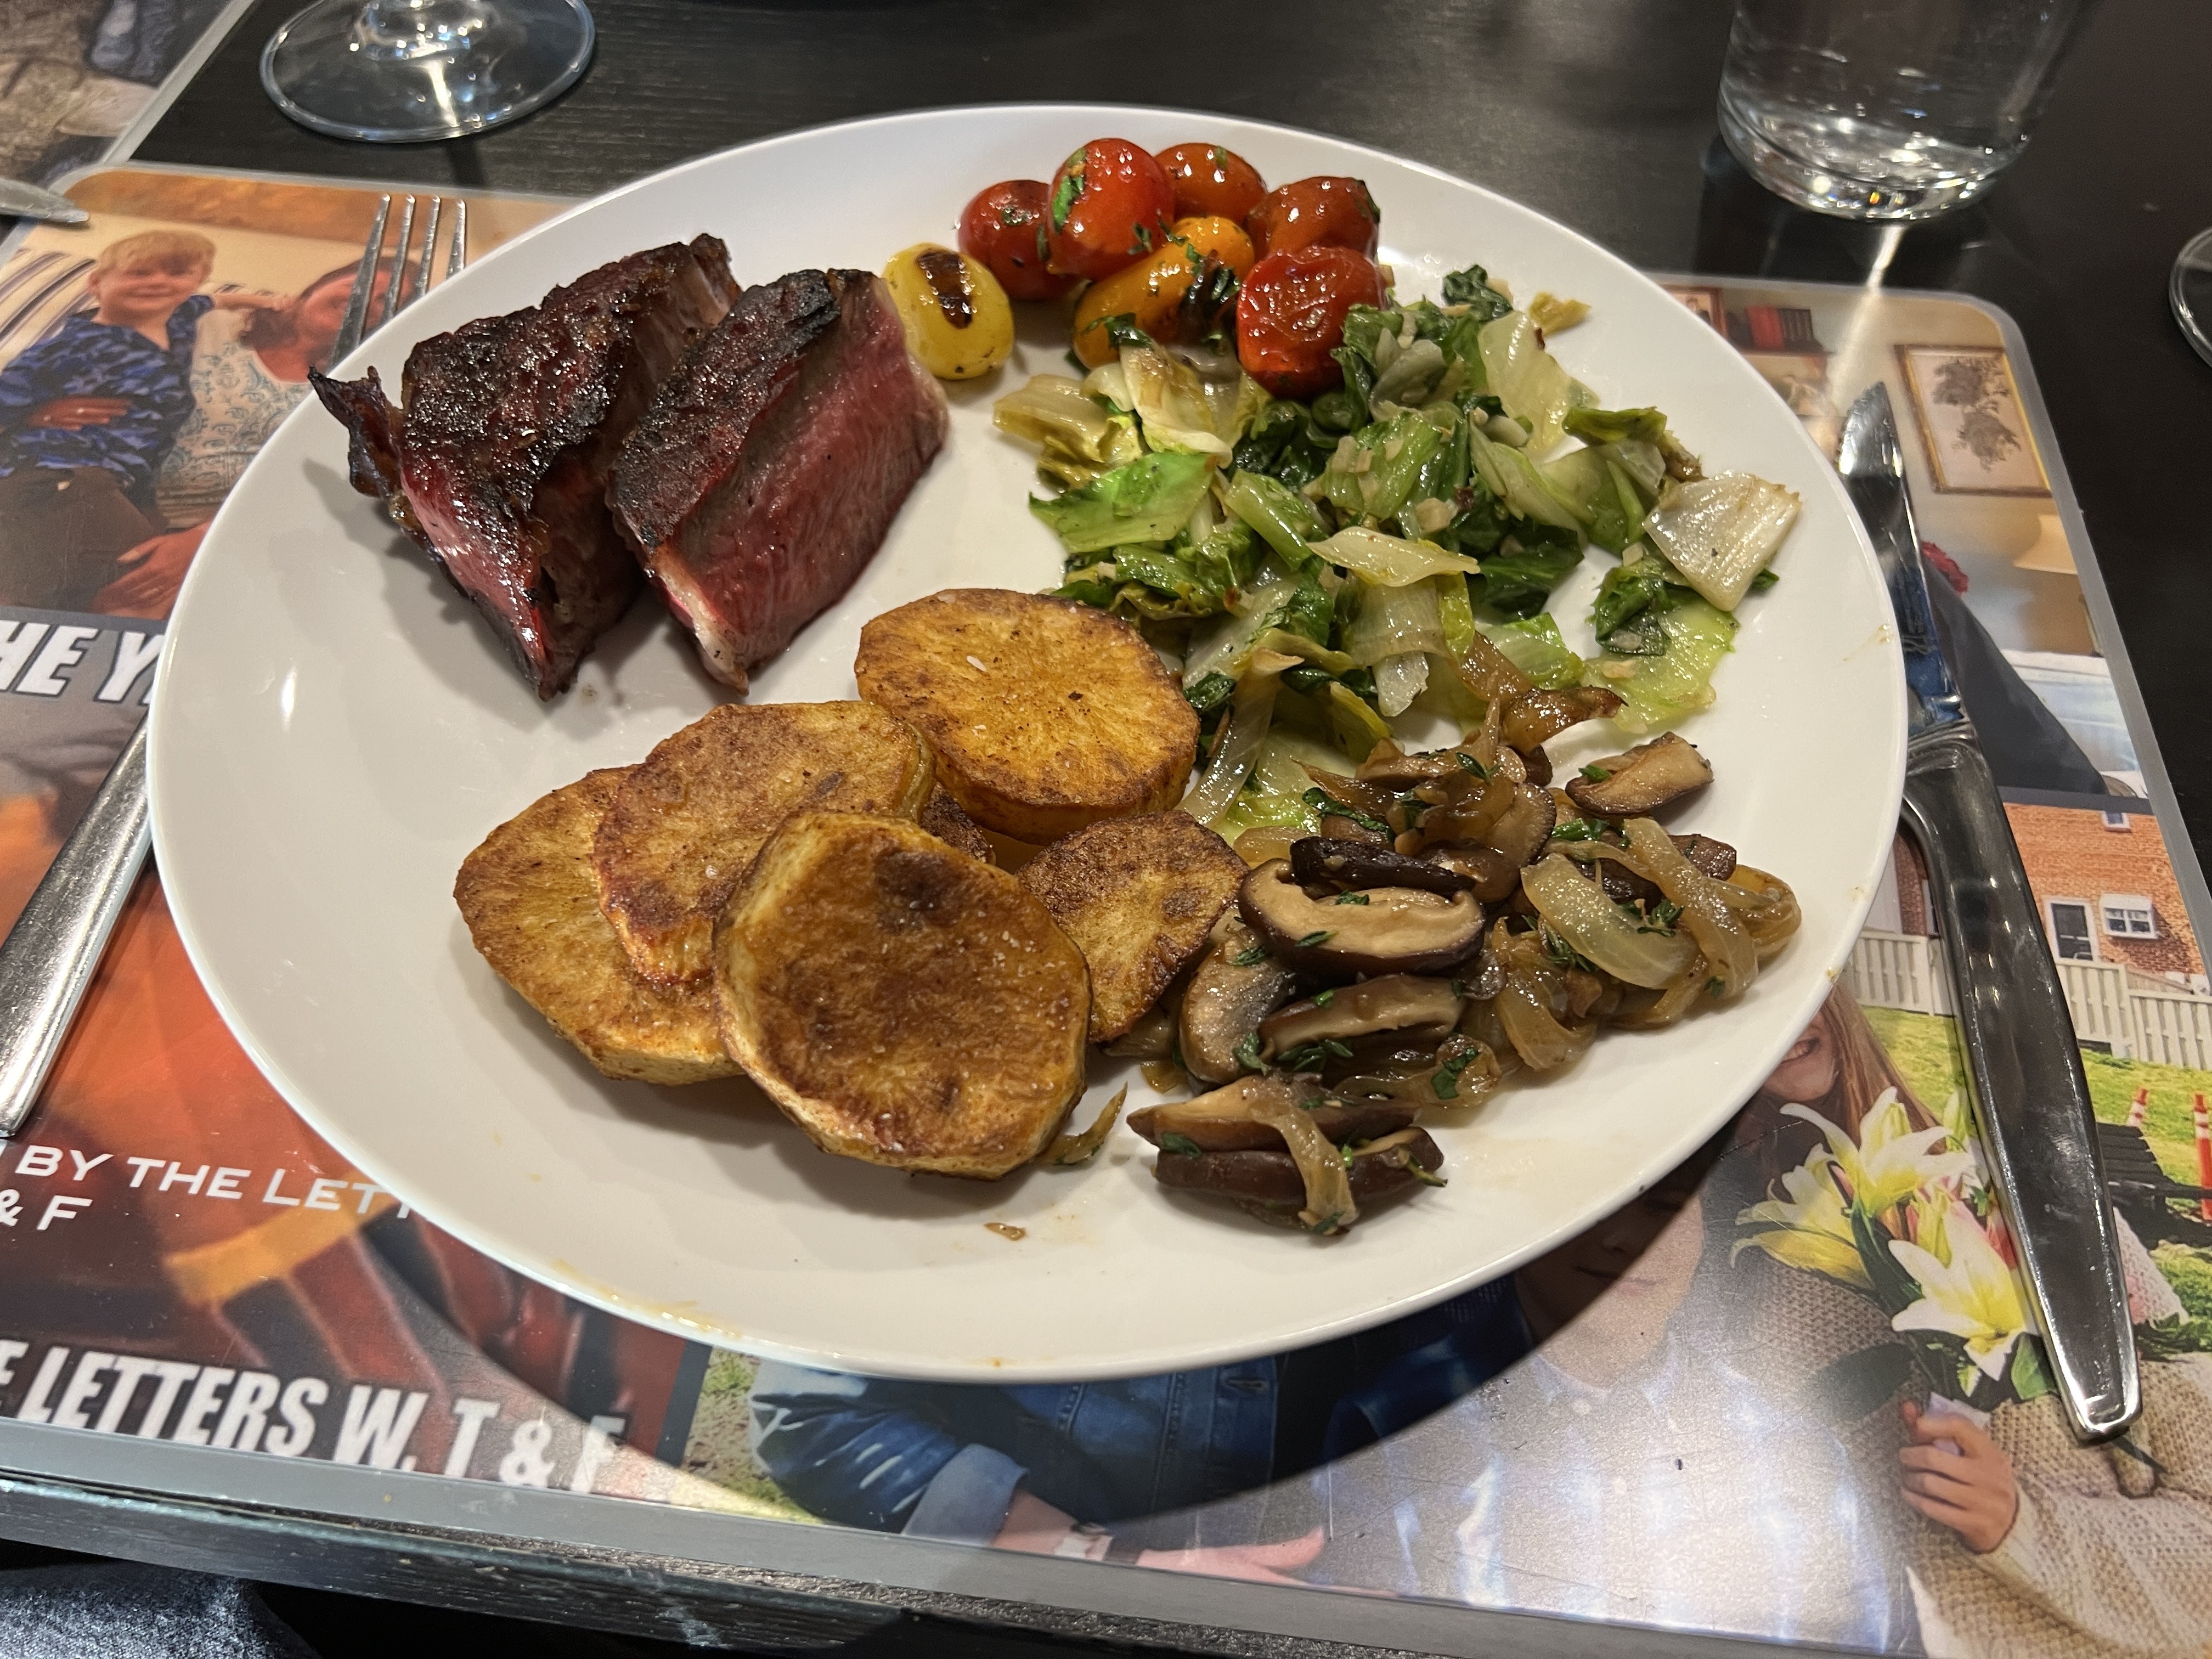
I carve the steak off the bone and then into ½” slices. You can see in the picture below that over 80% of the meat has the rosy red color of a nicely rare steak from the edge all the way back to next to the bone. On the top and bottom there is only a tiny ribbon under the crust before we get to the rare meat that was our goal for this steak.

A lovely steak like this deserves a very good wine we had a 2008 Amarone that I have had in my cellar for about 11 years. It had beautiful body with softened tannins from the aging and matched up perfectly with the steak. No sauce was needed for this steak.
Beth made some delicious, healthy accompaniments including some crispy potato slices that were delicious and very low in calories. It was a very wonderful meal, and a healthy one by the way it was prepared. The two slices of steak on my plate in the picture were plenty for me. Each bite of steak was moist and very tender, with great flavor.
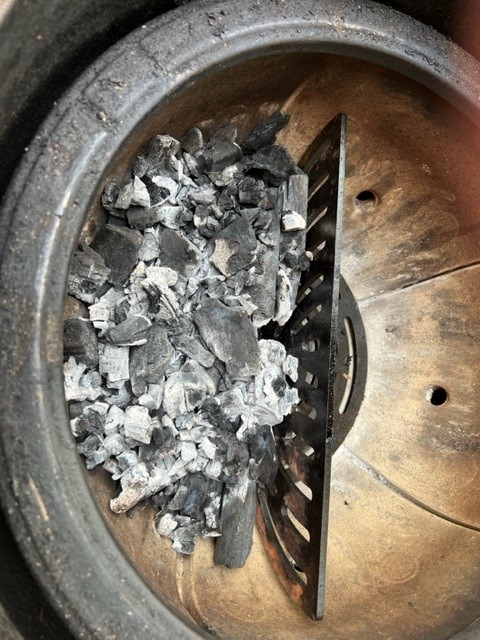
One of the things that I really like about the Kamado is how efficient it is in burning the charcoal. I have smoked a brisket for 12 hours and did not need to add any charcoal and I have read writeups of people smoking pulled pork overnight for over 15 hours without adding charcoal. From the time I lit the fire until I took the steak off was 2 hours. I shut all the vents which cuts off air to the coals and causes them to stop burning. This picture is the next day and shows the charcoal that was left to be used for my next cooking effort on the Kamado.
It took me ALOT longer to write this up and post it than it did to cook this delicious steak. Once I had the fire at the right temp I put the steak on to temper and about 15 minutes later I flipped it. During the rest of that 35 minutes of tempering I could be doing anything else. Once the steak got to 100° I took it off and left it in the pan it dry aged in for 10 minutes while I got the fire up to red hot. I then put the steak on the very hot fire for 4 minutes per side and then I was done. About 20 minutes when I was actively cooking.
I went into a lot of commentary with lots of pictures here because I enjoy cooking, and writing it about is a fun for me. I wanted to show some of the advantages of a Kamado style grill for this but, as discussed in my earlier blog on Reverse Searing, there are all sorts of ways to do it and it really isn’t very hard. Find one that works for you and you will no longer want individual steaks for everyone. You will want to get a nice thick steak that you can dry age, temper, and reverse sear that will be much more flavorful, tender, and juicy than your individual steaks have been.
In sum – To get there took planning in terms of getting the steak at a very good price, taking the two days to dry age it, and starting the fine in the Kamado at 5:00 to sit down to eat at 7:00. Yes, the reverse sear is some work, but I enjoy the cooking process and I really enjoy the end product.

Wow, my mouth is watering! Your food pictures and descriptions are amazing.
LikeLike